< Previous | Contents | Next >
4 Enter the alternate file path you want that volume to have. For example, if you’re on a Windows workstation and you want to access a Linux volume, type the Linux file path into the Mapped Mount column.
![]()
Decode Options
This panel contains all options available for using the GPU to accelerate the decoding and debayering of various formats.
— Use GPU for Blackmagic RAW decode: Lets you use your GPU to accelerate the decoding of Blackmagic RAW (BRAW) media.
— Decode H.264/HEVC using hardware acceleration: Allows the use of hardware acceleration for
H.264 or HEVC playback, if available on the computer you’re using.
— Use easyDCP decoder: Since DaVinci Resolve has its own DCP encoder and decoder built in, this checkbox lets you switch over to using easyDCP to do DCP decoding, if you have a license installed on your workstation.
— Automatically refresh growing files in the media pool: If you’re using a third-party application that records live to a growing video file, you can now begin to edit that file while it’s still recording. Simply import the growing file into the Media Pool, and when this box is checked, DaVinci Resolve will continuously refresh to determine if the file has changed, and automatically update its attributes in the Media Pool.
— Use GPU for RED Debayer: Lets you use your GPU to accelerate debayering of R3D media. The latest RED API enables accelerated 8K debayering using either Metal or Cuda.
There are three options:
— None
— Debayer
— Decompression and Debayer
Video & Audio I/O
The preferences in this panel let you choose video and audio interfaces on your workstation.
Video I/O
This section lets you choose which Blackmagic Design video interfaces you want to use for monitoring, capture, playback, and Resolve Live, assuming you have any connected to your workstation. If you have more than one Blackmagic Design video device connected to your computer, you can independently configure them for playback and capture. If no interfaces are connected, no options will be available.
— Capture Device: If you have a compatible video capture card for video input, you should choose from the card options that appear here. This setting also sets the selected input device for use in Resolve Live, allowing you to monitor and color correct a live video signal. Any changes to this setting require a restart of the program.
— Monitor Device: If you have a compatible video output card, you should choose from the card options that appear here. Leaving this set to “None” disables external video output. Disabling video output can improve real time performance when external monitoring and output is not a priority. You can also choose “None” when you’re using DaVInci Resolve with another application open at the same time that’s using your workstation’s video output interface. When you’ve quit the other application, you can reselect the video output interface for use by DaVinci Resolve. Any changes to this setting require a restart of the program.
![]()
— Release video device when not in focus: When turned on, DaVinci Resolve releases control of the video output device whenever you switch to another application.
— Enable discrete audio output: This enables sending audio to individual outputs per channel from your designated device.
— Audio monitoring delay: Allows you to adjust any latency between the video images and the audio monitoring.
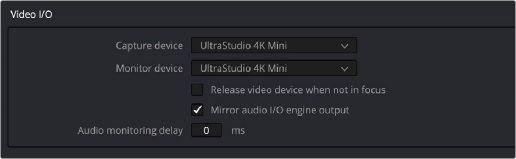
Video input/output options in the System Preferences
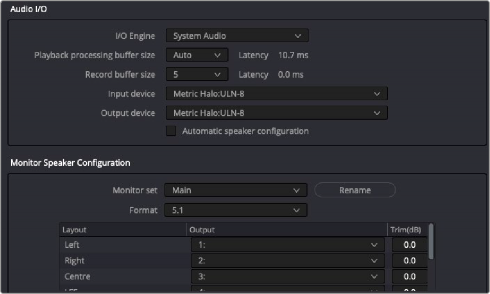
Audio I/O
This section lets you define the audio hardware and different sets of speakers with which to monitor audio playback. To access more than the default stereo system output that most workstations default to, you must use whatever software is available for your operating system to choose the desired audio hardware you want to use, and define how many audio outputs are required for the type of monitoring you want to do (stereo, immersive, and so on). For example, on macOS you’ll use the Audio Midi Setup utility to choose output hardware and select a speaker configuration to be made available on your system.
— I/O Engine: Lets you choose the audio hardware that DaVinci Resolve uses to process audio. Choices include System Audio, Desktop Video, Fairlight Audio Accelerator, and ASIO (Windows only).
— System Audio: System Audio interfaces with your computer’s native audio hardware and enables the following parameters.
— Playback processing buffer size: Lets you determine the size of the Playback buffer; to the right a latency display indicates the approximate latency of your choice in milliseconds.
— Record buffer size: Lets you determine the size of the Record buffer; to the right a latency display indicates the approximate latency of your choice in milliseconds.
— Input Device: Lets you chose the audio input device from the hardware attached to your system.
— Output Device: Lets you chose the audio output device from the hardware attached to your system.
— Automatic speaker configuration: Checking this box sets DaVinci Resolve to output audio via your workstation’s built-in audio output, even if a compatible video I/O interface is enabled for capture and playback or for Resolve Live. Unchecking this box exposes additional controls with which you can define your own speaker setup.

About Audio Monitoring and Audio Input
The audio processing throughout DaVinci Resolve, including on the Fairlight page and audio processing using Fairlight FX plugins, is equally compatible with all platforms that DaVinci Resolve runs on, including macOS, Windows, and Linux. In particular, DaVinci Resolve supports audio monitoring and audio input using (i) the audio of a supported Blackmagic Design I/O device such as an UltraStudio or Decklink, (ii) your
macOS, Windows, or Linux workstation’s on-board audio, (iii) any Core Audio-compatible, Windows-compatible, ASIO, or Advanced Linux Sound Architecture (ALSA)-supported third party audio interface.
Alternately, you can monitor audio with the optional Fairlight Audio Accelerator, which is a PCI card that’s designed to handle even more channels of audio I/O monitoring and
recording, and that’s also capable of accelerating audio processing operations to provide better performance for audio operations.
![]()
Assigning different audio I/O devices and required buffer adjustments

NOTE: ASIO is a trademark and software of Steinberg Media Technologies GmbH.
NOTE: ASIO is a trademark and software of Steinberg Media Technologies GmbH.
NOTE: ASIO is a trademark and software of Steinberg Media Technologies GmbH.
Monitor Speaker Configuration
When the Automatic Speaker Configuration box is unchecked it reveals another panel in the Video and Audio I/O Preferences. Here you can assign your monitors to the default Main or Near sets, and you can also create an additional 15 monitor sets specific to your needs.
— Monitor Set: Choose the default Main or Near or create up to 15 other user-definable configurations.
— Rename: This button allows you to rename any of the monitor sets to something more meaningful for your individual needs.
— Format: A drop-down menu allows you to choose the desired format type from Mono up to Dolby Atmos 9.1.6. Below the Format type there are three windows to create the Monitor Set:
— Layout: Breaks out the channels that correspond to the chosen format.
— Output: Where you can assign the Output channels to your system.
— Trim: Where you can reduce each individual level by up to -24dB of gain or add up to +10dB of gain for fine tuning the speaker calibration required for your particular playback space.
Monitor System External Inputs
![]()
You can create multiple sets of monitoring with up to 16 user-definable setups from the Control Room and Studio tabs in this panel. This allows flexibility to have different combinations of monitoring speakers that you can switch among for checking, reviewing, and creating different mixes.
— External Monitor Source: Chose None or up to 16 definable configurations.
— Format: When a Format is chosen, a drop-down menu appears allowing you to choose the desired format type from Mono up to Dolby Atmos 9.1.6. Once a format has been chosen, three more windows appear:
— Layout: Which breaks out the channels that correspond to the chosen format.
— Source: Where you can assign either Input Destination or Audio Repro.
— Input: Where you can assign an individual track when in Audio Repro, or assign the specific channel when in Input Destination.
— Rename: This button allows you to rename any of the numerically labeled monitor sets to something more meaningful for your individual needs.

Patching and renaming different external inputs in Preferences
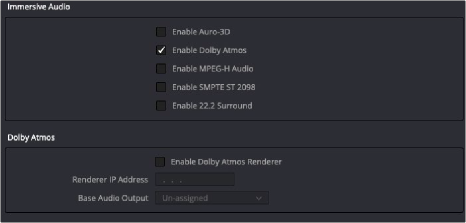
Immersive Audio Controls
These two Preference panels allow you to configure for the type of Immersive Audio that you want to have available in your project and also for linking to a Dolby RMU for doing Dolby Atmos mixing.
— Immersive Audio: This panel allows you to enable the various types of Immersive Audio offered within DaVinci Resolve. Those formats are: Auro-3D, Dolby Atmos, MPEG-H Audio, SMPTE ST 2098, and 22.2 Surround.
— Dolby Atmos: Checking this box allows the use of an external Dolby Atmos Renderer. Once checked you can enter the IP address of the RMU and choose the base audio output.
![]()