< Previous | Contents | Next >
The Video Inspector has an additional set of cropping parameters:
— Crop Left, Right, Top, and Bottom: Lets you cut off, in pixels, the four sides of the image. Cropping a clip creates transparency, so that whatever is underneath shows through.
— Softness: Lets you blur the edges of a crop. Setting this to a negative value softens the edges inside of the crop box, while setting this to a positive value softens the edges outside of the crop box.
Dynamic Zoom
The Dynamic Zoom controls, which are off by default, make it fast and easy to do pan and scan effects to zoom into or out of a clip. Also, if you import a project from Final Cut Pro X with clips that use the Ken Burns effect, then those clip’s effects will populate the Dynamic Zoom parameters in DaVinci Resolve. Turning the Dynamic Zoom group on activates two controls in the Inspector that work hand-in-hand with the Dynamic Zoom onscreen adjustment controls you can expose in the Timeline Viewer (described below):
— Dynamic Zoom Ease: Lets you choose how the motion created by these controls accelerates. You can choose from Linear, Ease In, Ease Out, and Ease In and Out.
![]()
— Swap: This button reverses the start and end transforms that create the dynamic zoom effect.
Stabilization
Image Stabilization is available for clips right in the Timeline. These controls let you smooth out or even steady unwanted camera motion within a clip. The analysis is performed in such a way as to preserve the motion of individual subjects within the frame, as well as the overall direction of desirable camera motion, while correcting for unsteadiness.
These are the same stabilizer controls found in the Color page’s Tracker palette (minus the tracker graph), and the resulting stabilization analysis is mirrored on the Color page, where you can see the data visualized on the graph, if necessary.

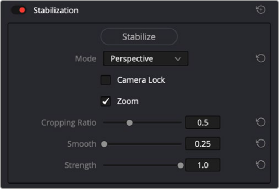
Stabilization controls found in the Edit page Inspector for each clip
A pop-up menu provides three different options that determine how the selected clip is analyzed and transformed during stabilization. You must choose an option first, before clicking the Stabilize button
above, because the option you choose changes how the image analysis is performed. If you choose another option, you must click the Stabilize button again to reanalyze the clip.
— Perspective: Enables perspective, pan, tilt, zoom, and rotation analysis and stabilization.
— Similarity: Enables pan, tilt, zoom, and rotation analysis and stabilization, for instances where perspective analysis results in unwanted motion artifacts.
— Translation: Enables pan and tilt analysis and stabilization only, for instances where only X and Y stabilization gives you acceptable results.
The other controls let you customize how aggressively the selected clip is stabilized.
— Stabilization Toggle: The toggle control for the Stabilization controls lets you turn stabilization off and on to be able to compare the stabilized and unstabilized image.
— Camera Lock: Turning on this checkbox disables Cropping Ratio and Smooth, and enables the stabilizer to focus on eliminating all camera motion from the shot in an effort to
create a locked shot.
— Zoom: When this checkbox is turned on, the image is resized by a large enough percentage to eliminate the blanking (black edges) that is the result of warping and transforming the image to eliminate unwanted camera motion. The lower a value Cropping Ratio is set to, the more DaVinci Resolve will need to zoom into an image to eliminate these blanked edges. If you turn
![]()
this off, the image is not zoomed at all, and whatever blanking intrudes into the image is output along with the image, on the assumption that you’ll have dedicated compositing artists deal with eliminating this blanking by filling in the missing image data in a more sophisticated manner.
You may also leave this checkbox turned off if you’re planning on animating the Input Sizing Zoom parameter to dynamically zoom into and out of a shot being stabilized to eliminate blanking only where it occurs, using only as much zooming as is necessary for each region of the shot.
— Cropping Ratio: This value limits how hard the stabilizer tries to stabilize, by dictating how much blanking or zooming you’re willing to accept in exchange for eliminating unwanted motion.
A value of 1.0 results in no stabilization being applied. Progressively lower values enable more aggressive stabilization. Changing this value requires you to click the Stabilize button again to reanalyze the clip.
— Smooth: Lets you apply mathematical smoothing to the analyzed data used to stabilize the clip, allowing camera motion in the shot while eliminating unwanted jittering. Lower values perform less smoothing, allowing more of the character of the original camera motion to show through, while higher values smooth the shot more aggressively. Changing this value requires you to click the Stabilize button again to reanalyze the clip.
— Strength: This value is a multiplier that lets you choose how tightly you want to use the stabilization track to eliminate motion from a shot using the current analysis. With a value of 1, stabilization is maximized. Since some clips might look more natural with looser stabilization, choosing a number lower than 1 lets a percentage of the original camera motion show through. Zero (0) disables stabilization altogether. As an additional tip, you can invert the stabilization by choosing –1 when pasting a stabilization analysis from another clip to perform a match move based on the overall motion of the scene, and you can use a negative value either lower than
0 or higher than –1 to under or overcompensate when inverting the stabilization, simulating the effects of parallax where foreground and background planes move together but at different speeds.