< Previous | Contents | Next >
— Bicubic: While the Sharper and Smoother options are slightly higher quality, Bicubic is still an exceptionally good resizing filter and is less processor intensive than either of those options.
— Bilinear: A lower quality setting that is less processor intensive. Useful for previewing your work on a low-performance computer before rendering, when you can switch to one of the higher quality options.
— Other Resize Methods: A selection of specific resize algorithms is available if you need to match them to other VFX workflows.
Onscreen Controls for Transform, Crop, and Dynamic Zoom
You also have the option of transforming, cropping, or adding dynamic zoom effects to clips using the Transform/Crop/Dynamic Zoom button at the bottom left of the Timeline Viewer. These on-screen controls can also be selected by choosing an option from the View > Viewer Overlay submenu; these commands are not mapped to keyboard shortcuts by default, but you can make a manual mapping if
![]()
there’s a mode you find yourself using regularly. The currently selected overlay can be toggled on and off by pressing Shift-` (Tilde), or by choosing View > Viewer Overlay > Toggle On/Off.
Transform controls in the Timeline Viewer
Object Snapping in the Viewer
While dragging objects or dynamic zoom outlines to reposition them, snapping occurs at the X and Y center of the frame, as well as around the outer third of the frame. Holding the Shift key down while dragging a text object constrains movement to just the X or Y axis.
Using Onscreen Controls
For many, the onscreen controls provide a more intuitive experience for manipulating your clips.
1 Click the Transform/Crop button at the bottom left of the Timeline Viewer to turn it on; white is enabled, gray is disabled. When enabled, if no clips are selected in the Timeline, then the clip in the highest auto-select-enabled track that intersects the playhead will display onscreen transform controls. If a clip is selected, that specific clip can be transformed.
2 Do one of the following:
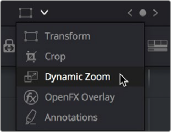
a) Choose the Transform mode from the pop-up menu, if necessary, to change modes.
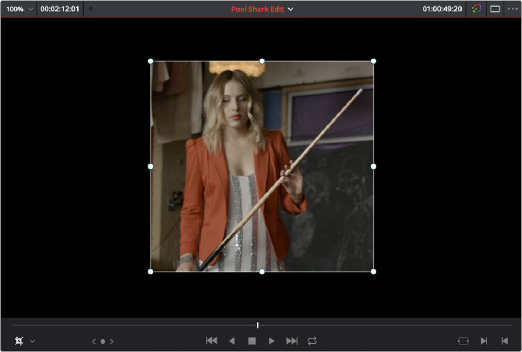
The appropriate onscreen controls appear to let you manipulate the clip with the mouse. When in Transform mode, you can drag anywhere within the clip’s bounding box to adjust pan and tilt, drag any diagonal corner to proportionally resize, drag any side to squeeze or stretch just width or height, or drag the center handle to rotate.

![]()
Onscreen controls for transforming in the Timeline Viewer
b) Choose the Cropping mode from the pop-up menu. In this mode, each side has a handle for cropping.
Onscreen controls for cropping in the Timeline Viewer
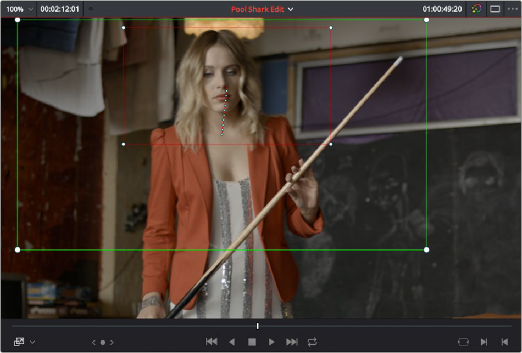
c) Choose the Dynamic Zoom mode from the pop-up menu. In this mode, the green box shows the starting size and position of the animated transform, while the red box shows the ending size and position of the animated transform. Drag anywhere within either bounding box to adjust pan and tilt for either the start or the end of the animated effect, and drag any of the corners to adjust the size. A motion path appears to show the motion that’s being created. Adjusting the Dynamic Zoom controls automatically enables dynamic zoom in the Inspector.
![]()
Onscreen controls for transforming and cropping in the Timeline Viewer
3 If necessary, choose a smaller viewing percentage from the Timeline Viewer scale pop-up to better see the onscreen controls if you’re rescaling the image, or use the scroll control of your mouse, trackpad, or tablet to zoom out of the image.
4 When you’re finished, turn the Transform/Crop/Dynamic Zoom button off.