< Previous | Contents | Next >
Rippling or Overwriting the Timeline When Using Retime
Whether or not clips to the right in the Timeline will ripple to accommodate the change in duration resulting in speed changes you make with the Retime controls depends on whether you’re using the Selection tool/mode (in which case the Timeline won’t ripple), or the Trim tool/mode (in which case the Timeline will).
Reading Clip Speed Arrows
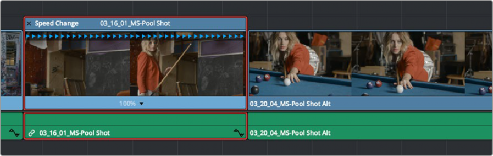
When you retime a clip, the Clip Speed pop-up menu displays the current speed of the entire clip. Additionally, the arrows in the Retime control track show you the speed and direction of playback. When clip speed is slowed down below 100%, the Retime control track shows yellow playback triangles that are spaced farther apart. When clip speed is sped up above 100%, the Retime control track shows blue triangles that are bunched closer together. At 100% normal speed, the Retime control track shows blue, evenly spaced triangles, while left-facing blue arrows indicates reverse playback.
![]()
Three clips set to different speeds. From left to right, 100% speed, slow motion, and fast forward are indicated by the yellow arrows.
Creating Variable Speed Effects Using the Retime Controls
You can also use the Retime controls to insert freeze frames within the middle of a clip, and create other custom variable speed effects using speed points. Additional variable speed options include rewind and speed ramp effects, which automatically place speed points to create preset effects.
1 With the Retime controls exposed, move the playhead to the frame you want to freeze, within that clip. Ideally, this will be for an effect where you want a character in motion to suddenly stop at a particular frame.
2 Open the Clip Speed pop-up menu (the pop-up next to the speed percentage text at the bottom of the clip), and choose Freeze Frame. Two new speed points are added to the clip, defining a range within which the clip is frozen at that frame. This can be seen by the vertical red bars in the Retime control track. Past the second speed point, the clip resumes playback from the next frame forward.
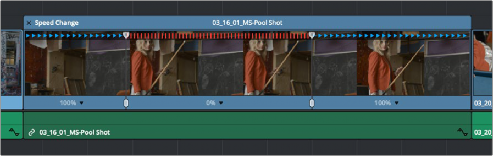
Speed effect controls set to insert a momentary freeze frame within the clip
3 Drag the second speed point forward or back to define the duration of the freeze frame. The result is that the clip plays normally up until the first speed point, then freezes on that frame until the second speed point, at which playback resumes.
1 With the Retime controls exposed, move the playhead to the frame at which you want to change the speed of the clip, and choose Add Speed Point from the Clip Speed pop-up menu.
2 Move the playhead forward to the next frame at which you want the clip speed to change again, and add another speed point. It takes a minimum of two speed points to create a speed effect.
![]()
3 To alter the speed of the clip segment appearing between these two speed points, do one of the following:
— Using the pointer, drag the top handle of the second speed point to the right to slow down clip playback, or to the left to speed up clip playback within just that segment. Doing this either shortens or lengthens the clip, and either overwrites or ripples neighboring clips depending on whether you’re using the Selection or Trim modes.
— Also using the pointer, you can drag the bottom handle of any speed point to widen the range of the clip that plays at that particular speed. Doing this reallocates frames from before and after the speed segment being adjusted to keep all speed segments playing at the same speed, and this also shortens or lengthens the clip, but by a different amount.
— Using the Clip Speed pop-up menu, choose a new speed for that segment from the Change Speed pop-up menu. You can also set any segment to play in reverse by choosing Reverse Segment.
4 To clear a speed point and eliminate that particular clip’s speed segment from the effect, choose Clear Speed Point from any Clip Speed pop-up menu to eliminate whichever speed point appears to its left.
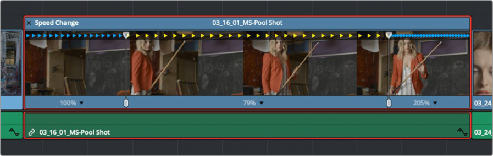
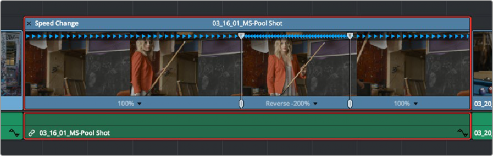
When you create variable-speed effects, the arrows in the Retime control track can help you keep track of what you’re doing, and each segment’s speed pop-up shows you the actual numeric speed. The change in speed from each speed segment to the next is automatically eased, for a smooth transition from one speed to another.
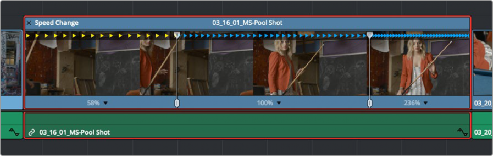
Speed controls set to ramp among three different playback speeds; arrow spacing shows the timing
There are two additional sets of commands for creating preset speed effects that use multiple speed points.
![]()
With a clip’s Retime controls exposed, open any Clip Speed pop-up menu and choose a preset percentage from the Rewind submenu. This results in two additional speed points being added after the rightmost speed point in the current segment, which creates the effect of the current segment playing in fast reverse for the chosen percentage, and then playing a second time from the beginning.
Speed effect controls before and after creating a “rewind” effect
With a clip’s Retime controls exposed, open any Clip Speed pop-up menu and choose one of the two options from the Speed Ramp submenu to replace the current speed effect with a series of