< Previous | Contents | Next >
Organize Unsupported Media Files
Depending on your workflow and on the NLE you’re working with, there may be clips using formats that are unsupported in DaVinci Resolve. Unsupported generators, media formats, and other effects constructs may simply not be seen in DaVinci Resolve, and will consequently appear as unlinked clips.
If you know this in advance, you can move all such clips into dedicated tracks where they can be isolated, and the track can be turned off to hide the unsupported clips, simplifying timeline navigation. This also saves the colorist from the need to worry about why there are offline clips in the Timeline at 3 o’clock in the morning, immediately before starting a render.
Creating an Offline Reference Movie
Even though the colorist in any given workflow is likely to be building new grades from scratch, it can be valuable to have a reference movie showing any color corrections, filters, or effects that the offline editor applied during the editing process. This offline reference can be imported into a
DaVinci Resolve project, and used as a split-screen reference whenever there’s some question about a look or effect from the offline edit.
Offline reference movies also serve as a useful tool when conforming a project in the Edit page. After project conform, you can compare the project as seen in the Record Viewer with the synchronized offline movie as seen in the Source Viewer set to Offline mode. This makes it easy to scrub through a project to make sure that each clip has imported correctly and is in sync.
![]()
More information about using offline reference movies appears later in this chapter.
Mixed Frame Sizes and Mixed Codecs
Most NLEs can freely mix media using different frame sizes, different codecs, and different frame rates. DaVinci Resolve deals with these combinations in different ways, depending on what settings you’ve selected in the Project Settings.
— Mixing Frame Sizes: Mixed frame sizes are easily handled. The Set Timeline Resolution To parameter in the Project Settings panel of the Project Settings dictates the current resolution of the project. Any clips with a frame size that doesn’t match the project is resized according to
the option selected in the Image Scaling panel of the Project Settings. You can, of course, always manually readjust the sizing of any clip if you want to make a specific adjustment. All resizing is done using the optical-quality resizing algorithms in DaVinci Resolve. For more information, see Chapter 150, “Sizing and Image Stabilization.”
— Mixing Codecs: Mixed codecs are also not a problem, as long as the different codecs used by the media in the project you’re importing are compatible with the list of codecs and formats that DaVinci Resolve supports. For more information about the currently supported list of codecs and formats, check the Blackmagic Design support page for DaVinci Resolve. This list is updated often with newly supported formats.
Mixed Frame Rates
DaVinci Resolve also supports mixed frame rates, although there is a setting you must choose to ensure the best results for the NLE you’re importing from. By default, mixed clip frame rate support is enabled via the “Mixed frame rate format” pop-up menu that appears either in the Master Project Settings, or in the Import AAF or XML dialog.
The different options available in the “Mixed frame rate format” pop-up are available to let you conform projects using the method of mixed frame rate calculation used by the NLE a project was originally edited in; different NLEs have different ways of mixing frame rates, and that used by Final Cut Pro 7 is different from that used by Final Cut Pro X or Avid Media Composer. If you need to change this setting, you must do so before you import any media into the Media Pool; once the Media Pool is populated, this setting can no longer be changed.
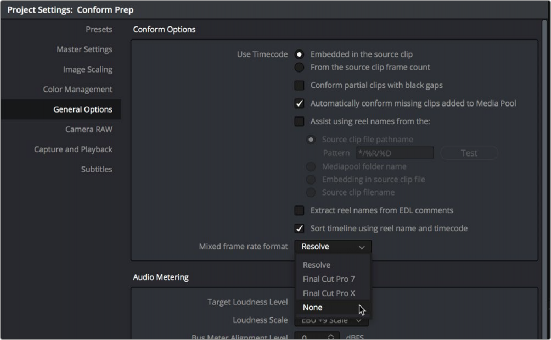
![]()
Mixed frame rate format selection
This Mixed frame rate format pop-up menu is also found in the Load AAF and Load XML dialogs. DaVinci Resolve automatically chooses a setting from the “Mixed frame rate format” pop-up menu that corresponds to the project file you’re importing, but in some cases you can override this setting if necessary. For projects sent from Final Cut Pro, you can choose either “Final Cut Pro 7” or “Final Cut Pro X” to match the type of project you’re importing. On the other hand, you should choose “Resolve” for projects imported from Premiere Pro, Smoke, Media Composer, or other NLEs.
When “Mixed frame rate format” is set to anything but None, DaVinci Resolve conforms and processes all clips in the Timeline to play at the project’s frame rate. For example, 23.98, 29.97, 30, 50, 59.94,
and 60 fps clips will all play at 24 fps if that’s what “Timeline frame rate” is set to in the Master Project Settings. Clips with different source frame rates will be retimed to match the Timeline conform frame rate.
The Retime process that’s used to render clips with differing frame rates can be changed for individual clips via the Retime Process parameter in the Edit page Inspector, or it can be changed project-wide using the Retime Process parameter found in the Frame Interpolation panel of the Master Project Settings. For more information on how each of the three available options work, see the “Frame Interpolation” section of Chapter 4, “System and User Preferences.”
If you choose “None,” then clips with frame rates that aren’t equal to the Timeline frame rate will ignore their original frame rate and will play at the Timeline rate, resulting in either faster or slower motion, depending on the difference between the original and Timeline frame rates.

NOTE: Because DPX files often either lack or have incorrect frame rate information in the header data, you may need to select None when conforming a project using image sequences to make sure your media is not incorrectly interpreted.
NOTE: Because DPX files often either lack or have incorrect frame rate information in the header data, you may need to select None when conforming a project using image sequences to make sure your media is not incorrectly interpreted.
NOTE: Because DPX files often either lack or have incorrect frame rate information in the header data, you may need to select None when conforming a project using image sequences to make sure your media is not incorrectly interpreted.