< Previous | Contents | Next >
Step 3–Do Whatever Grading is Necessary
Many productions that decide not to record camera raw media instead elect to record a log-encoded or “flat” image to ProRes or DNxHD media files in order to preserve the most image data for grading without clipping highlights or shadows. This can be accomplished using in-camera settings that record log-encoded QuickTime or MXF media, or via external video recorders such as the Blackmagic Video Assist. Depending on the camera you’re shooting with, the recorded media will use one of a variety of log-encoded gamma curves such as Log-C, S-Log, S-Log2, S-Log3, BMD Film, CanonLog, Panasonic VLog, or REDlog Film, among others.
In other workflows, raw video formats are recorded and later debayered as log-encoded clips in order to preserve the maximum amount of debayered data for grading, or in preparation for transcoding.
If you’re outputting high-quality media files meant to be used themselves for later finishing, then you may want to simply pass the source image data through unaltered. However, if you’re creating offline media for editors, directors, and producers to watch for the next three months, you can grade this data in a variety of ways to provide more pleasing output that’s been “normalized” in order to look closer to what was monitored on-set during the shoot.
There are many ways of normalizing log-encoded media in DaVinci Resolve. If you’re working with one or more raw formats, you can choose to debayer all clips straight to Rec. 709 in the Camera Raw panel of the Project Settings. However, if you’re working with log-encoded ProRes or DNxHD media, you need to normalize these clips using other methods.
![]()
An easy and powerful way to do so is to use DaVinci Resolve Color Management. To do so, set the “Color science” setting within the Color Management panel of the Project Settings to “DaVinci YRGB Color Managed.” Then, right-click each clip or group of clips in the Media Pool, and choose the appropriate setting for each type of media from the Input Color Space submenu (you can define the Input Color Space of multiple selected clips at once). For more information on using DaVinci color management, see Chapter 9, “Data Levels, Color Management, and ACES.”
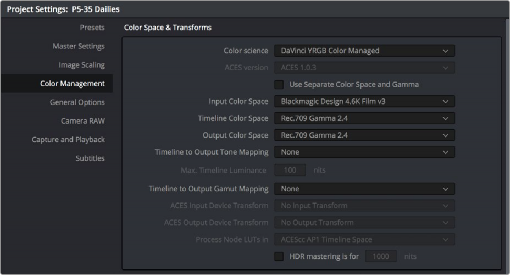
Enabling DaVinci Resolve color management
If you don’t want to use DaVinci color management, you can also use one or more LUTs (Lookup Tables) to normalize log-encoded media. You can apply a LUT to the entire project to normalize the particular log characteristics of the media you’re processing. Project-wide LUTs can be applied in the Color Management panel of the Project Settings. For more information, see Chapter 4, “System and User Preferences.”
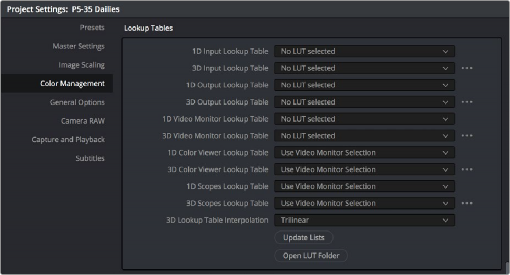
Project-wide LUT table settings on the Lookup Tables panel of the Project Settings
![]()
In the case of LUT-managed shooting workflows where a variety of LUTs have been custom-designed to monitor different scenes, you can manually apply individual LUTs to one or more selected clips from each scene using the Media Pool’s contextual menu.
You can also edit each scene’s clips into timelines, and apply separate LUTs to each clip in the
Clip mode of the Node Editor of the Color page, or apply a single LUT to an entire timeline using the Timeline mode of the Node Editor. For more information on using LUTs as part of grades,
see Chapter 140, “Node Editing Basics.”
Alternately, if on-set color correction from the shoot been provided via a CDL-compliant EDL exported from one of several on-set grading solutions that are available, you can use the ColorTrace™ from CDL command to batch import grading information from another application. For more information on CDL import workflows, see Chapter 146, “Copying and Importing Grades Using ColorTrace.”
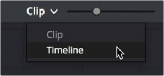
Selecting Timeline in the Node Editor
If your project’s workflow requires that you start out with even higher quality dailies, you can go ahead and manually grade individual clips as you would with any project. However, if you want to create a fast “one-light” adjustment for every clip in the Master Timeline at once, you can use the Timeline grade mode of the Node Editor in the Color page to apply a single correction simultaneously to every clip in the current Timeline. This is particularly useful as you can readjust the Timeline grade as much as you like, and the changes are automatically applied to every clip in the Timeline. For more information, see Chapter 140, “Node Editing Basics.”