
< Previous | Contents | Next >
More About Conforming XML Files
DaVinci Resolve can import projects that were exported to the Final Cut Pro 7 or Final Cut Pro X XML formats. Adobe’s Premiere Pro and Autodesk Smoke and Flame Premium are also capable of using the Final Cut Pro XML project exchange format to accommodate round-trip workflows. However, for the best results you need to make sure that you’re exporting XML from Premiere Pro version 5.5.1 or newer; ideally you want to export from the latest version of Premiere Pro that’s available.
Manage Your Media Before Exporting an XML
In workflows using imported XML or AAF projects (or even EDLs), it’s easiest to relink and conform to the accompanying media files if they’re all located in a single directory path. Having media sorted into multiple directories is fine as long as they’re all within a single main directory that you can select at the appropriate stage of project import.
Exporting XML for use by DaVinci Resolve is straightforward, and there really aren’t any settings you need to manage when exporting an XML file other than the version of XML you want to export. For this reason, it’s best to do whatever timeline and/or media management you need to before XML export.
![]()
Importing XML Project Files
This section covers the Import AAF/EDL/XML dialog in much more detail. One procedure lets you accomplish any of the following workflows:
— Importing an XML file and automatically conforming to and importing the media it’s linked to.
— Importing an XML file and manually choosing another set of media, presumably in a different format or resolution, with identical metadata, to conform to instead.
— Importing an XML file that’s linked to offline media derived from a camera original format, and automatically conforming it to and importing the camera original media.
Each of these workflows is possible by choosing the correct combination of options, each of which is described in the following procedure.
You can select multiple XML, AAF, FCP XML, or EDL timelines (or any combination thereof) at the same time using the Timeline Import dialog. The selected timelines will import sequentially, pausing after each time the OK button is pressed, allowing you to adjust separate Import Settings for each timeline.
1 Do one of the following:
— From any page, choose File > Import Timeline (Shift-Command-I).
— Open the Edit page, right-click anywhere in the Media Pool, and choose Timelines > Import > AAF/EDL/XML/DRT/ADL/OTIO.
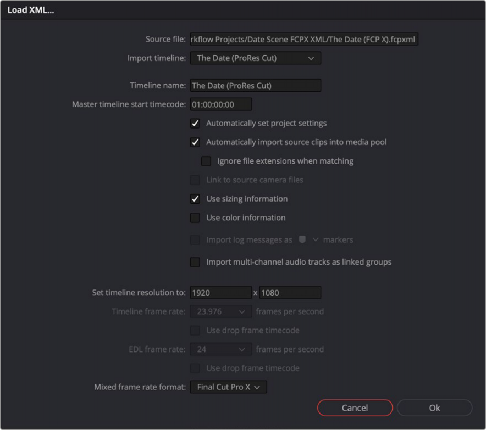
2 Using the file dialog that appears, find the project file you want to import, and click the file to open it. The Load XML window appears, depending on your selection.
![]()
Options when importing an XML file
3 Choose the options that are applicable to your particular project. By default, these options are based on metadata within the file you selected.
— Source file: The file you selected in the previous step.
— Import timeline: If there are multiple sequences within the selected XML source file, this pop-up menu lets you choose which sequence to import as a DaVinci Resolve timeline.
— Timeline name: The name of the Timeline you’re about to create. This defaults to the name of the sequence that was exported, but you can change it if you like.
— Master timeline start timecode: The timecode at which the imported timeline will start. This automatically matches the start timecode of the selected Import Timeline.
— Automatically set project settings: Leave this option on to automatically change the frame size and frame rate settings in the Project tab of the Config page with those in this window. You can import timelines with frame rates that are different from the Project frame rate.
— Automatically import source clips into media pool: Leave this checkbox on to automatically import the media referenced by the XML project file you selected into the Media Pool based on the embedded file paths. If the media files are not automatically found at these locations, you will be prompted to manually select a directory where the clips are located.
— Ignore file extensions when matching: Turn this checkbox on if you want to manually choose a different directory of media to link to, for example if the XML you’re importing links to ProRes Proxy media, and you want to relink to another directory of corresponding ProRes 4444 or camera raw media.
— Use sizing information: Lets you import position, scale, and rotation transforms from the originating NLE via the imported XML project file. These transforms are stored in each clip’s settings in the Edit page Inspector.
— Use color information: For Final Cut Pro X XML files only. This option lets you import a subset of color correction data from the Final Cut Pro X color board controls.
— Import multi-channel audio tracks as linked groups: Turn on this checkbox if you want to import multi-channel audio, such as stereo, 5.1, and 7.1 audio into individual mono timeline tracks that are linked together in the Fairlight page. For more information about Linked Groups, see Chapter 167, “Setting Up Tracks, Busses, and Patching.” If this checkbox is turned off, multi-channel audio will be imported into multi-channel audio tracks in the Timeline.
— Set timeline resolution to: Two fields let you specify the width and height of the frame size you want to work at in DaVinci Resolve. The default is whatever resolution is specified in the XML file being imported.
— Timeline frame rate: By default, this is derived from the frame rate of the XML file being imported. If you’re importing an XML file into a project that already has media in the Media Pool, the Timeline frame rate is locked and cannot be changed.
— Use drop frame timecode: By default, this is derived from the XML file being imported.
— EDL frame rate: By default, this is derived from the frame rate of the selected file.
— Use drop frame timecode: By default, this is derived from the frame rate of the selected file.
![]()
— Mixed frame rate format: This pop-up menu lets you choose the method used to conform mixed frame rates for rendering and playback. You can choose the “Final Cut Pro 7” or “Final Cut Pro X” methods of conform, while for projects imported from Media Composer, Premiere Pro, Smoke, or other NLEs, you should leave this set to “DaVinci Resolve.” This pop-up menu also appears in the Load XML dialogs when you import a project.
4 After choosing all necessary settings, click OK.
5 Assuming you left “Automatically import source clips into media pool,” turned on, if the media linked to by the XML file is not in the expected disk location, or if you turned on the “Ignore file extensions when matching” checkbox, then another dialog appears prompting you to choose the folder within which the media for this project is stored. Do one of the following:
— If you want to try to relink to media in another disk location: Click Yes, and then navigate to the folder containing your media (all subfolders will be automatically traversed as well), select it, and click OK.
— If you want to just import the Timeline with all offline clips: Click No.
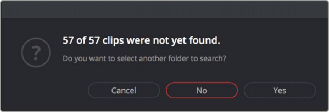
A prompt appears if all the media was not found

IMPORTANT: It’s always possible to choose the top level of any volume to automatically find all media in any directories located within, but if the volume is large and full of many files, scanning every folder and document of the volume may be an extremely time-intensive process.
IMPORTANT: It’s always possible to choose the top level of any volume to automatically find all media in any directories located within, but if the volume is large and full of many files, scanning every folder and document of the volume may be an extremely time-intensive process.
IMPORTANT: It’s always possible to choose the top level of any volume to automatically find all media in any directories located within, but if the volume is large and full of many files, scanning every folder and document of the volume may be an extremely time-intensive process.
6 If you clicked Yes to selecting another folder, then use the folder selection dialog to navigate to another folder, and click Ok. You can cycle through this process as many times as you need to until you’ve found all the media that timeline is linked to.
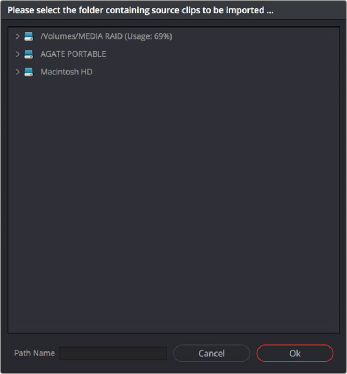
![]()
Selecting the source folder for your XML imported clips
The XML file is imported. A new timeline and the referenced media files appear in the Media Pool, and the Timeline is opened so you can see its contents. Clips that could not be linked to a

TIP: You can open the Edit Index and choose Filter Offline Clips from the option menu to see a list of all offline clips in the current Timeline.
TIP: You can open the Edit Index and choose Filter Offline Clips from the option menu to see a list of all offline clips in the current Timeline.
TIP: You can open the Edit Index and choose Filter Offline Clips from the option menu to see a list of all offline clips in the current Timeline.
corresponding file on disk appear red in both the Media Pool and Timeline to indicate that they’re offline and unlinked.