< Previous | Contents | Next >
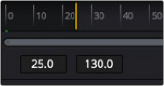
A red playhead within the Time Ruler indicates the currently viewed frame. Clicking anywhere within the Time Ruler jumps the playhead to that frame, and dragging within the Time Ruler drags the playhead within the available duration of that clip or composition.
Zoom and Scroll Bar
A two-handled gray scroll bar lets you zoom into the range shown by the Time Ruler, which is useful if you’re using a very large Global range such that the Render range is a tiny sliver in the Time Ruler.
TIP: Holding the middle mouse button and dragging in the Time Ruler lets you scroll the visible range.
TIP: Holding the middle mouse button and dragging in the Time Ruler lets you scroll the visible range.
TIP: Holding the middle mouse button and dragging in the Time Ruler lets you scroll the visible range.
Dragging the left or right handles of this bar zooms relative to the opposite handle, enlarging the width of each displayed frame. Once you’ve zoomed in, you can drag the scroll bar left or right to scroll through the composition.
Transport Controls in the Fusion Page
The Transport Controls in DaVinci Resolve’s Fusion page include buttons that control playback as well as time fields on the left side for setting the render range and the current time on the right side. Additional controls are available in the right-click menu.
Controlling Playback
![]()
There are six transport controls underneath the Time Ruler in the Fusion page. These buttons include Composition First Frame, Play Reverse, Stop, Play Forward, Composition Last Frame, and Loop.
![]()
The Fusion page controls for playback
Navigation Shortcuts
Many standard transport control keyboard shortcuts you may be familiar with work in Fusion, but some are specific to Fusion’s particular needs.
— Spacebar: Toggles forward playback on and off.
— JKL: Basic JKL playback is supported, including J to play backward, K to stop, and L to play forward.
— Back Arrow: Moves 1 frame backward.
— Forward Arrow: Moves 1 frame forward.
— Shift-Back Arrow: Moves to the clip’s Global Start frame.
— Shift-Forward Arrow: Moves to the clip’s Global End frame.
— Command-Back Arrow: Jumps to the Render Range In point.
— Command-Forward Arrow: Jumps to the Render Range Out point.
Real-Time Playback Not Guaranteed
Because many of the effects you can create in the Fusion page are processor-intensive, there is no guarantee of real-time playback at your project’s full frame rate unless you’ve cached your composition first (discussed later).
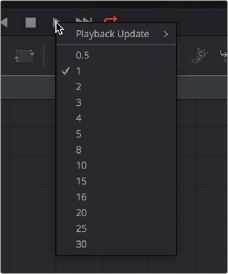
Frame Increment Options
Right-clicking either the Play Reverse or Play Forward buttons opens a contextual menu. This menu contains options to set a frame increment value, which lets you use a keyboard shortcut to move the playhead in sub-frame or multi-frame increments.
Moving the playhead in multi-frame increments can be useful when rotoscoping. Moving the playhead in sub-frame increments can be useful when rotoscoping or inspecting interlaced frames one field at a time (0.5 of a frame).
![]()
Right-click the Play Forward or Play Backward buttons to choose a frame increment in which to move the playhead.
Looping Options
The Loop button can be toggled to enable or disable looping during playback. You can right-click this button to choose the looping method that’s used:
— Playback Loop: The playhead plays to the end of the Time Ruler and starts from the beginning again.
— Ping-pong Loop: When the playhead reaches the end of the Time Ruler, playback reverses until the playhead reaches the beginning of the Time Ruler, and then continues to ping-pong back and forth.
Render Range Fields
The two time fields on the left side of the transport controls are used to modify the Render Range. You can enter time values in frames, or click and drag inside the fields to modify the In and Out of the render range for previews and caching.