< Previous | Contents | Next >
Transport Controls in Fusion Studio
The transport controls in Fusion Studio include buttons to control playback, time fields on the left side for setting the global range and render range, and a Render button to initiate rendering of the composite. There are also controls on the right side for proxy and motion blur. The time field on the far right is used for the current time.
![]()
Fusion Studio transport controls
Controlling Playback
There are eight transport controls underneath the Time Ruler in Fusion Studio. These buttons include Composition First Frame, Step Backward, Play Reverse, Stop, Play Forward, Step Forward, Composition Last Frame, and Loop.
![]()
Fusion Studio transport controls
Navigation Shortcuts
Many standard transport control keyboard shortcuts you may be familiar with work in Fusion, but there are some keyboard shortcuts specific to Fusion’s particular needs.
— Spacebar: Toggles forward playback on and off.
— JKL: Basic JKL playback is supported, including J to play backward, K to stop, and L to play forward.
![]()
— Back Arrow: Moves 1 frame backward.
— Forward Arrow: Moves 1 frame forward.
— Shift-Back Arrow: Moves to the clip’s Global End frame.
— Shift-Forward Arrow: Moves to the clip’s Global Start frame.
— Command-Back Arrow: Jumps to the Render Range In point.
— Command-Forward Arrow: Jumps to the Render Range Out point.
Real-Time Playback Not Guaranteed
Because many of the effects you can create in the Fusion page are processor-intensive, there is no guarantee of real-time playback at your project’s full frame rate, unless you’ve cached your composition first. For more information, see the “Fusion RAM Cache for Playback” section later in this chapter.
Frame Increment Options
Right-clicking the Step Backward, Play Reverse, Play Forward, or Step Forward buttons opens a drop- down menu with options to set a frame increment value. Selecting a frame number from the menu lets you move the playhead in sub-frame or multi-frame increments whenever you use a keyboard shortcut or press the Step Forward/Backward buttons.
Moving the playhead in multi-frame increments can be useful when rotoscoping. Moving the playhead in sub-frame increments can be useful when rotoscoping or inspecting interlaced frames one field at a time (0.5 of a frame).
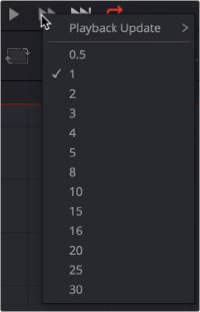
Right-click the Step Forward or Step Backward buttons to choose a frame increment in which to move the playhead.
Looping Options
The Loop button can be toggled to enable or disable looping during playback. You can right-click this button to choose the looping method that’s used:
![]()
— Playback Loop: The playhead plays to the end of the Time Ruler and starts from the beginning again.
— Ping-pong Loop: When the playhead reaches the end of the Time Ruler, playback reverses until the playhead reaches the beginning of the Time Ruler, and then continues to ping-pong back and forth.
Range Fields
The four time fields on the left side of the transport controls are used to quickly modify the global range and render range in Fusion Studio.
![]()
Global Time Fields to the left of the transport controls
Audio
The Audio button is a toggle that mutes or enables any audio associated with the clip. Additionally, right-clicking on this button displays a drop-down menu that can be used to select a WAV file, which can be played along with the composition, and to assign an offset to the audio playback.
Render
Clicking the Render button in the transport controls displays the composition’s Render Settings dialog. This dialog is used to configure the render options and initiate rendering of any Saver nodes in the composition. Shift-clicking on the button skips the dialog, using default render values (full resolution, high quality, motion blur enabled).
The Current Time
The Current Time field at the right of the transport controls shows the frame at the position of the playhead, which corresponds to the frame seen in the viewer. However, you can also enter time values into this field to move the playhead by specific amounts.
When setting ranges and entering frame numbers to move to a specific frame, numbers can be entered in sub-frame increments. You can set a range to be –145.6 to 451.75 or set the playhead
to 115.22. This can be very helpful when animating parameters because you can set keyframes where they actually need to occur, rather than on a frame boundary, so you get more natural animation.

NOTE: Many fields in Fusion can evaluate mathematical expressions that you type into them. For example, typing 2 + 4 into most fields results in the value 6.0 being entered. Because Feet + Frames uses the + symbol as a separator symbol rather than a mathematical symbol, the Current Time field will not correctly evaluate mathematical
expressions that use the + symbol, even when the display format is set to Frames mode.
Having sub-frame time lets you use time remapping nodes or just scale keyframes in the Spline view and maintain precision.
Fusion Studio Viewer Quality and Proxy Options
![]()
Five buttons along the right side of the transport controls let you either enable high-quality playback at the expense of greater processing times, or enter various proxy modes that temporarily lower the display quality in order to speed processing as you work.
Rendering for final output is always done at the highest quality, regardless of these settings.
![]()
Five buttons control the viewer quality, motion blur, proxy options, and image- processing update settings.
As you build a composition, often the quality of the displayed image is less important than the speed at which you can work. The High Quality setting gives you the option to either display images with faster interactivity or at final render quality. When you turn off High Quality, complex and time-consuming operations such as area sampling, anti-aliasing, and interpolation are skipped to render the image to the viewer more quickly. Enabling High Quality forces a full-quality render to the viewer that’s identical to what will be output during final delivery.
The Motion Blur button is a global setting. Turning off Motion Blur temporarily disables motion blur throughout the composition, regardless of any individual nodes for which it’s enabled.