
< Previous | Contents | Next >
The MediaIn nodes in the Fusion Page are the foundation of every composition you create. This section provides more detail about the controls available for adjusting MediaIn and Loader nodes.
MediaIn Node Inputs
TIP: If you connect a mask node without any shapes drawn, that mask outputs full transparency, with the result that the image output by the MediaIn node is uselessly blank. If you want to rotoscope over a MediaIn node, first create a disconnected mask node, and with the mask node selected (exposing its controls in the Inspector) and the MediaIn node loaded into the viewer, draw your mask. Once the shape you’re drawing has been closed, you can connect the mask node to the MediaIn node’s input, and you’re good to go.
TIP: If you connect a mask node without any shapes drawn, that mask outputs full transparency, with the result that the image output by the MediaIn node is uselessly blank. If you want to rotoscope over a MediaIn node, first create a disconnected mask node, and with the mask node selected (exposing its controls in the Inspector) and the MediaIn node loaded into the viewer, draw your mask. Once the shape you’re drawing has been closed, you can connect the mask node to the MediaIn node’s input, and you’re good to go.
TIP: If you connect a mask node without any shapes drawn, that mask outputs full transparency, with the result that the image output by the MediaIn node is uselessly blank. If you want to rotoscope over a MediaIn node, first create a disconnected mask node, and with the mask node selected (exposing its controls in the Inspector) and the MediaIn node loaded into the viewer, draw your mask. Once the shape you’re drawing has been closed, you can connect the mask node to the MediaIn node’s input, and you’re good to go.
MediaIn nodes have one Effects mask input and one output. In the case of the Effects mask input, connecting a mask node such as a Polygon or B-Spline node creates an alpha channel in the MediaIn node.
Inspector Properties of MediaIn Nodes
Which Inspector options are available for MediaIn nodes of your composition depends on how you imported the media.
MediaIn Node Parameters for Clips in a Timeline
![]()
When you create a composition using clips from the Edit page Timeline, the MediaIn nodes for those clips display fewer parameters than those imported directly from the Media Pool, because the timing of clips that have already been edited into a Timeline is already set.
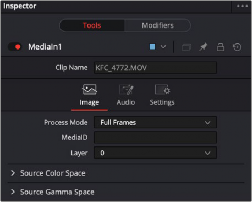
The Inspector Image tab parameters for a clip from the Timeline
Image Tab
— Clip Name: Displays the name of that clip.
— Process Mode: Lets you choose whether the clip represented by that node will be processed as Full Frames, or via one of the specified interlaced methods.
— Media Source: Selects where the media is linked from, allowing you to access Edit track composite results.
— Timeline: Links the clip from the Edit Timeline (default)
— Background: In cases where the clip is composited over another clip in the Edit Timeline, the background clip is loaded instead.
— Media Pool: Links the clip directly from the Media Pool, bypassing the Edit Timeline.
— Layer: In the case of Photoshop PSD files, this selects the layer of the PSD file to use.
Source Color Space
The Color Space Type menu sets the color space of the media to help achieve a linear workflow. Unlike the Gamut tool, this doesn‘t perform any actual color space conversion but rather adds the source space data into the metadata, if that metadata doesn‘t already exist. The metadata can then be used downstream by a Gamut tool with the From Image option, or in a Saver if explicit output spaces are defined there.
— Auto: Passes along any metadata that might be in the incoming image.
— Space: Allows the user to set the color space from a variety of options.
Source Gamma Space
The Curve Type menu automatically determines or allows you to choose the Gamma setting for the image and allows the option to remove the Gamma curve to help achieve a linear workflow.
— Auto: Passes along any metadata that might be in the incoming image.
— Space: Allows you to choose a specific setting from a Gamma Space drop-down menu, while a visual graph lets you see a representation of the gamma setting you’ve selected.
![]()
— Log: Similar to the Log-Lin node, this option reveals specific log-encoded gamma profiles so that you can select the one that matches your content. A visual graph shows a representation of the log setting you’ve selected. When Cineon is selected from the Log Type menu, additional Lock RGB, Level, Soft Clip, Film Stock Gamma, Conversion Gamma, and Conversion table options are presented to finesse the gamma output.
— Remove Curve: Depending on the selected gamma space or on the gamma space found in Auto mode, the associated gamma curve is removed from the material, effectively converting it to output in a linear color space.

TIP: All content in the DaVinci Resolve Fusion page is processed using 32-bit floating-point bit depth, regardless of the content’s actual bit depth.
TIP: All content in the DaVinci Resolve Fusion page is processed using 32-bit floating-point bit depth, regardless of the content’s actual bit depth.
TIP: All content in the DaVinci Resolve Fusion page is processed using 32-bit floating-point bit depth, regardless of the content’s actual bit depth.
— Pre-Divide/Post-Mujltiply: Lets you convert “straight” alpha channels into pre-multiplied alpha channels, when necessary.
Audio Tab
The Inspector for the MediaIn node contains an Audio tab, where you can choose to solo the audio from the clip or hear all the audio tracks in the Timeline.
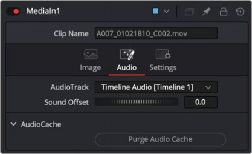
The MediaIn Audio tab
The Audio tab in the MediaIn node is used to select the track for playback, slip the audio timing, and reset the audio cache
If the audio is out of sync when playing back in Fusion, the Audio tab’s Sound Offset wheel allows you to slip the audio in subframe frame increments. The slipped audio is only modified in the Fusion page. All other pages retain the original audio placement.
The audio and its settings are cached for faster performance. If you change which audio tracks you want to play back in Fusion, or you use the Sound Offset wheel to slip the audio tracks, you need
to purge the audio cache. Also, if you return to the Edit, Cut, or Fairlight page and modify the audio levels, you need to purge the audio cache.
— Click the Purge Audio Cache button in the Inspector.
The audio will be updated when you next play back the composition.
![]()
Aligning Clips from the Media Pool
When you add a clip from the Media Pool or your file system directly into a composition, the resulting MediaIn node has more options than clips from the Edit page Timeline. These additional options make it easier to align the Media Pool clips with other clips from the Edit or Cut page Timeline. You can also trim clips, hold the first or last frame for a longer duration than the original media, and reverse or loop the clip to get more range for your composition.
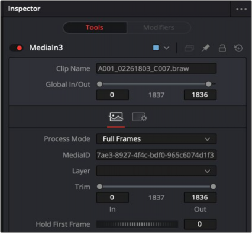
The Inspector parameters for a clip imported from the Media Pool.