< Previous | Contents | Next >
TIP: If you connect a Mask node without any shapes drawn, that mask outputs full transparency, so the result is that the image output by the MediaIn node is blank. If you want to rotoscope over a MediaIn node, first create a disconnected Mask node, and with the Mask node selected and the Media In node loaded into the viewer, draw your mask. Once the shape you’re drawing has been closed, connect the Mask node to the MediaIn node’s input, and you’re good to go.
TIP: If you connect a Mask node without any shapes drawn, that mask outputs full transparency, so the result is that the image output by the MediaIn node is blank. If you want to rotoscope over a MediaIn node, first create a disconnected Mask node, and with the Mask node selected and the Media In node loaded into the viewer, draw your mask. Once the shape you’re drawing has been closed, connect the Mask node to the MediaIn node’s input, and you’re good to go.
TIP: If you connect a Mask node without any shapes drawn, that mask outputs full transparency, so the result is that the image output by the MediaIn node is blank. If you want to rotoscope over a MediaIn node, first create a disconnected Mask node, and with the Mask node selected and the Media In node loaded into the viewer, draw your mask. Once the shape you’re drawing has been closed, connect the Mask node to the MediaIn node’s input, and you’re good to go.
Loader nodes have one Effects mask input and one output. In the case of the Effects mask input, connecting a mask node such as a Polygon or B-Spline node automatically creates an alpha channel in the Loader node.
Using Proxies for Better Performance
For increased performance, you can do one of two things:
— Generate smaller media files and write them to disk using Optimized Media in DaVinci Resolve
— Render out proxy files using Saver nodes in Fusion Studio
Both applications also allow you to generate proxies on-the-fly without rendering new files to disk using the Proxy and Auto Proxy options in the transport controls area.
To enable the Proxy and Auto Proxy options, you can do one of two things, depending on the version of Fusion you are using:
![]()
— In the Fusion page, right-click the empty area behind the transport controls to enable the Proxy option.

Proxy and Auto Proxy options in the transport controls right-click menu.
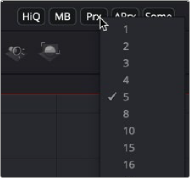
— In Fusion Studio, click the Proxy (Prx) button in the transport area to enable the usage of proxies.
The Proxy option reduces the resolution of the images as you view and work with them. Instead of displaying every pixel, the Proxy option processes one out of every x pixels interactively. In Fusion Studio, the value of x is determined by right-clicking the Prx button and selecting a proxy ratio from the drop-down menu. For instance, choosing 5 from the menu sets the ratio at 5:1. In the Fusion page, the proxy ratio is set by choosing Fusion > Fusion Settings and setting the Proxy slider in the General panel.