< Previous | Contents | Next >
Getting Started with a Fusion Transition Template
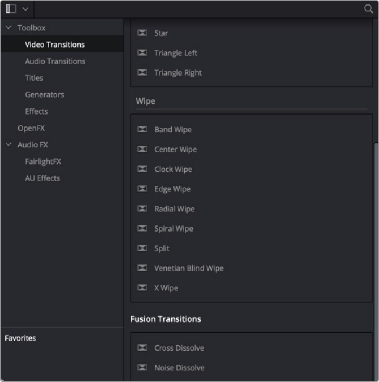
When creating a Fusion transition template, it’s easiest to start with an existing transition template and build off that. Three transitions are located in the Fusion Transitions category of the
DaVinci Resolve Effects Library. The simplest transition is the Cross Dissolve, while the most complex example is the Slice Push.
![]()
The Fusion transition templates located in DaVinci Resolve’s Effects Library.
Creating a Fusion Transition Template
The three Fusion Transitions located in the DaVinci Resolve Effects Library are basically Fusion compositions that have been turned into macros. Ordinarily, macros are used as building blocks inside of Fusion so that you can turn frequently-made compositing tricks that you use all the time into your own nodes. However, you can also use this macro functionality to build transition templates for the DaVinci Resolve Edit page.
Once you apply a Fusion Transition in the Edit page, you can right-click it and choose Open in Fusion Page.

Right-clicking over a Fusion Transition in the DaVinci Resolve Edit page.
The Fusion page opens, displaying the node tree used to create the Fusion transition.
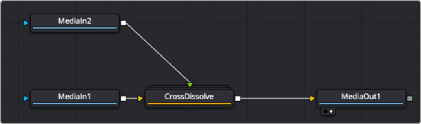
The Cross Dissolve node tree in Fusion.
The MediaIn 1 node represents the outgoing clip in the Edit page Timeline. The MediaIn 2 clip represents the incoming clip. You can modify or completely change the Cross Dissolve effect to create your own custom transition using any of Fusion’s nodes.
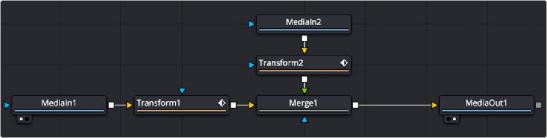
The Fusion Cross Dissolve node tree replaced with Transforms and a Merge node.

TIP: To modify the duration of the Fusion transition from the Edit page Timeline, you must apply the Resolve Parameter Modifier to any animated parameter. In place of keyframing the transition, you create the transition using the Scale and Offset parameters of the Resolve parameter modifier.
TIP: To modify the duration of the Fusion transition from the Edit page Timeline, you must apply the Resolve Parameter Modifier to any animated parameter. In place of keyframing the transition, you create the transition using the Scale and Offset parameters of the Resolve parameter modifier.
TIP: To modify the duration of the Fusion transition from the Edit page Timeline, you must apply the Resolve Parameter Modifier to any animated parameter. In place of keyframing the transition, you create the transition using the Scale and Offset parameters of the Resolve parameter modifier.
![]()
Updating a Fusion Transition
After modifying the transition in Fusion, you can choose to update the transition in the Timeline or create a new transition, which you save into the Edit page Effects Library. To update the transition, just return to the Edit page. The transition in the Edit page Timeline reflects the changes you make in the Fusion page.
Saving a New Fusion Transition
If after modifying the transition in Fusion, you need to save it to the Effects Library to reuse it on other transitions or other projects, you must make a macro and save it to the Transitions folder.

TIP: Since the transition template must include the MediaIn and MediaOut nodes, the final steps for saving a transition template must be performed in DaVinci Resolve’s Fusion page and cannot be performed in Fusion Studio.
TIP: Since the transition template must include the MediaIn and MediaOut nodes, the final steps for saving a transition template must be performed in DaVinci Resolve’s Fusion page and cannot be performed in Fusion Studio.
TIP: Since the transition template must include the MediaIn and MediaOut nodes, the final steps for saving a transition template must be performed in DaVinci Resolve’s Fusion page and cannot be performed in Fusion Studio.
Start by selecting every node in the Node Editor that you want to include in the transition template, including the two MediaIn nodes and the MediaOut node.
Having made this selection, right-click one of the selected nodes and choose Macro > Create Macro from the contextual menu.
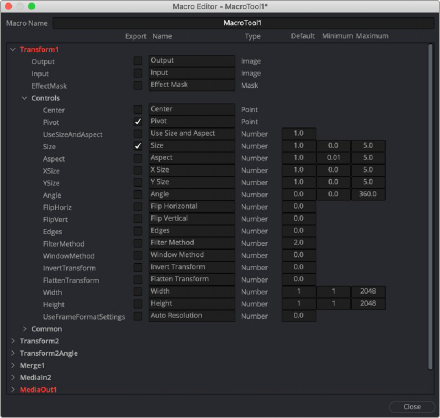
The Macro Editor displaying the parameters of all the nodes you selected.
![]()
The Macro Editor window appears, displaying a hierarchical list of every parameter in the composition you’ve just selected. The order of nodes is based on the order they were selected in the Node Editor prior to creating the macro.
The Macro Editor is designed to let you choose which parameters you want to display as custom controls in the Edit page Inspector when the transition is applied.
For transitions, you can choose not to display any controls in the Inspector, allowing only duration adjustments in the Timeline. However, you can choose a simplified set of parameters for customization by enabling the checkboxes next to any parameter name.
Once you enable all the parameters you want to use in the eventual template, click the Close button, and a Save Macro As dialog appears. Here, you can enter the name of the transition, as it should appear in the Edit page Effects Library.
To have the transition template appear in the Effects Library > Fusion Transitions category of DaVinci Resolve, save the macro in the following locations:
— On macOS: Macintosh HD/Users/username/Library/Application Support/Blackmagic Design/ DaVinci Resolve/Fusion/Templates/Edit/Transitions
— On Windows: C:\Users\username\AppData\Roaming\Blackmagic Design\DaVinci Resolve\ Support\Fusion\Templates\Edit\Transitions
— On Linux: home/username/.local/share/DaVinciResolve/Fusion/Templates/Edit/Transitions