< Previous | Contents | Next >
and you cannot render the entire range of frames you want, you can choose to lower the resolution to a setting that delivers the best quality/duration ratio for your preview.
Network
Network rendering is only available in Fusion Studio. For more information on network rendering, see Chapter 66, “Rendering Using Saver Nodes,” in the DaVinci Resolve Reference Manual or Chapter 4 in the Fusion Reference Manual.
Shoot On
Sometimes you may not want to render every single frame, but instead every second, third, or fourth frame to save render time and get faster feedback. You can use the Step parameter to determine the interval at which frames are rendered.
Frame Range
This field defaults to the current Render Range In/Out set in the Time Ruler to determine the start and end frames for rendering. You can modify the range to render more or fewer frames.
Configurations
Once you’ve created a useful preview configuration, you can save it for later use by clicking the Add button, giving it a name, and clicking OK.
Updating a Preview
This option is designed for the interactive frame-by-frame work of rotoscoping and painting. Right- click over a preview in the viewer and choose Update from its contextual menu. When active, any frames that are modified on the previewed node are automatically updated in the preview’s playback. This lets you reserve the RAM for playback. You can keep it playing on a loop or ping-pong while you work in another viewer.
![]()
Onscreen Controls
When it comes to adjusting images, the Control Panel provides very precise numerical values, but sometimes visually positioning an element using onscreen controls can get you where you want to go with less tweaking.
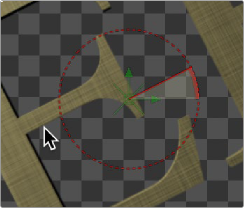
The Angle preview control