< Previous | Contents | Next >
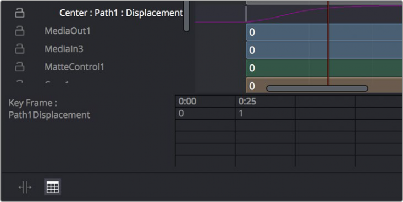
If you turn on the Spreadsheet and then click on the name of a layer in the keyframe track, the numeric time position and value (or values if it’s a multi-dimensional parameter) of each keyframe appear as entries in the cells of the Spreadsheet. Each column represents one keyframe, while each row represents a single aspect of each keyframe.
Editing keyframes in the Spreadsheet
For example, if you’re animating a blur, then the Key Frame row shows the frame each keyframe is positioned at, and the Blur1BlurSize row shows the blur size at each keyframe. If you change the Key Frame value of any keyframe, you’ll move that keyframe to a new frame of the Timeline.
Scaling and Panning the Timeline
![]()
At the top, a series of zoom and framing controls let you adjust the work area containing the layers.
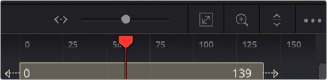
The Keyframe Editor framing controls
![]()
A Horizontal zoom control lets you scale the size of the editor.
![]()
A Zoom to Fit button fits the width of all tracks to the current width of the Keyframes Editor.
![]()
A Zoom to Rect tool lets you draw a rectangle to define an area of the Keyframes Editor to zoom into.
![]()
A Sort pop-up menu lets you sort or filter the tracks in various ways.
![]()
An Option menu provides access to many other ways of filtering tracks and controlling visible options.