< Previous | Contents | Next >
— When none is selected: DaVinci Resolve conforms and processes all clips in the Timeline to play at the frame rate that’s selected in the “Timeline frame rate” drop-down menu.
For example, 23.98, 29.97, 30, 50, 59.94 and 60 fps clips will all play at 24 fps if that’s what “Timeline frame rate” is set to in the Master Project Settings, and clips will play slower or faster accordingly.
![]()
How clips in mixed frame rate timelines are rendered out depends on whether the Render Settings are set to render individual source clips or one single clip. When you render the Timeline as individual source clips, all clips are rendered individually at their original frame rate. If you select “single clip,” all clips are converted to the “Timeline frame rate” frame rate and rendered as a single media file.
Color
These settings affect clip versions and timeline interactions when working in the Color page.
— Automatically label gallery stills using: When enabled, DaVinci Resolve automatically generates labels for all gallery stills you take based on the following controls:
— Naming drop-down: Lets you choose what name to use for new stills. Options include: Clip Name, Clip Version Name, Source Timecode, Timeline Timecode, Timeline Name, Display LUT Name, Custom Label Using Tags (using metadata variables).
— Append still number on export checkbox: When enabled, each new still has an appended still number. Where the number appears depends on the following radio buttons.
— As Suffix/As Prefix buttons: Lets you choose to place still numbers at the end of an auto generated gallery label or at the beginning.
— Luminance mixer defaults to zero: Selecting this option sets the Y channel of the YRGB parameters for all grades to zero. This is required to be able to export a compliant ASC-CDL, and will impact all grades that use the Lum Mix control.
— Use legacy Log grading ranges and curve: DaVinci Resolve 12.5 introduced a modification to the Log grading controls that provides smoother, more pleasing results using the same controls. To maintain backward compatibility with older projects, a “Use legacy Log grading
ranges and curve” checkbox in the Color panel of the Project Settings lets you switch your project between the older Log control behavior and the newer one. Older projects that are opened in DaVinci Resolve have this checkbox turned on by default, while new projects have this turned off by default.
— Use S-curve for contrast: On by default, this checkbox sets the contrast control in the Color Wheels palette to apply an “S-curve” to the image, such that the shadows and highlights of a signal will not be clipped when you increase the value. If you would prefer for these contrast adjustments to be made linearly, and for the signal to be allowed to clip when you reach the upper and lower boundaries of the video signal, you can turn this checkbox off.
— Use legacy sizing interactions for windows and effects: DaVinci Resolve 14.1.1 improved how window tracking applies transformations, to correctly handle things like pixel aspect ratio (par). New projects should leave this setting disabled, however older projects should leave this checkbox enabled to ensure tracking and transforms remain applied the way they were before.
l
l
l
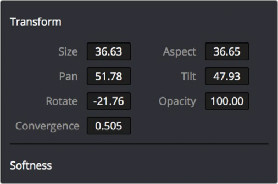
— Apply stereoscopic convergence to windows and effects: When enabled, DaVinci Resolve correctly maintains the position of a window that’s been properly placed over each eye as convergence is adjusted in the 3D palette. Enabling this checkbox also enables an additional Convergence parameter in the Window palette that lets you create properly aligned convergence for a window that’s placed onto a stereoscopic 3D clip, as seen in the following screenshot.
![]()
The Convergence control in the Transform section of the Window palette appears when you enable “Apply stereoscopic convergence to windows and effects”
— Use local version for new clips in timeline: Automatically sets all new clips that are added to existing timelines, or all clips that are added to new timelines that are imported via AAF, EDL, or XML, to use local grades by default. If you want all clips added to new timelines to use remote grades instead, as with DaVinci Resolve version 9 and earlier, you can turn this checkbox off.
— Automatically match master timeline with media pool: If you turn on this option before importing any media into the Media Pool, or importing any timelines that will in turn import media into the Media Pool, you can create projects with a Master Timeline. When enabled, clips are added to and removed from the Master Timeline as they’re added to and removed from the Media Pool, so that the Master Timeline always contains all media in the Media Pool. Once media has been imported into a project, this setting cannot be changed.
— Save timeline thumbnails with project: To minimize project size, and maximize the speed of saving and loading projects, you should leave this checkbox unchecked. If you select the checkbox, all of your Timeline thumbnails will be stored inside every project, instead of in the
default directory that’s ordinarily dedicated to stills, during both Save and Auto Save operations. This provides a good history of the project but takes much longer to complete and uses more hard disk space.
— Use BGR pixel order for DPX v2: Lets you choose a different pixel order for projects using DPX version 2 media.
— Embed timecode in audio output: When turned on, directs DaVinci Resolve to output LTC timecode that’s embedded in channel 16 of the SDI stream and channel 2 of the analog audio output from your video interface.
— Use Timelines Bin: This option is only available to be changed before you add clips to the Media Pool; after you’ve added clips, it’s no longer available. Turning Use Timelines Bin on creates a dedicated Timelines bin in the Media Pool, at the top of the Bin List. When enabled, the Timelines bin contains all timelines in a project, and you’re prevented from putting timelines into any other bin in the Media Pool. Whenever you create or import a new timeline, it automatically appears in the Timelines bin. You can add subfolders to the Timelines bin for more specific organization.