
< Previous | Contents | Next >
For example, if you’re animating a blur, then the Key Frame row shows the frame each keyframe is positioned at, and the Blur1BlurSize row shows the blur size at each keyframe. If you change the Key Frame value of any keyframe, you’ll move that keyframe to a new frame of the Timeline.
Duplicating Spline Keyframes
Keyframes can be duplicated, either onto the same keyframe track or onto different tracks. This can save you time if you need to repeat a keyframe sequence at another time on the same segment, or even just create identically-timed keyframes on two different segments.
1 Select one or more keyframes you want to duplicate.
2 Hold Command and drag one of the selected keyframes to a new position.
Time Stretching Keyframes
If you select a range of keyframes in a keyframe track, you can turn on the Time Stretch tool in the lower left of the Keyframes Editor, to show a box you can use to squeeze and stretch the entire range of keyframes relative to one another, to change the overall timing of a sequence of keyframes without losing the relative timing from one keyframe to the next. Alternatively, you can turn on Time Stretch and draw a bounding box around the keyframes you want to adjust to create a time-stretching boundary that way. Click the Time Stretch tool again to turn it off.
![]()
Time stretching keyframes
Showing Keyframe Values
When a node and its accompanying segment have animated parameters, keyframes appear as colored tick marks in keyframe tracks to indicate when animated changes occur. If the tracks and splines are open on a parameter, choosing Show Values from the Keyframes Editor Option menu shows editable fields beneath each keyframe. These fields show each keyframe’s current value and allow you to edit them simply by entering a new number.
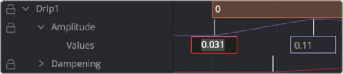
Show values from the Keyframes Editor Option menu