< Previous | Contents | Next >
Customizing the Keyframes Editor
There are a few ways you can change the appearance of the Keyframes Editor to better fit your needs. All these options are found by right-clicking anywhere within the Keyframes Editor and choosing an option from the contextual menu that appears.
Line Size
The Line Size option controls the height of each Timeline segment individually. It is often useful to increase the height of a Timeline bar, especially when editing or manipulating complex splines.
— To change the hight of just one segment: Right-click anywhere within the Keyframes Editor and choose a size from the Line Size submenu. The options are Minimum, Small, Medium, Large, and Huge.
— To change the height of all segments: Right-click anywhere within the Keyframes Editor and choose a size from the All Line Size submenu. The options are Minimum, Small, Medium, Large, and Huge.
Display Point Values
![]()
A more traditional view of keyframes is to view them as control points instead of vertical bars, making them easier to select for some people. From the Timeline contextual menu, you can right-click anywhere within the Keyframes Editor and choose Options > Display Point Values to change how keyframes look.
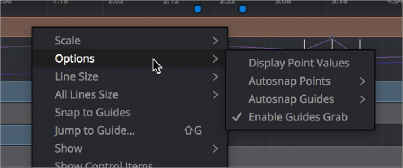
The Options submenu for changing Display Point Values
Here are the two options, compared.


Keyframes displayed as bars (left), and keyframes displayed as Point Values (right).
Displaying Audio Waveforms
You can display a MediaIn node’s audio waveform in the Keyframes Editor and use it as a guide as you add and move keyframes.
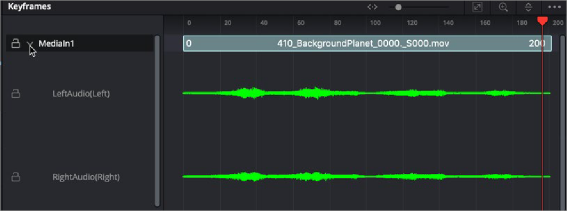
Waveforms are displayed in the Keyframes Editor for all MediaIn nodes
1 Open the Keyframes Editor.
2 Click the disclosure arrow next to the MediaIn node to view the audio waveform for that clip.
1 Open the Keyframes Editor.
2 In the Keyframes Editor, select the audio track of the waveform you want to modify.
3 Right-click over the audio waveform and choose Line Size > Minimum/Small/Medium/Large/Huge.
![]()
4 When using Fusion Studio, you can view the audio waveforms in the Keyframes Editor by displaying the Saver node.
1 Open the Keyframes Editor.
2 Expand the Saver track to view the audio waveform.
When you want to find the precise location of an audio beat, transient, or cue, you can slowly drag over the audio waveform to hear the audio. If you need to see more resolution in the waveform display, you can increase the size.
1 Open the Keyframes Editor.

TIP: Right-clicking a track in the Keyframes Editor and choosing All Line Size > Minimum/ Small/Medium/Large/Huge changes all the tracks and audio waveforms in the Keyframes Editor.
TIP: Right-clicking a track in the Keyframes Editor and choosing All Line Size > Minimum/ Small/Medium/Large/Huge changes all the tracks and audio waveforms in the Keyframes Editor.
TIP: Right-clicking a track in the Keyframes Editor and choosing All Line Size > Minimum/ Small/Medium/Large/Huge changes all the tracks and audio waveforms in the Keyframes Editor.
2 Right-click over the audio waveform and choose Line Size > Minimum/Small/Medium/Large/Huge.