< Previous | Contents | Next >
Dragging on a keyframe’s handles adjusts the slope of the segments passing through the spline. By default, the two control handles on a control point are locked together so that if one moves, the one on the other side moves with it. This maintains a constant tension through the keyframe. There are situations, however, when it is desirable to modify these control handles separately for a more pronounced curve or effect.
1 Select the control point to be modified.
2 Hold down the Command key and drag one of the control handles. They will now move independently of each other, as long as the Command key is held down.
— Right-click in the graph and choose Independent Handles from the Options contextual menu.
Enabling this option causes all the Bézier handles to be independent. This is the same as using the Command key when moving a handle, except it is applied to all control points until it is disabled.
Reducing Points
When there are too many control points too close together on a spline, you can choose Reduce Points to decrease their number, making it easier to modify the remaining points. The overall shape of the spline is maintained as closely as possible while eliminating redundant points from the path.
1 Select the range of keyframes you want to thin out.
2 Right-click in the graph area and choose Reduce Points from the contextual menu.
![]()
3 When the Reduce Points dialog appears, drag the slider to a lower value.

TIP: When the value is 100, no points will be removed from the spline. Use smaller values to eliminate more points.
TIP: When the value is 100, no points will be removed from the spline. Use smaller values to eliminate more points.
TIP: When the value is 100, no points will be removed from the spline. Use smaller values to eliminate more points.
You can set the slider value as low as possible as long as the spline still closely resembles the shape of your original spline.
Filtering the Spline Editor
The animation splines for multiple parameters can be displayed within the Spline Editor simultaneously, and Fusion offers several ways for you to choose which spline to view and which to edit.
A complex composition can easily contain dozens, if not hundreds, of animation curves. As a composition grows, locating a specific spline can become more difficult. There are two ways to filter the splines shown in the Spline Editor: display selected tools only or create a filter to show only certain tools.
The Spline Editor includes different ways to control which splines are displayed. The majority of these options are available in the Options menu, located in the upper-right corner of the Spline Editor panel.
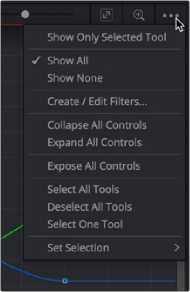
The Options menu is used to control which splines are
displayed in the Spline Editor
— Show Only Selected Tool: You can choose to limit the splines displayed in the Spline Editor by showing only the splines from selected tools. Choosing this option at the top of the Options menu displays only the splines for tools currently selected in the Node Editor.
![]()
— Show All/None: The default behavior of the Spline Editor displays all the splines for all the nodes with animated parameters. You can override this by enabling Show Only Selected Tools in the Options menu. You can also disable the Show All setting by choosing Show None, in which case the Spline Editor remains empty.
— Expose All Controls: The Expose All Controls option is a way of not filtering the parameters. Choosing this option displays all parameters in the Spline Editor header for all nodes in the Node Editor. It can be a fast way of activating one of the parameters and automatically adding an animation spline for it if one does not exist.
— With a large number of nodes displayed, which themselves might have a large number of parameters, this might lead to cluttering and slowing down the interface. This option is most effective when used in conjunction with the Show Only Selected Tool option to limit the number of nodes and parameters displayed and yield optimum performance.
— Follow Active: The Follow Active option is located by right-clicking in the graph and choosing Options > Follow Active. This option provides a way to filter the splines in the graph while not filtering the header list of tools. Where the Show Only Selected Tool option hides other tools in the header, the Follow Active option leaves the header displaying all the tools but automatically enables only the splines of the Active tool.