< Previous | Contents | Next >
There are three types of motion paths: Polyline paths, XY paths, and 3D motion paths for 3D scenes.
— A Polyline path is generated by applying the path modifier. It uses two splines to define the path; one for the shape of the path displayed in the viewer, and a Displacement spline for the speed of the object along the path, displayed in the Spline Editor. The Polyline path is the default type of path modifier, and most documentation in this chapter assumes that this type is used.
— The XY path modifier employs a spline for the X position of the point and another for the Y position. The XY path modifier is explained in detail later in this chapter.
— 3D motion paths pertain only to positional controls within 3D scenes.
Polyline Path
Polyline paths are the easiest motion paths to work with. You can use the spline shape in the viewer to control the shape of the path, while a single Displacement curve in the Spline Editor is used to control the acceleration along the path. The most obvious way to create a Polyline motion path is by keyframing the Center X/Y parameter of a Transform node in the Inspector.
1 Position the playhead on the frame where the motion will begin.
![]()
2 In the Inspector, click the gray Keyframe button to the right of the Center X and Y parameters. This action applies the path modifier in the Modifiers tab in the Inspector.
3 Adjust the Center X and Y for the first keyframe position.
4 Position the playhead on the frame where the motion should change or stop.
5 In the Inspector, change the Center X and Y parameters to set a keyframe for the new location automatically.
6 In the viewer, modify and refine the motion path by selecting a control point and using any of the spline controls in the viewer toolbar.
7 Open the Spline Editor and adjust the Displacement spline to control the speed of the object along the path.
Keyframing Center X/Y is not the only way to apply the path modifier. An alternative method is to apply the path modifier to the Center X/Y parameter either in the Inspector or using the coordinate control in the viewer.
1 Position the playhead on the frame where the motion will begin.
2 Position the center coordinate control for the object, or effect, at its starting position.
3 Right-click the onscreen center coordinate control in the viewer (or over the Center X and Y parameter in the Inspector), and choose Path from the contextual menu for that control.
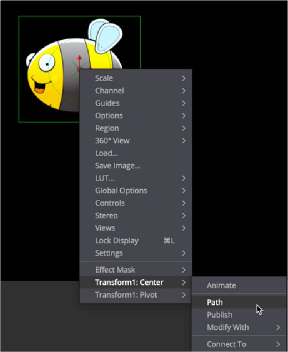
Applying a path modifier to the center of a Transform node
![]()
The object now has a path modifier applied, so without setting a keyframe you can drag the object to begin creating a motion path in the viewer.
4 Move the playhead to a new frame.
5 Drag the onscreen coordinate control or adjust the Offset or Center values in the Inspector. A keyframe is automatically created on the motion path, and a polyline is drawn from the original keyframe to the new one.
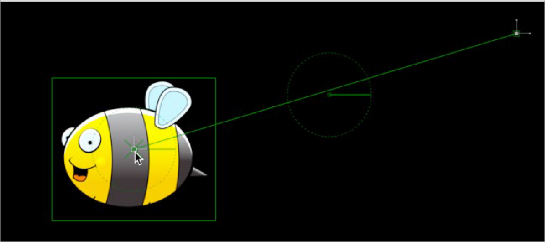
Two keyframes spaced several frames apart display a motion path showing the direction of animation.
6 The position of the center control is interpolated between the two keyframes. You can continue adding points by moving the playhead and adjusting the object’s position until the entire motion path you need is created. For motion paths, there’s no need to close the spline path; you can leave it open.
7 Upon completion, set the polyline to Insert and Modify mode by selecting a point on the path and pressing Command-I or clicking the Insert and Modify button on the toolbar. Don’t worry too much about the overall shape of the motion path at this point. The shape can be refined further by adding additional points to the polyline and modifying the existing points.
A final alternative method for creating a motion path is to draw a spline shape first and then connect a path modifier to the spline. Using any of Fusion’s spline tools, you can draw the shape of the path and then connect the path modifier to the published spline. Once the path modifier and the published
spline are connected, you can keyframe the Displace parameter to move an image along the path. This method is useful when you want to use a paint stroke or mask shape as a motion path.
1 Draw a polygon mask or paint stroke in the shape of the path you want to use. You do not have to close the mask shape.
![]()
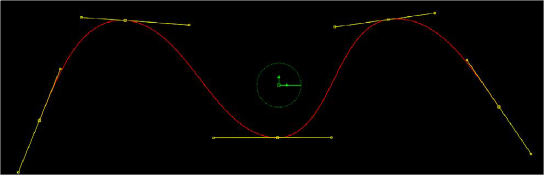
An open Polyline mask shape
2 When done drawing the shape, click the Insert and Modify button in the viewer toolbar to leave the mask shape as an open spline.
3 At this point you can select any of the control points along the spline and press Shift-S to make them smooth or Shift-L to make them linear.
All mask polylines have animation enabled by default, but that is usually not desirable for a motion path. You will need to remove this keyframe animation if you are using a mask shape.
4 At the bottom of the Inspector, right-click on the “Right-click here for shape animation” label and choose Remove Polygon1Polyline.
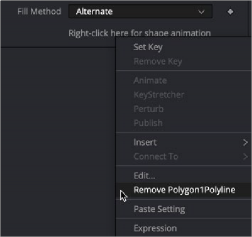
Right-clicking at the bottom of the Inspector to remove auto-keyframing from a mask shape
5 Right-click at the bottom of the Inspector again and select Publish to give other nodes access to this spline shape. (For a paint stroke, you will need to make the Stroke editable first by clicking the Make Editable button in the Stroke Controls.)
This enables the Modifiers tab with the Published Polyline modifier. This published spline can be used to define the shape of splines in other nodes.
6 Connect a Transform node to the image you want to have follow the path.
7 Right-click over the Center X/Y parameter in the Inspector and choose Path. This adds a path modifier into the Modifiers tab.
8 In the Inspector, click the Modifiers tab and double-click the Path1 heading to open its parameters.
The Displacement parameter already has a keyframe on it automatically. You’ll want to remove that so you can set your own.
![]()
9 Click the red keyframe button to the right of the Displacement parameter to remove it.
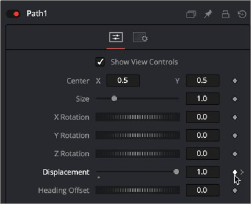
Remove the automatic displacement keyframe prior to creating your own keyframes.
10 At the bottom of the Modifiers tab, right-click on “Right-click here for shape animation” and choose Connect To > Polygon1Polyline.
11 To quickly see where your object has gone, drag the Displacement slider back and forth.
12 You may want to use the Size parameter to adjust the size of the overall path.
The Displacement slider is meant to be keyframed for animating the object along the path.