< Previous | Contents | Next >
In terms of functionality, it makes no difference which method you use to generate the path modifier. All the above methods are just different ways to get to the same point. Whichever way you decide to add the path modifier, the Modifiers tab contains controls for the path.
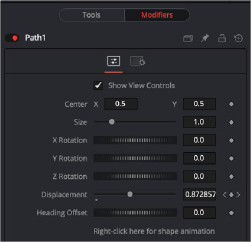
Creating a path adds controls to the Modifiers tab in the Inspector.
You can use the path modifier controls in the Inspector to change the position, size, and rotation of the entire path shape. The Displacement parameter is represented as a spline in the Spline Editor, which determines the object’s position along the path and the Heading Offset is used for the orientation along the path.
Controlling Speed and Orientation along a Path
![]()
Every Polyline path has an associated Displacement spline in the Spline Editor. The Displacement spline represents acceleration, or the position of the animated object along its path, represented as a value between 0.0 and 1.0.
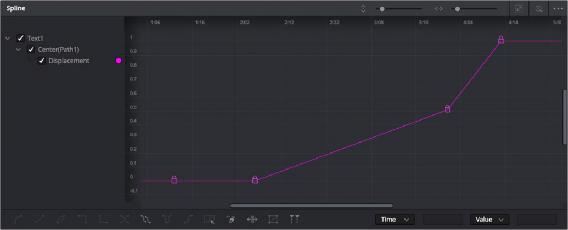
The Displacement curve of a Poly path represents the acceleration of an object on a path.
Smaller values are closer to the beginning of a path, while larger values are increasingly closer to the end of the path.
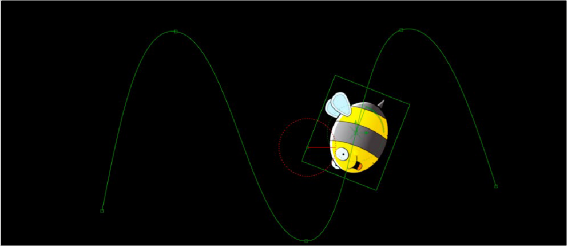
For instance, let’s say you have a bumblebee that bobs up and down as it moves across the screen. To have the bee accelerate as it moves up and down but slow down as it reaches its peaks and valleys you use the Displacement curve.
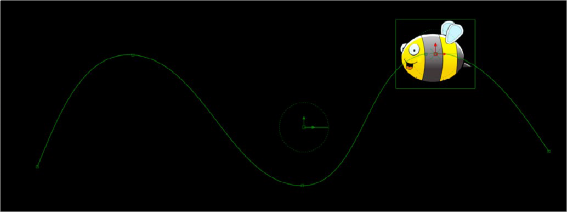
A curvy path defined by a spline shape
The curved shape path does not define how fast the bee moves. The speed of the bee at any point along the path is a function of the Displacement parameter. You can control the Displacement parameter either in the Modifiers tab or in the Spline Editor.
1 Position the playhead at the start of the animation.
2 In the Modifiers tab, drag the Displacement parameter to 0.0. This positions the object at the start of the path.
3 Click the Keyframe button to the right of the Displacement parameter.
![]()
4 Position the playhead somewhere further into the comp and drag the Displacement parameter until the object is where you want it to be based on the current frame.
5 Continue updating the playhead and the Displacement parameters at key points in the comp until you have reached the end of the path.
After the initial animation is set, you can use the Displacement curve in the Spline Editor to adjust the timing.
1 Open the Spline Editor and enable the Displacement spline in the header.
2 Move control points horizontally closer together to increase the speed between the two points while maintaining the location of the object along the path.
A longer, flatter curve between two points indicates a slower rate of change.
3 Drag a control point up or down to change its location on the path while maintaining the timing between two points.
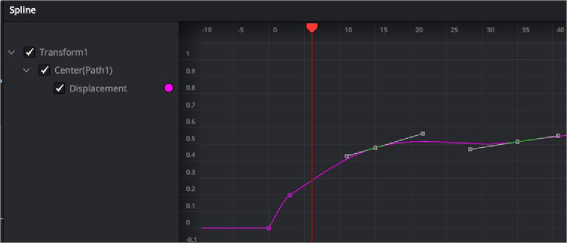
A Displacement curve in the Spline Editor

TIP: Holding down the Option key while clicking on the spline path in the viewer will add a new point to the spline path without adding a Displacement keyframe in the Spline Editor. This allows you to refine the shape of the path without changing the speed along the path.
TIP: Holding down the Option key while clicking on the spline path in the viewer will add a new point to the spline path without adding a Displacement keyframe in the Spline Editor. This allows you to refine the shape of the path without changing the speed along the path.
TIP: Holding down the Option key while clicking on the spline path in the viewer will add a new point to the spline path without adding a Displacement keyframe in the Spline Editor. This allows you to refine the shape of the path without changing the speed along the path.
Using a Path Modifier to Adjust Orientation
The Heading parameter is used to adjust the orientation of the object along the path. For instance, if you want the bee in our animation to auto-orient based on the direction of the path, you can connect the bee’s angle to the Heading parameter.
![]()
1 Right-click over an object’s angle parameter in a Transform node.
2 Choose Connect To > Path > Heading.
In our example comp, the bee now auto-orients as the path descends and rises.
The Transform’s angle parameter connected to the path modifier’s Heading parameter