< Previous | Contents | Next >
To remove a SimpleExpression, right-click the name of the parameter, and choose Remove Expression from the contextual menu.
Customizing User Controls
Each tool’s parameters are organized in a logical order in the Inspector. The most used controls are closer to the top, and the more subtle refinement controls are lower in the list. Sometimes, though, you may want to add, hide, or change the controls. You often need to do this for SimpleExpressions and macros, but you may also do this for usability and aesthetic reasons for favorites and presets.
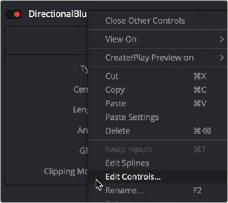
Custom controls can be added or edited via the Edit Control dialog, which you access by right-clicking over the node’s name in the Inspector and choosing Edit Controls from the menu.
![]()
Choose Edit Controls to create and customize parameters
In the Edit Control dialog, you use the ID menu to select an existing parameter or create a new one. You can name the control and define whether it is a text field, number field, or a point using the Type attributes list.
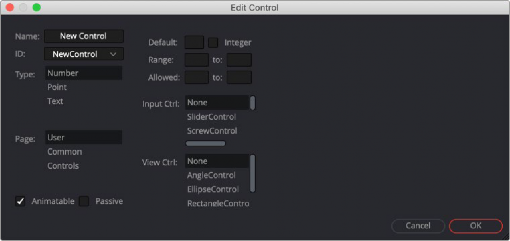
Edit Control dialog
You use the page list to assign the new control to one of the tabs in the Inspector. There are also settings to determine the defaults and ranges, and whether it has an onscreen preview control. The Input Ctrl box contains settings specific to the selected Type, and the View Ctrl attributes box contains a list of onscreen preview controls to be displayed, if any.
All changes made using the Edit Controls dialog get stored in the current tool instance, so they can be copied/ pasted to other nodes in the comp. However, to keep these changes for other comps, you must save the node settings, and add them to the Bins in Fusion Studio or to your favorites.
As an example, we’ll customize the controls for a DirectionalBlur:
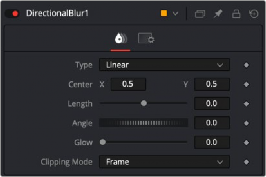
The Inspector for a default direction blur
Let’s say we wanted a more interactive way of controlling a linear blur in the viewer, rather than using the Length and Angle sliders in the Inspector. Using a SimpleExpression, we’ll control the length and angle parameters with the Center parameter’s onscreen control in the viewer. The SimpleExpression would look something like this:
![]()
sqrt(((Center.X-.5)*(self.Input.XScale))^2+((Center.Y-.5)*(self.Input. YScale)*(self.Input.Height/self.Input.Width))^2)
atan2(.5-Center.Y , .5-Center.X) * 180 / pi
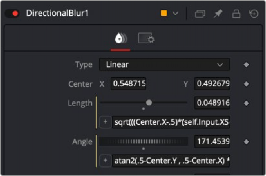
DirectionalBlur controlled by the Center’s position.
This admittedly somewhat advanced function does the job fine. Dragging the onscreen control adjusts the angle and length for the directional blur. However, now the names of the parameters are confusing. The Center parameter doesn’t function as the center anymore. It is the direction and length
of the blur. It should be named "Blur Vector" instead. You no longer need to edit the Length and Angle controls, so they should be hidden away, and since this is only for a linear blur, we don’t need the
Type menu to include Radial or Zoom. We only need to choose between Linear and Centered. These changes can easily be made in the Edit Controls dialog.
1 In the Edit Control dialog, select the Center from the ID list.
2 A dialog will appear asking if you would like to Replace, Hide, or Change ID. We’ll choose Replace.
3 Change the Name to Blur Vector.
4 Set the Type to Point.
5 Select Controls in the Page list. (Controls is the first tab in the Inspector, normally.)
6 Click OK.
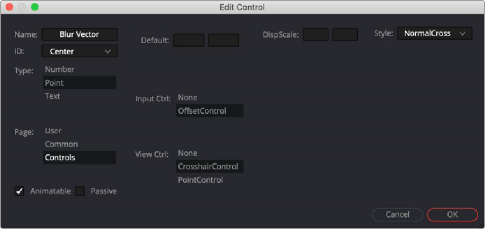
DirectionalBlur Center parameter name changed to Blur Vector.
![]()
The new Blur Vector parameter now appears in the Inspector. The internal ID of the control is still Center, so our SimpleExpressions did not change.
1 In the Edit Control dialog, select the Length from the ID list.
2 Select Controls from the Page list.
3 In the input Ctrl list, select Node.
4 Click OK.
5 In the Edit Control dialog, select the Angle from the ID list.
6 In the input Ctrl list, select Node.
7 Click OK.
1 In the Edit Control dialog, select the Type from the ID list.
2 Select Controls from the Page list.
3 Select Radial from the Items list and click Del to remove it.
4 Select Zoom from the Items list and click Del to remove it.
5 Click OK.