< Previous | Contents | Next >
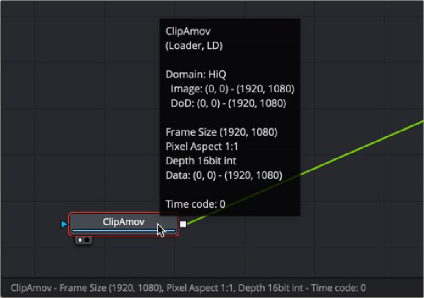
If you aren’t sure what the color depth process is for a tool, you can position the pointer over the node’s tile in the Node Editor, and a tooltip listing the color depth for that node will appear on the Status bar.
Hover over a node to view its Color Bit Depth setting.

TIP: When working with images that use 10-bit or 12-bit dynamic range or greater, like Blackmagic RAW or Cinema DNG files, set the Depth menu in the Inspector to 16-bit float or 32-bit float. This preserves highlight detail as you composite.
TIP: When working with images that use 10-bit or 12-bit dynamic range or greater, like Blackmagic RAW or Cinema DNG files, set the Depth menu in the Inspector to 16-bit float or 32-bit float. This preserves highlight detail as you composite.
TIP: When working with images that use 10-bit or 12-bit dynamic range or greater, like Blackmagic RAW or Cinema DNG files, set the Depth menu in the Inspector to 16-bit float or 32-bit float. This preserves highlight detail as you composite.
![]()
Combining Images with Different Color Depths
You can combine images with different color depths in a single composition. When images of different color depths are combined, the image from the background input of the node determines the bit depth output, and the foreground image is adjusted to match.
Advantages of Floating-Point Processing
There are two major advantages to floating-point processing that make the additional RAM requirements and longer render times worth your while. The first benefit is that floating-point values are more accurate than integer values. The second benefit is the preservation of shadow and highlight values that go beyond the normal tonal range.
Greater Accuracy
Using 16- or 32-bit floating-point processing prevents the loss of accuracy that can occur when using 8- or 16-bit integer processing. The main difference is that integer values cannot store fractional or decimal values, so rounding occurs in all image processing. Floating-point processing allows decimal or fractional values for each pixel, so it is not required to round off the values of the pixel to the closest integer. As a result, color precision remains virtually perfect, regardless of how many operations are applied to an image.
If you have an 8-bit pixel with a red value of 75 (dark red) and that pixel is halved using a Color Correction tool, the pixel’s red value is now 37.5. Since you cannot store decimal or fractional values in integers, that value is rounded off to 37. Doubling the brightness of the pixel with another Color Correction tool should bring back the original pixel value of 75 but because of rounding 37 x 2 is 74. The red value lost a full point of precision due to integer rounding on a very simple example. This is a problem that can result in visible banding over several color corrections. Similar problems arise when merging images or transforming them. The more operations that are applied to an image, the more color precision is lost to rounding when using 8- or 16-bit integer processing.
Accessing Extended Highlights and Shadows
Increasingly more productions are capturing out-of-range images thanks to digital cinema cameras like the Blackmagic URSA Mini Pro and even the Pocket Cinema 6K camera. These cameras capture very high dynamic range RAW images and maintain color detail even in heavily over or underexposed frames. The extended white color detail can also give very nice, natural results when blurred, glowed, color corrected, or even just when faded or dissolved. While it is possible to work with these RAW images using integer data, doing so results in the loss of the extended range values, losing all
detail in the highlights and shadows. Float processing makes working with logarithmic RAW images considerably easier by preserving highlight and shadow detail.
If you have an 8-bit pixel that has a red value of 200 (bright red) and a Color Gain tool is used to double the brightness of the red channel, the result is 200 x 2, or 400. However, 8-bit color values are limited to a range of 0 through 255. So the pixel‘s value is clipped to 255, or pure red. If now the brightness is halved, the result is half of 255, or 127 (rounded), instead of the original value of 200.
When processing floating-point colors, pixel values brighter than white or darker than black are maintained. There is no value clipping. The pixel is still shown in the viewer as pure red, but if float processing is used instead of 8-bit, the second operation where the gain was halved would have restored the pixel to its original value of 200.
![]()
Using Float with 8-Bit HD Video
There is also some value to using float color depths with an 8-bit HD video when the images require a lot of color correction. Using float helps maintain precision by avoiding the rounding errors common to 8-bit processing, as described above.
Detecting Extended Highlight and Shadow Values
Although floating-point processing preserves extended values below 0.0 and greater than 1.0, also called “out-of-range values,” the viewer still displays them as black or white. This can make it difficult for you to determine the overall dynamic range of an image.
— Right-click in the viewer and choose Options > Normalized Color Range.
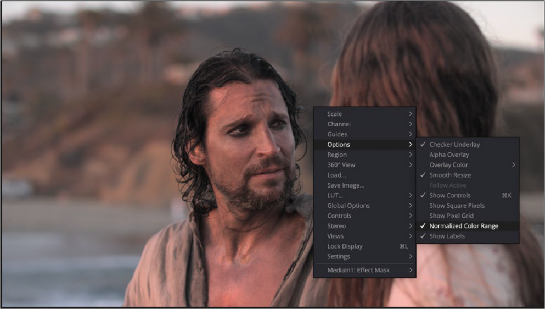
Use the Normalized Color Range pop-up menu to detect out-of-range images.
Enabling this display mode rescales the color values in the image so that the brightest color in the image is remapped to a value of 1.0 (white), and the darkest is remapped to 0.0 (black).
The 3D Histogram subview can also help visualize out-of-range colors in an image. For more information, see Chapter 69, “Using Viewers.” in the DaVinci Resolve Reference Manual, or Chapter 7 in the Fusion Reference Manual.
Clipping Out-of-Range Values
![]()
When processing in floating point, there may be situations where the out-of-range values in an image need to be clipped. The Brightness/Contrast tool provides checkboxes that can be used to clip out-of- range values to 0 or 1.
For example, there may be files that contain out-of-range alpha values. Since the alpha channel represents the opacity of a pixel, it makes little sense to be more than completely transparent or more than fully opaque, and compositing such an image may lead to unexpected results. To easily clip alpha values below 0 and above 1, add a Brightness/Contrast toolset to Clip Black and Clip White, with only the Alpha checkbox selected.
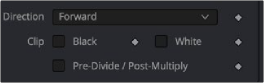
Clip White and Clip Black settings in Brightness/ Contrast can be used to clip mattes.
Alternatively, you can clip the range by adding a Change Depth node and switching to 8-bit or 16-bit integer color depths.