
< Previous | Contents | Next >
The default option is Merge, but you can also choose Subtract, Minimum, Maximum, Multiply, or any other operation that will give you the mask boolean interaction you need. Additionally, a pair of Invert and Solid checkboxes let you further customize how to combine the current mask with the one before it.
The Invert and Solid options
Mask Inputs on Other Nodes

TIP: If you select a node with an empty effect mask input, adding a Mask node automatically connects to the open effect mask input.
TIP: If you select a node with an empty effect mask input, adding a Mask node automatically connects to the open effect mask input.
TIP: If you select a node with an empty effect mask input, adding a Mask node automatically connects to the open effect mask input.
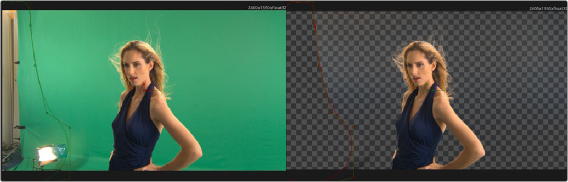
Masks can be used for a variety of reasons, so there are several categories of mask inputs that different nodes include to accommodate these different uses. Incidentally, in most cases you can connect either masks or mattes to a mask input to take advantage of that input’s functionality.
Effects Mask Inputs
![]()
Almost every node in Fusion has an Effect mask input (colored blue), which lets you choose which parts of the image will or will not be affected by that node.
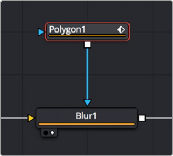
A Blur node with a Polygon node masking its effect
While masks (or mattes) are connected via an input, they are actually applied “post effect,” which means the node first applies its effect to the entire image, and then the mask is used to limit the result by copying over unaffected image data from the input.

TIP: Effects masks define the domain of definition (DoD) for that effect, making it more efficient.
TIP: Effects masks define the domain of definition (DoD) for that effect, making it more efficient.
TIP: Effects masks define the domain of definition (DoD) for that effect, making it more efficient.
Although many nodes support effects masking, there are a few where this type of mask does not apply—notably Savers, Time nodes, and Resize, Scale, and Crop nodes.
A Polygon node used as a mask to limit the Blur node’s effect
Pre-Masking Inputs
Unlike effect masks, a pre-mask input (the name of which is usually specific to each node using them) is used by the node before the effect is applied. This usually causes the node to render more quickly and to produce a more realistic result. In the case of the Highlight and the Glow nodes, a pre-mask restricts the effect to certain areas of the image but allows the result of that effect to extend beyond the limits of the mask.
The advantage to pre-masking is that the behavior of glows and highlights in the real world can be more closely mimicked. For example, if an actor is filmed in front of a bright light, the light will cause a glow in the camera lens. Because the glow happens in the lens, the luminance of the actor will be affected even though the source of the glow is only from the light.
![]()
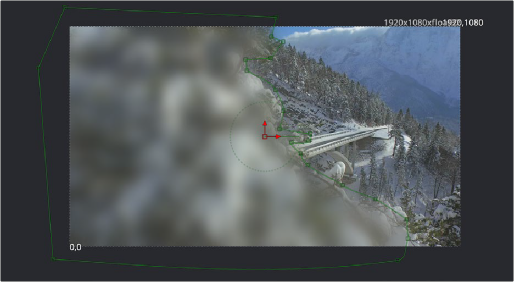
In the case of the DVE node, a pre-mask is used to apply a transformation to a selected portion of the image, without affecting portions of the image outside of the mask. This is useful for applying transformations to only a region of the image.
Garbage Matte Inputs
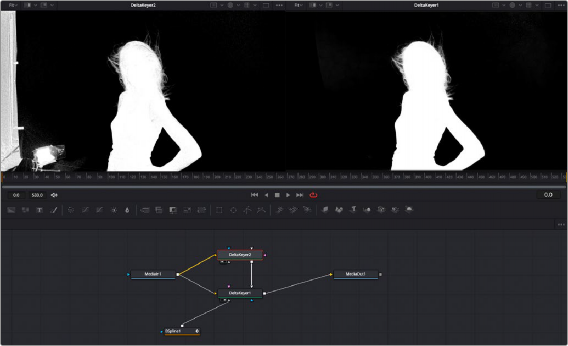
Garbage Matte inputs (usually colored gray) are used to exclude light stands, rigging, and boom microphones that intrude upon masks being pulled via blue-screen and green-screen keys. In the following example, a lighting stand to the left is removed from the image via a B-Spline node’s mask connected to the Garbage Matte input of the DeltaKeyer node.
A B-Spline node is connected to the Garbage Matte input of a DeltaKeyer node to eliminate a light stand at the left of frame

TIP: You can quickly add a mask node to the Effect/Solid/Garbage Matte inputs of a keyer node by right-clicking the header bar of that node in the Inspector and
choosing whichever mask node you want to use from the Effect Mask, SolidMatte, and GarbageMatte submenus.
TIP: You can quickly add a mask node to the Effect/Solid/Garbage Matte inputs of a keyer node by right-clicking the header bar of that node in the Inspector and
choosing whichever mask node you want to use from the Effect Mask, SolidMatte, and GarbageMatte submenus.
TIP: You can quickly add a mask node to the Effect/Solid/Garbage Matte inputs of a keyer node by right-clicking the header bar of that node in the Inspector and
choosing whichever mask node you want to use from the Effect Mask, SolidMatte, and GarbageMatte submenus.
You choose whether a garbage matte is applied to a keying node as opaque or transparent in the Inspector for the node to which it’s connected.
Solid Matte
Solid Matte inputs (colored white) are intended to fill unwanted holes in a matte, often with a less carefully pulled key producing a dense matte with eroded edges, although you could also use a polygon or mask paint to serve this purpose. In the example below, a gentle key designed to preserve the soft edges of the talent’s hair leaves holes in the mask of the woman’s face, but using another DeltaKeyer to create a solid matte for the interior of the key that can be eroded to be smaller than the original matte lets you fill the holes while leaving the soft edges alone. This is also sometimes known as a hold-out matte.
![]()
Filling in holes in the mask pulled by the DeltaKeyer1 node (left) with another, harder but eroded key in DeltaKeyer2 that’s connected to the SolidMatte input of DeltaKeyer1 (right)