
< Previous | Contents | Next >
Creating and Editing Polylines In-Depth
This section covers the Polygon node’s capabilities in depth.
The Polyline Toolbar
Whenever a node that contains one or more polylines is selected, the polyline is shown on all viewers and the Polyline toolbar is displayed along the side of each viewer. The toolbar contains several buttons that make switching polyline modes and options easy to access.
The Polyline toolbar
If you hover the pointer over any of the Polyline toolbar buttons, a tooltip that describes the button’s function appears. Clicking on a button will affect the currently active polyline or the selected polyline points, depending on the button.
You can change the size of the toolbar icons, add labels to the buttons, or make other adjustments to the toolbar’s appearance in order to make polylines easier to use. All the options can by found by right-clicking on the toolbar and selecting from the options displayed in the contextual menu.
Selecting a Specific Polyline
![]()
It is possible to have several polylines in the viewer at once if you select multiple Mask nodes in the Node Editor, so it’s important to be able to switch between polylines easily.
— Click one of the polyline’s control points or segments.
— Press Tab and Shift-Tab to cycle between available polylines.
— Right-click in the viewer and choose the desired polyline by name from the Controls > Select menu.
Polyline Creation Modes
There are several different modes available from the toolbar for creating and modifying polylines. The specific mode used when a polyline is first added will depend on whether it is used as a path or a mask.
Each of the modes is described in more detail below.
Click Append
This mode is the default mode for mask creation. It’s used to quickly define the rough shape of the mask, after which you switch to Insert and Modify mode to refine the mask further.
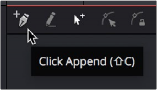
The Click Append toolbar button (Shift-C)
1 Select Click Append from the toolbar or press Shift-C.
2 Click the pointer where you want to start the shape.
3 Move and click the pointer to append a point to the last one.
4 To close the shape, place the mouse pointer over the first point created and click when the pointer changes shape.
When a shape is closed, the polyline is automatically switched to Insert and Modify mode.

TIP: Holding Shift while you draw a mask constrains subsequent points to 45-degree angles relative to the previous point. This can be very helpful when drawing
regular geometry.
TIP: Holding Shift while you draw a mask constrains subsequent points to 45-degree angles relative to the previous point. This can be very helpful when drawing
regular geometry.
TIP: Holding Shift while you draw a mask constrains subsequent points to 45-degree angles relative to the previous point. This can be very helpful when drawing
regular geometry.
Although the Click Append mode is rarely used with paths, it can be helpful when you know the overall shape of a motion path, but you don’t yet know the timing.
![]()
Insert and Modify
Masks, which are created in Click Append mode, automatically switch to Insert and Modify mode when the mask shape is closed. You can also manually switch to this mode by clicking the Insert and Modify button in the toolbar or using the Shift-I keyboard shortcut. This mode makes it easier to add additional points and refine the shape of the mask. Dragging the control points or direction handles modifies existing points on the polyline.
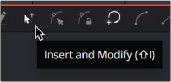
The Insert Modify toolbar button (Shift-I)
Insert and Modify mode is also the default mode for creating motion paths. A new control point is automatically added to the end of the polyline, extending or refining the path, any time a parameter that is animated with a motion path is moved.