
< Previous | Contents | Next >
TIP: The center point and rotation of a shape are not auto-animated. Only the control points are automatically animated. To animate the center position or rotation, enable keyframes for that parameter in the Inspector.
TIP: The center point and rotation of a shape are not auto-animated. Only the control points are automatically animated. To animate the center position or rotation, enable keyframes for that parameter in the Inspector.
TIP: The center point and rotation of a shape are not auto-animated. Only the control points are automatically animated. To animate the center position or rotation, enable keyframes for that parameter in the Inspector.
Animating masks is surprisingly easy. When Polygon or B-Spline masks are added to the Node Editor, the spline’s control points are automatically ready to be animated. All you have to do to animate a mask is move the playhead to a new frame and then change the shape of the mask. A new keyframe is added in the Spline Editor and Timeline Editor. This one keyframe controls the position of all control points for that mask at that frame. Once two or more keyframes have been created, the shape of the polygon or B-Spline is automatically interpolated from one keyframe to the next.
To adjust the overall timing of the mask animation, you edit the Keyframe horizontal position spline using the Spline Editor or Timeline Editor. Additional points can be added to the mask at any point to refine the shape as areas of the image become more detailed.
Removing Animation from a Polyline Mask
If you want a Polyline mask to remain static, you can remove the automatic animation setting. In the Inspector for the mask, right-click in the bottom of the panel where it says Right Click Here For
Shape Animation. From the contextual menu, choose Remove Bézier Spline. If you decide you need to animate the mask at a later time, right-click in the same area again and choose Animate.
![]()
Adding and Removing Points from an Animated Mask
When adding points to an animated mask, the new point is fit into the shape at all keyframes. Deleting a point removes that point from all keyframes in the animated mask.
Publishing Specific Control Points
Although you can rapidly animate the entire shape of a polyline using a single keyframe, by default the Spline Editor and Timeline display only one keyframe for the entire shape at any given frame.
This default keyframing behavior is convenient when quickly animating shapes from one form to another, but it doesn’t allow for specific individual control points that need to be keyframed
independently of all other control points for a particular shape. If you’re working on a complex mask that would benefit from more precise timing or interpolation of individual control points, you can expose one or more specific control points on a polyline by publishing them.
Be aware that publishing a control point on a polyline removes that point from the standard animation spline. From that point forward, that control point can only be animated via its own keyframes
on its own animation spline. Once removed, this point will not be connected to paths, modifiers, expressions, or trackers that are connected to the main polyline spline.
— Click on the Publish Points button in the Polyline toolbar.
— Select Publish Points from the Polyline’s contextual menu.
A new coordinate control is added to the Polyline mask controls for each published point, named Point 0, Point 1, and so on.
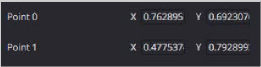
The Publish Points controls in the Inspector
The onscreen control indicates published points on the polyline by drawing that control point much larger. Once a published point is created, it can be connected to a tracker, path, expression, or modifier by right-clicking on this control and selecting the desired option from the point’s contextual menu.
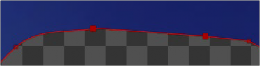
The published point in the viewer
Using “Publish to Path” to Preserve Animation
![]()
When a point is published, any animation already applied to that point is removed. However, if you need to keep the animation, you can use the “Publish to Path” option. This Polyline contextual menu option publishes the selected points and converts their existing animation to a path. You can also use the Publish to Path button in the Polyline toolbar.
Using “Follow Published Points” to Add Points
There are times when you will need to have control points that lie between two other published points follow the motion of the published points, while still maintaining their relative offset and shape. For this reason, points in a Polyline mask can be set to “Follow Published Points” using the Polyline’s contextual menu.
When a point of an effect mask is set to follow points, the point will be drawn as a diamond shape rather than a small box.
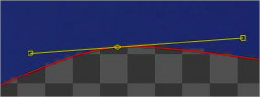
A control point set to Follow Published Points
When this mode is enabled, the new “following” control points will maintain their position relative to the motion of any published points in the mask, while attempting to maintain the shape of that segment of the mask. Unlike published points, the position of the following points can still be animated to allow for morphing of that segment’s shape over time.