< Previous | Contents | Next >
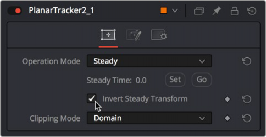
With the second PlanarTracker node selected, we go into the Inspector and turn on the Invert Steady Transform checkbox, which inverts the steady warp transform to restore the image back to the way it was.
Turning on Invert Steady Transform to try to restore the image back to the way it was
This is just one example of how to set up a Planar Tracker and Paint node. In some instances, you made need to do more work with masks and layering, but the above example gives you a good starting point.
Painting a Clean Plate
On simple clips, planar tracking the clone paint strokes may work fine. In other cases, you may not be able to steady the clip, or the strokes might appear like they are “bubbling.” Paint is just a single
stroke repeated over multiple frames. Each painted frame has the potential to appear differently than the one before or after. Often, the more reliable way to use paint is by creating what is referred to as a “clean plate.” Create one good painted frame and freeze it. Then use the Planar Tracker to track the cleaned area over the top of the original. The benefit is that there is only a single paint stroke instead
![]()
of repeated paint strokes that potentially show unwanted artifacts. For this next example, we continue with the previous clip, but now the technique is to freeze, mask, and composite just a single frame of the fixed forehead over the original clip.
Creating a Freeze Frame and Clean Plate
As in the previous example, you still track the clip using the Planar Tracker. After tracking, you can branch out from the MediaIn (or Loader node if you are using Fusion Studio) into a Time Stretcher to create the freeze frame.
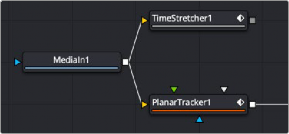
Time Remap is used to retime or freeze a clip
Disable the default Keyframe in the Time Stretcher and enter the frame you want to freeze. If you have already performed a Planar Track, then entering the frame you set as the Reference Frame is usually a good frame to freeze.
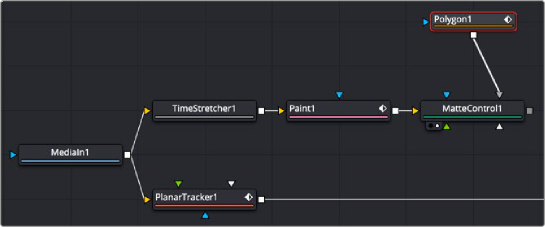
To create the clean plate, you connect the paint node to the output of the Time Stretcher. Clone over the areas you want to hide, and you now have a single clean frame. Now you need to composite the clean area over the original.
Isolating the Painted Forehead
First, we need to mask out just the man’s painted forehead. We can do this by connecting a MatteControl node to the output of the Paint node and then connect a Polygon node to the garbage matte input. This lets us draw a shape with the Polygon node and use it as a mask to crop out the man’s painted forehead.
![]()
Add a MatteControl node with a garbage mask to cut out the painted forehead

TIP: When it comes to using masks to create transparency, there are a variety of ways to connect one—for example, (a) attach the image to the background input of a Brightness/Contrast node and attach a Polygon mask node to the effect mask input. On the Brightness/Contrast node, enable the Alpha channel and lower the Gain slider to darken a hole, or (b) using Channel Booleans to copy channel data to the alpha from a Polygon node attached to the foreground input and the image attached to the background input.
TIP: When it comes to using masks to create transparency, there are a variety of ways to connect one—for example, (a) attach the image to the background input of a Brightness/Contrast node and attach a Polygon mask node to the effect mask input. On the Brightness/Contrast node, enable the Alpha channel and lower the Gain slider to darken a hole, or (b) using Channel Booleans to copy channel data to the alpha from a Polygon node attached to the foreground input and the image attached to the background input.
TIP: When it comes to using masks to create transparency, there are a variety of ways to connect one—for example, (a) attach the image to the background input of a Brightness/Contrast node and attach a Polygon mask node to the effect mask input. On the Brightness/Contrast node, enable the Alpha channel and lower the Gain slider to darken a hole, or (b) using Channel Booleans to copy channel data to the alpha from a Polygon node attached to the foreground input and the image attached to the background input.
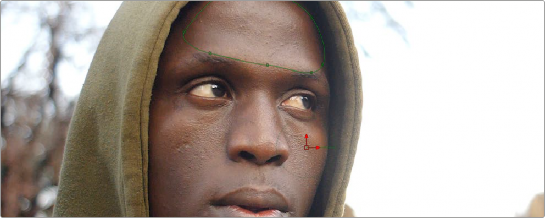
Drawing a Polygon Mask
After moving the playhead to the first frame of the clip, we’re ready to draw a mask to isolate the “clean plate” forehead. Loading the MatteControl1 into the viewer and selecting the Polygon1 node so that we see its tools in the viewer toolbar sets us up for drawing a polygon.
Drawing shapes using the Polygon node is similar to shape drawing in other spline-based environments, including the Color page:
— Clicking once draws a corner control point.
— Clicking and dragging creates a Bézier curve.
— Clicking the first control point you created closes a shape.
We click and drag to create a shape that outlines the man’s forehead, and when we close the shape, we see exactly the opposite of what we want, a hole in the middle of the image.
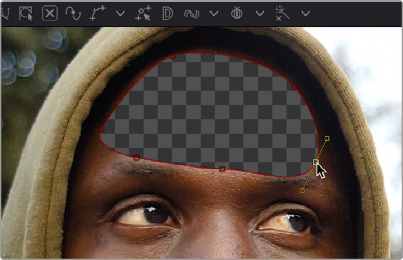
Drawing a shape to isolate the forehead gives an inverted result at first when using the Garbage Matte input of the MatteControl node to attach the Polygon to the MatteControl node
Before fixing this, we drag the Soft Edge slider in the Inspector to the right to blur the edges just a bit.
Inverting the Garbage Input
![]()
Selecting the MatteControl1 node, we open the Garbage Matte controls and click the Invert checkbox, which immediately gives us the result we want, of the forehead in isolation, ready for compositing.
![]()

Inverting the Garbage Matte input (Left), and the resulting inverted mask inverting the forehead (right)
Compositing the Painted Forehead Against the Original Image
Almost finished. Next, we’ll add a Merge node to layer the fixed forehead over the original image being output by the MediaIn node.
We create a Merge node connected to the output of the PlanarTracker node, and then we connect the MatteControl’s output to the green foreground input of the Merge node. This puts the cropped and fixed forehead on top of the original image.
The painted forehead composited against the original image
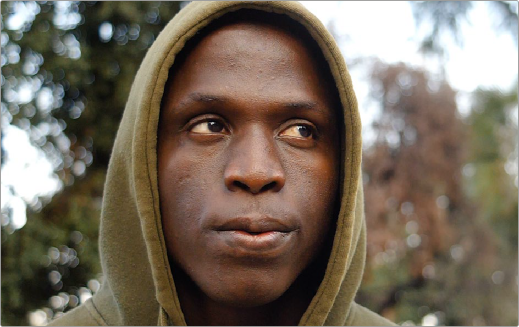
Match Moving the Mask to the Shot
![]()
Now we have the best of both worlds: a fixed forehead and the background of the shot looking good. However, if we select the Polygon node and then scrub forward in the clip, the fixed forehead mask drifts out of sync with the motion of the shot, so we have one remaining issue. Fortunately, match moving the mask to move with the shot is really simple.

Because the Polygon isn’t animated to match the motion of the shot, it goes out of sync
Selecting the first PlanarTracker node that comes right after the MediaIn node, and choosing Track from the Operation Mode menu, reveals a Create Planar Transform button at the bottom of the listed controls. Clicking this button creates a new, disconnected Planar Transform node in the Node Editor, which has the transforms from the Planar Tracker baked in. Unlike the Planar Tracker,
the Planar Transform is intended for use with masks. With the Planar Transform created, there is no longer a use for the Planar Tracker, and it can be disconnected or deleted from the Node Editor.
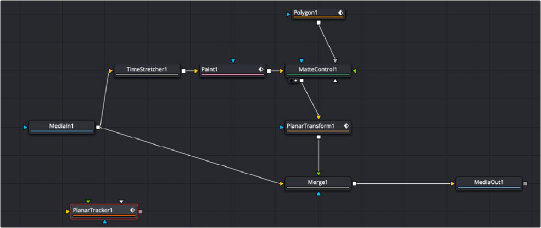
We can insert this new node into the node tree to use it by holding down the Shift key and dragging the node over the connection between the Polygon node and the MatteControl node, dropping it when the connection highlights.
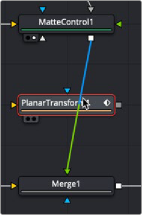
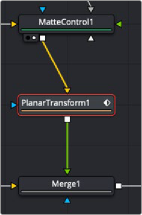
Inserting a PlanarTransform node by holding down the Shift key while dropping over a connection (left), and after inserting the PlanarTransform node (right)
![]()
With the new Planar Transform node inserted, the Polygon automatically moves to match the motion of the forehead that was tracked by the original PlanarTracker node, and it animates to follow along with the movement of the shot. At this point, we’re finished!
The final painted image, along with the final node tree