< Previous | Contents | Next >
Analyze the Image to be Tracked
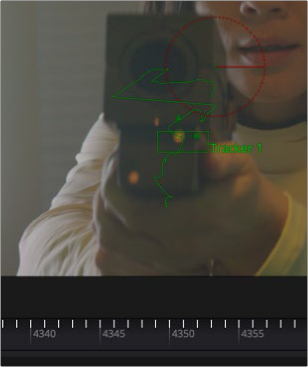
After constructing the node tree and inserting the Tracker where you want, you can set up the tracker in the viewer. You identify one or more features in the image that you wish to track (referred to as patterns) by adding trackers (there’s one by default) and positioning them using the onscreen controls in the viewer. After the Tracker node analyzes the clip, the resulting tracking data is stored within
that Tracker node. Keyframes, one per frame, indicate the Tracked Center X and Y data that has been saved, while a motion path shows the path of tracked data in the viewer.
![]()
A motion path that indicates the tracked motion, and tic marks that indicate tracking data keyframes
Apply the Tracking Data
The resulting tracking data stored within the Tracker node is used to stabilize, match move, corner pin, or remove perspective in one of two ways.
Method 1: Use the Tracker node to match move and merge
You can connect a foreground image to the Tracker node and apply the motion from the analyzed background image.
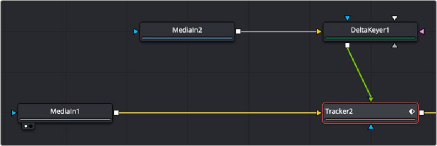
Using a Tracker node in line for a match move
Setting the Operation parameter in the Operation tab in the Inspector to Match Move, Corner Position, or Perspective Position always applies the motion to the foreground input (if one is connected). This is an easy workflow for simple situations. In this scenario, you can use the Tracker node to replace a Merge node since Tracker nodes include all the same functionality as a Merge.
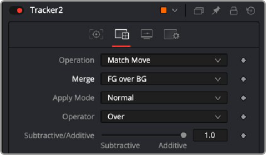
Using a Tracker node to do a match move and merge, all in one
Method 2: Connect specific parameters to the Tracker Node
Alternatively, you can connect the tracking data from the Tracker node to the specific parameters of other nodes that will actually do the work, for instances where setting up a match move isn’t just a matter of transforming a foreground image. Each Tracker node and each pattern within the Tracker node publishes its data for other nodes to use without directly linking to them in the node tree.
![]()
For example, in the following node tree, an Ellipse node is being used to isolate a glow effect for the ray gun prop.
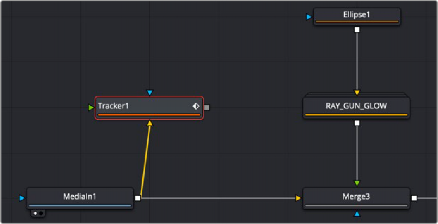
The Tracker set up as a branch and connected using the Connect To menu
The ellipse needs to follow the motion of the ray gun, so a Tracker node is used to analyze the movement of the gun tip so that tracking data can be used to animate the ellipse. The ellipse is not connected to the tracker directly via the foreground input but indirectly through the Connect To contextual menu.

Applying the light of a ray gun by connecting tracking data to the center position of an Ellipse node
This is made easier by renaming the Tracker you created to something descriptive of what’s being tracked.

You can rename trackers in the Tracker List by double-clicking them and typing descriptive text
Once the tip of the ray gun has been tracked, this tracking data is then connected to the Center parameter of an Ellipse node that’s limiting a Glow effect by right-clicking the label of the Center parameter in the Inspector, and choosing Tracker1 > Ray Gun Glow: Offset position from the Connect to submenu of the contextual menu. All the data from every Tracker node in your node tree and every tracking pattern appears within this submenu, and since we named the Tracker, it’s easy to find.
![]()
Choosing Offset position because it will place the center of the ellipse directly over the path. However, it also gives us the flexibly to offset the ellipse if need be, using the offset controls in the Inspector.
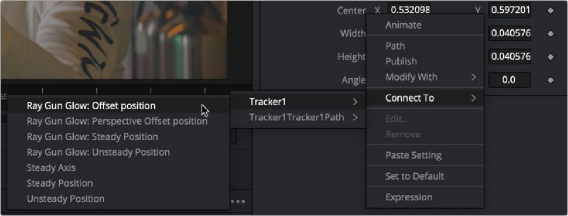
Right-clicking a parameter’s label lets you connect tracking data to it to animate it
You can connect the data from a Tracker node to any other node’s parameter; however, you’ll most typically connect track data to center, pivot, or corner X/Y style parameters. When you use tracking data this way, it’s not necessary to connect the output of the Tracker node itself to anything else in your node tree; the data is passed from the Tracker to the Center parameter by linking it with the Connect To submenu.