< Previous | Contents | Next >
Motion Tracking Workflow In Depth
Tracker nodes serve two purposes. They provide a method to analyze an object you want to follow, and they serve as a container for the resulting track data. This allows you to use one node for analysis and to pass on that analysis to any other node that requires it. Following is a more detailed breakdown of the tracking process.
Connect the Image to Track
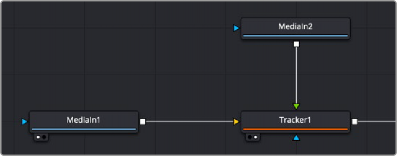
Regardless of whether you actually use the Tracker node itself to do anything with the tracking data, the image you want to track must be connected to the background input (yellow) of a Tracker node for there to be a successful analysis. While the Tracker node has a foreground input, it is initially ignored for purposes of tracking analysis, so even if you connect a foreground, the background is the only input used during the analysis process.
Connecting a MediaIn node’s output to a Tracker node’s background input
![]()
Add Trackers
Although each Tracker node starts with a single tracker pattern, a single node is capable of analyzing multiple tracking patterns that have been added to the Tracker List, enabling you to track multiple features of an image all at once for later use and to enable different kinds of transforms. Additional trackers can be added by clicking the Add button immediately above the Tracker List control.
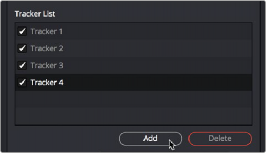
To add an additional tracker, click the Add button in the Inspector
Multiple patterns are useful when stabilizing, match moving, or removing perspective from a clip. They also help to keep the Node Editor from becoming cluttered by collecting into a single node what would otherwise require several nodes.
— To select a tracker: Click the name of the Tracker you want to select.
— To rename a tracker: You can rename trackers to make it easier to reference them later.
For example, if you’re tracking a car door handle, you can name the Tracker “Car Handle” so it’s easy to find later. To do so, just double-click the default name of the Tracker in the Tracker list, type a new one, and press Return.
— To delete a tracker: Select a tracker and click the Delete button.
— To disable, suspend, or re-enable trackers: Click the checkbox to the left of each tracker’s name in the Tracker List. It’s a three-way toggle that switches between Enabled, Suspended, and Disabled.
— Enabled: An Enabled tracker will re-track its pattern every time the track is performed. Its path data is available for use by other nodes, and the data is available for stabilization and corner positioning.
— Suspended: When the checkbox appears gray, it is Suspended. In this state, it does not re-track its pattern when the track is performed. The data is locked to prevent additional changes, but the data from the path is still available for other nodes. The data is also available for advanced tracking modes like stabilization and corner positioning.
— Disabled: A Disabled tracker does not create a path when tracking is performed. Its data is not available to other nodes or for advanced tracking operations like stabilization and corner positioning.
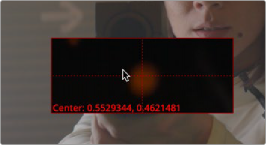
Position the Pattern Boxes
A pattern is the region of pixels that are targeted for tracking within an image using a pattern box. The pattern box is defined in the viewer by a rectangle when a tracker is active. A single Tracker node can have many pattern boxes, each targeting different patterns. Each tracked pattern will produce its own motion path.
![]()
Clicking any part of a tracker’s onscreen controls will select it. Selected pattern boxes are red, while deselected pattern boxes are green.
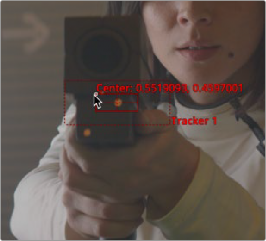
A pattern box positioned over an eye you want to track
When you add a Tracker node to the Node Editor, you start with one pattern box displayed in the viewer as a small rectangle. When the cursor is placed over the pattern rectangle, the control expands and two rectangles appear. The outer rectangle has a dashed line, and the
inner rectangle has a solid line. The outer rectangle is the search area, and the inner rectangle is the pattern.
If you need to select a new pattern, you can move the pattern box by dragging the small (and easily missed) handle at the top left of the inner pattern box.
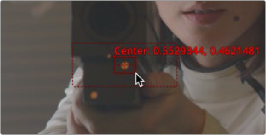
To move a pattern in the viewer, drag it from the upper-left corner
While moving the pattern box, an overlay pop-up appears, showing a zoomed version of the pixels contained within the rectangle to help you precisely position the pattern via the crosshairs within.
A zoomed view appears while you drag a pattern box to help you position it
![]()
The pattern rectangle can also be resized by dragging on the edges of the rectangle. You want to size the pattern box so that it fits the detail you want to track, and excludes area that doesn’t matter. Ideally, you want to make sure that every pixel of the pattern you’re tracking is on the same plane, and that no part of the pattern is actually an occluding edge that’s in front of what
you’re really tracking. When you resize the pattern box, it resizes from the center, so one drag lets you create any rectangle you need.
Resizing a pattern box to fit the tracking point on the ray gun

TIP: The magnified pattern box does not take viewer LUTs into account. When using Log content, it may make it easier to position the tracker if you temporarily insert a Brightness Contrast node between the source content and the yellow input of the tracker. You can use the Brightness Contrast node to temporarily increase the visibility of the region you are tracking.
TIP: The magnified pattern box does not take viewer LUTs into account. When using Log content, it may make it easier to position the tracker if you temporarily insert a Brightness Contrast node between the source content and the yellow input of the tracker. You can use the Brightness Contrast node to temporarily increase the visibility of the region you are tracking.
TIP: The magnified pattern box does not take viewer LUTs into account. When using Log content, it may make it easier to position the tracker if you temporarily insert a Brightness Contrast node between the source content and the yellow input of the tracker. You can use the Brightness Contrast node to temporarily increase the visibility of the region you are tracking.