< Previous | Contents | Next >
The Track Center (Append) mode selects a new pattern that will continue to add keyframes to the existing path. The offset between the old pattern and the new pattern is automatically calculated to create one continuous path.
1 When the pattern has become untrackable for some reason, stop analysis and move the playhead to the last frame that tracked successfully.
2 Choose Track Center (Append) from the Path Center pop-up menu in the Inspector.
3 Now, drag the Pattern selector to a new pattern that can be tracked from that point onward.
4 Restart tracking from the current frame.
When selecting a pattern to use in appending to an existing path, a pattern that is close to the old pattern and at the same apparent depth in the frame generates the best results. The further away the new pattern is, the more likely it is that the difference in perspective and axial rotation will reduce accuracy of the tracked result.
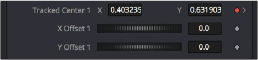
Setting Up Tracker Offsets
Often, it’s impossible to track the thing you want to apply an effect to. For example, the only pattern available for an accurate track is a button on an actor’s sleeve. However, the effect requires the person’s hand to be glowing. To cause the glow’s effect mask to be centered on the actor’s hand, it’s necessary to use the Tracker Offset control.
![]()
The Tracker Offset controls in the Inspector
The X and Y Offset controls allow for constant or animated positional offsets to be created relative to the actual Tracker’s pattern center. The position of the offset in the viewer will be shown by a dashed line running from the pattern center to the offset position. You can also adjust the offset in the viewer using the Tracker Offset button. Clicking the button enables you to reposition the path while keeping the Tracker pattern in place.
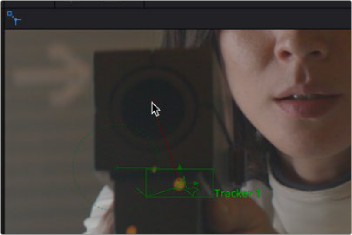
The Tracker Offset tool in the Node toolbar of the viewer; a track of the orange dot is being offset to the center of the ray gun