< Previous | Contents | Next >
Setting Up to Use the Planar Tracker
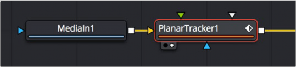
Similar to the Tracker node, to do a planar track, you need to connect the output of the image you want to track to the background input of a Planar Tracker node.
Connecting an image to the background input of a PlanarTracker node
Check for Lens Distortion
If the image has barrel distortion, or any other kinds of lens distortion, it can adversely affect your track. The more lens distortion in the footage, the more the resulting track will slide and wobble. If you can see distortion in the image or you’re having problems with the track, you’ll want to try inserting the Lens Distort node between the image and the Planar Tracker to eliminate this problem.
Fusion’s Lens Distort node can be used to remove or add lens distortion in an image. Connecting the MediaIn or Loader node to the Lens Distort node displays controls for manually correcting lens
distortion. If you use Synth Eyes, PFTrack or 3D Equalizer software, you can also import lens data from those applications to make the adjustments more automatic.

![]()
A Lens Distort node inserted between a MediaIn1 and Planar Tracker to remove lens distortion
For more information about using the Lens Distort node, see Chapter 121, “Warp Nodes,” in the DaVinci Resolve Reference Manual or Chapter 59 in the Fusion Reference Manual.
If you are using DaVinci Resolve, you can use the Lens Corrections control in the Cut page or Edit page. This adjustment carries over into the Fusion page. Lens correction in DaVinci Resolve
automatically analyzes the frame in the Timeline viewer for edges that are being distorted by a wide angle lens. Clicking the Analyze button moves the Distortion slider to provide an automatic correction. From there, the MediaIn node in the Fusion page will have the correction applied, and you can begin planar tracking.