< Previous | Contents | Next >
A Basic Planar Tracker Match Move Workflow
Using the Planar Tracker is a process, but it’s straightforward once you’ve learned how to use it. The following procedure tries to make this process as clear as possible.
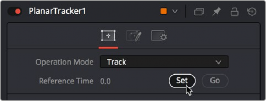
1 Make sure the Operation Mode is set to Track, as you need to analyze an image to track a surface before you do anything else.
2 With the background input of the Planar Tracker connected to an image, and the Planar Tracker open in a viewer, move the playhead to a frame of video where the planar surface you want to track is at its largest, is unoccluded, and is clearly a plane, and then click the Set button in the Track panel of the Inspector to make this the reference frame that will be used to guide the track.
Clicking the Set button to set the reference frame to use for analysis
![]()
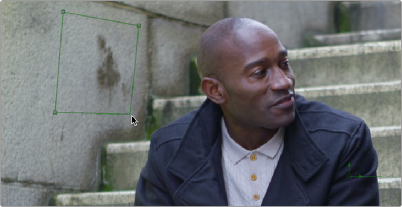
3 Next, you’ll need to identify the specific pattern within the image that you want to track. In most cases, this will probably be a rectangle, but any arbitrary closed polygon can be used. The pixels enclosed by this region will serve as the pattern that will be searched for on other frames. Please note that it is important that the pattern is drawn on the reference frame. In this example, we want to track the wall behind the man, so we draw a polygon around part of the wall that the man won’t pass over as he moves during the shot.

TIP: Do not confuse the pattern you’re identifying with the region you’re planning to corner pin (which always has four corners and is separately specified in
Corner Pin mode.
TIP: Do not confuse the pattern you’re identifying with the region you’re planning to corner pin (which always has four corners and is separately specified in
Corner Pin mode.
TIP: Do not confuse the pattern you’re identifying with the region you’re planning to corner pin (which always has four corners and is separately specified in
Corner Pin mode.
Drawing a polygon to identify the part of the image you want to track, which should be a flat, trackable plane
4 (Optional) If moving objects partially cover up or occlude the planar surface, you may wish to connect a mask that surrounds and identifies these occlusions to the white “occlusion mask” input of the Planar Tracker. This lets the Planar Tracker ignore details that will cause problems.
When using the Hybrid Tracker, providing a mask to deal with occluding objects is nearly mandatory, while with the Point Tracker it is recommended to try tracking without a mask.
5 If necessary, move the playhead back to the reference frame, which in this case was the first frame. Then, click the Track To End button and wait for the track to complete.
![]()
The Analyze buttons of the Planar Tracker
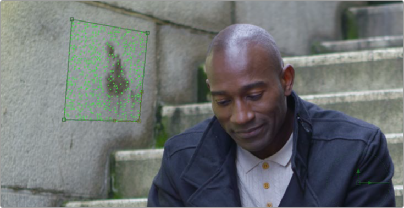
As the clip tracks, you can see track markers and trails (if they’re enabled in the Options tab of the Inspector) that let you see how much detail is contributing to the track, and the direction of motion that’s being analyzed.
![]()
During tracking, you can see track markers and trails to follow how well the track is going
6 Once the track is complete, play through the clip to visually inspect the track so you can evaluate how accurate it is. Does it stick to the surface? Switching to Steady mode can help here, as scrubbing through the clip in Steady mode will help you immediately see unwanted motion in the track.
7 Since we’re doing a match move, click the Create Planar Transform button to export a Planar Transform node that will automatically transform either images or masks to follow the analyzed motion of the plane you tracked.
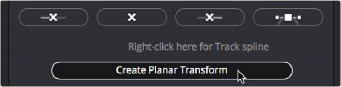
Clicking Create Planar Transform to create a node to use to transform other images or masks
In this case, the Planar Transform node will be inserted after a pair of Background and Paint nodes that are being used to put some irritatingly trendy tech jargon graffiti on the wall. The Planar
Transform will automatically transform the Paint node’s output connected to its background input to match the movement of the wall.
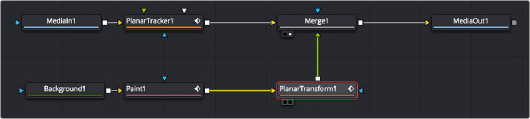
Adding the PlanarTransform node after a Paint node to match move it to the background image, combining it via a Merge node
![]()
The result is a seamless match move of the fake graffiti married to the wall in the original clip.


The final result; the paint layer is match moved to the background successfully

TIP: If you want to composite semi-transparent paint strokes on the wall, or use
Apply modes with paint stroke, you can attach a Paint node to a Background node set to 100 transparency. The resulting image will be whatever paint strokes you make against transparency and is easy to composite.
TIP: If you want to composite semi-transparent paint strokes on the wall, or use
Apply modes with paint stroke, you can attach a Paint node to a Background node set to 100 transparency. The resulting image will be whatever paint strokes you make against transparency and is easy to composite.
TIP: If you want to composite semi-transparent paint strokes on the wall, or use
Apply modes with paint stroke, you can attach a Paint node to a Background node set to 100 transparency. The resulting image will be whatever paint strokes you make against transparency and is easy to composite.