
< Previous | Contents | Next >
You can add light sources to a scene to create very detailed lighting environments and atmosphere. There are four different types of lights you can use in 3D scenes: ambient, directional, point,
and spotlights.
Enabling Lighting in the Viewer
A scene without lights uses a default directional light, but this automatically disappears once you add a 3D light object. However, even when you add light objects to your scene, lighting and shadows won’t be visible in the viewer unless you first enable lighting in the viewer contextual menu by right-clicking anywhere within a viewer and choosing 3D Options > Lighting or Shadows to turn on one or both.
Enabling Lighting to Be Rendered
Lighting effects won’t be rendered in the Renderer3D node until the Enable Lighting and/or Shadows checkboxes are checked in the Inspector.
The Lighting button under the viewer

NOTE: When lighting is disabled in either the viewer or final renders, the image will appear to be lit by a 100% ambient light.
NOTE: When lighting is disabled in either the viewer or final renders, the image will appear to be lit by a 100% ambient light.
NOTE: When lighting is disabled in either the viewer or final renders, the image will appear to be lit by a 100% ambient light.
![]()
Cotrolling Lighting within Each 3D Object
All nodes that create or merge geometry also include lighting options that are used to choose how each object is affected by light:
— Merge3D nodes have a Pass Through Lights checkbox that determines whether lights attached to an upstream Merge3D node also illuminate objects attached to downstream Merge3D nodes.
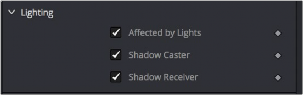
— ImagePlane3D, Cube3D, Shape3D, Text3D, and FBXMesh3D nodes have a set of Lighting controls that let you turn three controls on and off: Affected by Lights, Shadow Caster, and Shadow Receiver.
3D objects have individual lighting controls that let you control how each object interacts with light and shadows