< Previous | Contents | Next >
Camera tracking begins by tracking the movement of fixed features from one frame to the next. To put it another way, camera tracking algorithms follow features that are “nailed to the set.” Objects in the scene that move independently of the camera movement in the shot, such as cars driving or people walking, cause poor tracks, so masks can be used to restrict the features that are tracked in order to improve the results. Additionally, it is helpful to provide specific camera metadata, such as the sensor size and the focal length of the lens. This information guides the scene reconstruction calculation, called a solver, toward generating a more accurate virtual camera.
The Camera Tracker’s purpose is to create a 3D animated camera and point cloud of the scene. A point cloud is a large group of points generated by the solver that roughly recreates the 3D positions of the tracked features in a scene. The point cloud can then be used as a guide when integrating other 2D or 3D elements alongside live-action features.
The Camera Tracking Workflow
1 Tracking, which is the analysis of a scene.
2 Solving, which calculates the virtual 3D scene.
Once you complete these steps, an animated camera and point cloud are exported from the Inspector into a 3D composite. The Camera Tracker encompasses this complete workflow within one tool. Five tabs at the top of the Inspector are roughly laid out in the order in which you’ll use them. These five tabs are:
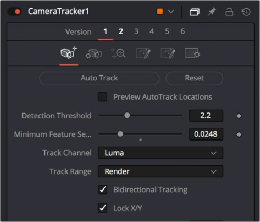
— Track: Used to track a clip.
— Camera: Configures the basic Camera parameters.
![]()
— Solve: Calculates the 3D placement of the 2D tracking points and reconstructs the camera.
— Export: Generates a Camera 3D node, a Point Cloud node, and a 3D scene in the node tree.
— Options: Used to customize the look of the onscreen overlays.
The Camera Tracker tab