
< Previous | Contents | Next >
Sometimes the first solve will be good enough. Other times, it may take a few hours of cleaning up tracks to get a good solve, and sometimes it is impossible. With experience, one gets a feel for
which tracks should be deleted and which should be kept, and which shots will be easy, difficult, or impossible to solve.
IMPORTANT: If you are not familiar with camera tracking, it may be tempting to try to directly edit the resulting 3D splines in the Spline Editor in order to improve a solved camera’s motion path. This option should be used as an absolute last resort. It’s preferable, instead, to modify the 2D tracks being fed into the solver.
IMPORTANT: If you are not familiar with camera tracking, it may be tempting to try to directly edit the resulting 3D splines in the Spline Editor in order to improve a solved camera’s motion path. This option should be used as an absolute last resort. It’s preferable, instead, to modify the 2D tracks being fed into the solver.
IMPORTANT: If you are not familiar with camera tracking, it may be tempting to try to directly edit the resulting 3D splines in the Spline Editor in order to improve a solved camera’s motion path. This option should be used as an absolute last resort. It’s preferable, instead, to modify the 2D tracks being fed into the solver.
Be aware that deleting too many tracks can cause the Average Solve Error to increase, as the solver has too little information to work with. In particular, if there are fewer than eight tracks on any frame, mathematically there is not enough information to solve the clip. However, it is strongly recommended to use a lot more than eight tracks to get a robust and accurate solve.
How to Judge Track Accuracy
The automatic color coding of tracking markers makes deleting false or poor tracks easier. After the solver runs, each tracker is assigned a solve error color that indicates which 3D locators match their 2D tracking points well, and which match up poorly.
— Green: Good. Tracked very well.
— Yellow: Moderate confidence. Usually an acceptable track.
— Orange: Low Confidence. May be acceptable in some situations.
— Red: No Confidence. The tracks have not solved well.
![]()
Hovering the pointer over any tracking point displays a large metadata tooltip that includes the solve error for the point. For a more visual representation of the accuracy, you can enable the display of 3D locators in the viewer by clicking the Reprojection Locators button in the viewer toolbar.

After a solve, the Camera Tracker toolbar can display Reprojection locators
When the tracking points are converted into a point cloud by the solver, it creates 3D reprojection locators for each tracking point. These Reprojection locators appear as small X marks near the corresponding tracking point. The more the two objects overlap, the lower the solve error.
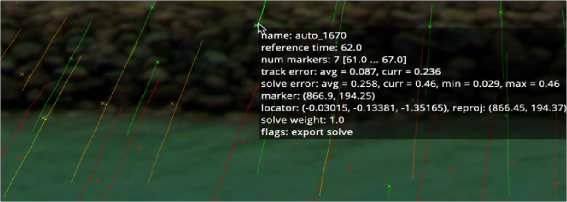
Reprojection locators displayed with tracking points, and tooltip
The goal when filtering the trackers is to remove all red tracker marks and keep all the green marks. Whether you decide to keep both the yellow and orange or just the yellow is more a question of how many marks you have in the clip. You produce a better solve if you retain only the yellow marks;

Tips for What to Keep and What to Delete
Understanding what false tracks look like, and then manually cleaning the track data to reduce it to a precise set of clear tracks, will result in a more accurate solve. When cleaning up any track—particularly yellow and orange color coded tracks—keep the following in mind:
— Keep all tracks with motion that’s completely determined by the motion of the live-action camera.
— Delete tracks on moving objects or people and tracks that have parallax issues.
— Delete tracks that are reflected in windows or water.
— Delete tracks of highlights that move over a surface.
— Delete tracks that do not do a good job of following a feature.
— Delete tracks that follow false corners created by the superposition of foreground and background layers.
— Consider deleting tracks that correspond to locators that the solver has reconstructed at an incorrect Z-depth.
however, if you do not have enough marks to calculate the 3D scene, you will have to keep some of the better orange marks as well.
![]()
Deleting Tracks
You can manually delete tracks in the viewer or use filters to select groups of tracks. When deleting tracks in the viewer, it is best to modify the viewer just a bit to see the tracks more clearly. From the Camera Tracker toolbar above the viewer, clicking the Track Trails button hides the trails of the tracking points. This cleans up the viewer to show points only, making it easier to make selections. At the right end of the toolbar, clicking the Darken Image button slightly darkens the image, again making the points stand out a bit more in the viewer.
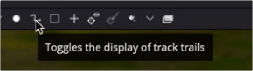
Hiding trails and darkening the viewer can make it easier to see and select poor tracks
To begin deleting poor-quality tracks, you can drag a selection box around a group of tracks you want to remove and then either click the Delete Tracks button in the Camera Tracker toolbar or press Command-Delete.
You can hold down the Command key to select discontiguous tracking marks that are not near each other. If you accidentally select tracks you want to keep, continue holding the Command key and drag over the selected tracks to deselect them.
When deleting tracks, take note of the current Average Solve Error at the top of the Inspector and then rerun the solver. It is better to delete small groups of tracks and then rerun the solver than to delete one or two large sections. As mentioned previously, deleting too many tracks can have adverse effects and increase the Average Solve Error.
Using Filters to Delete Problem Tracks
![]()
The Solve tab includes filters that can be used to select groups of similar tracks by track length, track error, and solve error. These can be used to quickly select and delete poorly performing tracks that may be misleading to the resulting camera, leaving a concise list of accurate tracks.
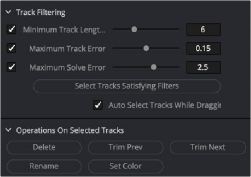
Tracks can be selected using filters and deleted using the Operations On Selected Tracks buttons
For instance, it is generally best to run the solver using tracks with longer durations. Since shorter tracks tend to be less accurate when calculating the camera, you can remove them using the Filter section in the Inspector.
Increasing the Minimum Track Length parameter sets a threshold that each tracker must meet. Tracks falling below the threshold appear red. You can then click the Select Tracks Satisfying Filters button to select the shorter tracks and click Delete from the Options section in the Inspector.