
< Previous | Contents | Next >
The remaining controls for the Image and Settings tabs are common to many 3D nodes. Their descriptions can be found in “The Common Controls” section at the end of this chapter.
Replace Material 3D [3Rpl]
The Replace Material 3D node
Replace Material 3D Node Introduction
The Replace Material 3D node replaces the material applied to all the geometry in the input scene with its own material input. Any lights or cameras in the input scene are passed through unaffected.
The scope of the replacement can be limited using Object and Material identifiers in the Inspector. The scope can also be limited to individual channels, making it possible to use a completely different material on the Red channel, for example.
Since the Text 3D node does not include a material input, you can use the Replace Material to add material shaders to the text.
![]()
Inputs
The Replace Material node has two inputs: one for the 3D scene, object, or 3D text that contains the original material, and a material input for the new replacement material.
— SceneInput: The orange scene input accepts a 3D scene or 3D text that you want to replace the material.
— MaterialInput: The green material input accepts either a 2D image or a 3D material. If a 2D image is provided, it is used as a diffuse texture map for the basic material built into the node. If a 3D material is connected, then the basic material is disabled.
Basic Node Setup
The Replace Material 3D node is inserted directly after the 3D object or scene whose material you want to replace. Below, it is used to replace the default material on a Text 3D node with a chrome shader.

Replace Material 3D used to replace the default material of a Text 3D node
Inspector
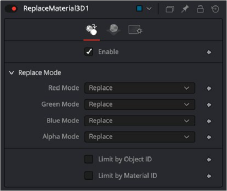
Replace Material 3D controls
![]()
Controls Tab
This checkbox enables the material replacement. This is not the same as the red switch in the upper- left corner of the Inspector. The red switch disables the tool altogether and passes the image on without any modification. The enable checkbox is limited to the effect part of the tool. Other parts, like scripts in the Settings tab, still process as normal.
The Replace Mode section offers four methods of replacing each RGBA channel:
— Keep: Prevents the channel from being replaced by the input material.
— Replace: Replaces the material for the corresponding color channel.
— Blend: Blends the materials together.
— Multiply: Multiplies the channels of both inputs.
When enabled, a slider appears where the desired IDs can be set. Other objects keep their materials. If both options are enabled, an object must satisfy both conditions.