< Previous | Contents | Next >

The Sharpen node
Sharpen Node Introduction
The Sharpen node uses a convolution filter to enhance detail in an image overall or to an individual channel.
Inputs
The two inputs on the Sharpen node are used to connect a 2D image and an effect mask that can limit the area affected by the sharpen.
— Input: The orange input is used for the primary 2D image for sharpening.
— Effect Mask: The blue input is for a mask shape created by polylines, basic primitive shapes, paint strokes, or bitmaps from other tools. Connecting a mask to this input limits the sharpen to only those pixels within the mask. An effect mask is applied to the tool after it is processed.
Basic Node Setup
![]()
The Sharpen node receives a 2D image like the MediaIn1 shown below. The output continues the node tree by connecting to another 2D image-processing node or a Merge node.

A Sharpen node applied to a MediaIn1 node in DaVinci Resolve
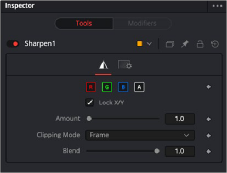
Inspector

Sharpen controls
Controls Tab
The Controls tab contains all the primary controls necessary for customizing the sharpen operation.

NOTE: This is not the same as the RGBA checkboxes found under the common controls. The node takes these selections into account before it processes the image, so deselecting a channel causes the node to skip that channel when processing, speeding up the rendering of the effect. In contrast, the channel controls under the Common Controls tab are applied after the node has processed.
NOTE: This is not the same as the RGBA checkboxes found under the common controls. The node takes these selections into account before it processes the image, so deselecting a channel causes the node to skip that channel when processing, speeding up the rendering of the effect. In contrast, the channel controls under the Common Controls tab are applied after the node has processed.
NOTE: This is not the same as the RGBA checkboxes found under the common controls. The node takes these selections into account before it processes the image, so deselecting a channel causes the node to skip that channel when processing, speeding up the rendering of the effect. In contrast, the channel controls under the Common Controls tab are applied after the node has processed.
This filter defaults to operating on R, G, B, and A channels. Selective channel filtering is possible by clicking the channel buttons to make them active or inactive.
This locks the X and Y Sharpen sliders together for symmetrical sharpening. This is checked by default.
This slider sets the amount of sharpening applied to the image. When the Lock X/Y control is deselected, independent control over each axis is provided.
This option determines how edges are handled when performing domain-of-definition rendering. This is profoundly important for nodes like Blur, which may require samples from portions of the image outside the current domain.
![]()
— Frame: The default option is Frame, which automatically sets the node’s domain of definition to use the full frame of the image, effectively ignoring the current domain of definition. If the upstream DoD is smaller than the frame, the remaining area in the frame is treated as black/ transparent.
— Domain: Setting this option to Domain respects the upstream domain of definition when applying the node’s effect. This can have adverse clipping effects in situations where the node employs a large filter.
— None: Setting this option to None does not perform any source image clipping at all. This means that any data required to process the node’s effect that would normally be outside the upstream DoD is treated as black/transparent.
The Blend slider determines the percentage of the affected image that is mixed with original image. It blends in more of the original image as the value gets closer to 0.
This control is a cloned instance of the Blend slider in the Common Controls tab. Changes made to this control are simultaneously made to the one in the common controls.
Common Controls
The Settings tab in the Inspector is also duplicated in other Blur nodes. These common controls are described in detail at the end of this chapter in “The Common Controls” section.