< Previous | Contents | Next >
The Settings tab in the Inspector is also duplicated in other Color nodes. These common controls are described in detail at the end of this chapter in “The Common Controls” section.
OCIO Color Space [OCC]

The OCIO Color Space node
OCIO Color Space Node Introduction
Fusion supports the Open Color IO color management workflow by way of three OCIO nodes.
— The OCIO CDL Transform node allows you to create, save, load, and apply a Color Decision List (CDL) grade.
— The OCIO Color Space allows sophisticated color space conversions, based on an OCIO config file.
— The OCIO File Transform allows you to load and apply a variety of Lookup tables (LUTs).
![]()
Generally, the OCIO color pipeline is composed from a set of color transformations defined by OCIO- specific config files, commonly named with a “.ocio” extension. These config files allow you to share color settings within or between facilities. The path to the config file to be used is normally specified by a user-created environment variable called “OCIO,” though some tools allow overriding this. If no other *.ocio config files are located, the DefaultConfig.ocio file in Fusion’s LUTs directory is used.
For in-depth documentation of the format’s internals, please refer to the official pages on opencolorio.org.
Sample configs can be obtained from https://opencolorio.readthedocs.io/en/latest/configurations/_ index.html#configurations
The functionality of the OCIO Color Space node is also available as a View LUT node from the View LUT menu.
Inputs
The OCIO Color Space node includes two inputs: one for the main image and the other for an effect mask to limit the area where the color space conversion is applied.
— Input: This orange input is the only required connection. It connects a 2D image for the color space conversion.
— Effect Mask: The optional blue effect mask input accepts a mask shape created by polylines, basic primitive shapes, paint strokes, or bitmaps from other tools. Connecting a mask to this input limits the color space conversion to only those pixels within the mask. An effect mask is applied to the tool after it is processed.
Basic Node Setup
The OCIO Color Space node is typically placed directly after a MediaIn node in DaVinci Resolve or a Loader node in Fusion Studio. Another OCIO Color Space node is placed just before a Media Out node in DaVinci Resolve or a Saver node in Fusion Studio.

An OCIO Color Space node applied to a Loader node and a Saver node in Fusion Studio
Inspector

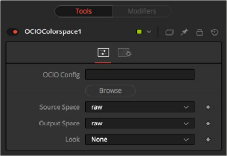
OCIO Color Space controls
Controls Tab
![]()
The Controls tab for the OCIO Color Space node allows you to convert an image from one color space to another based on an OCIO config file. By default, it uses the config file included with Fusion; however, the Controls tab does allow you to load your own config file as well.
Displays a File > Open dialog to load the desired config file.
Based on the config file, the available source color spaces are listed here.
The content of this list is based solely on the loaded profile and hence can vary immensely. If no other OCIO config file is loaded, the DefaultConfig.ocio file in Fusion’s LUTs directory is used to populate this menu.
Based on the config file, the available output color spaces are listed here.
The content of this list is based solely on the loaded profile and hence can vary immensely. If no other OCIO config file is loaded, the DefaultConfig.ocio file in Fusion’s LUTs directory is used to populate this menu.
Installed OCIO Color Transform Looks appear in this menu. If no looks are installed, this menu has only None listed as an option.