
< Previous | Contents | Next >
The White Balance node
White Balance Node Introduction
The White Balance node can be used to automatically remove color casts in the image caused by the incorrect setup of a camera or bad lighting conditions.

IMPORTANT When picking neutral colors using the Custom method, make sure you are picking from the source image, not the results of the White Balance node. This ensures that the image doesn’t change while you are still picking, and that the White Balance node gets an accurate idea of the original colors it needs to correct.
IMPORTANT When picking neutral colors using the Custom method, make sure you are picking from the source image, not the results of the White Balance node. This ensures that the image doesn’t change while you are still picking, and that the White Balance node gets an accurate idea of the original colors it needs to correct.
IMPORTANT When picking neutral colors using the Custom method, make sure you are picking from the source image, not the results of the White Balance node. This ensures that the image doesn’t change while you are still picking, and that the White Balance node gets an accurate idea of the original colors it needs to correct.
Correction can be done by selecting a color temperature or by choosing a neutral color from the original image that exhibits the color cast to be corrected.
Inputs
![]()
The White Balance node includes two inputs: one for the main image and the other for an effect mask to limit the area where the white balance is applied.
— Input: This orange input is the only required connection. It connects a 2D image for the white balance.
— Effect Mask: The optional blue effect mask input accepts a mask shape created by polylines, basic primitive shapes, paint strokes, or bitmaps from other tools. Connecting a mask to this input limits the white balance to only those pixels within the mask. An effect mask is applied to the tool after it is processed.
Basic Node Setup
The White Balance node, like many 2D image-processing nodes, receives a 2D image like the MediaIn1 shown below. The output continues the node tree by connecting to another 2D image-processing node or a Merge node.
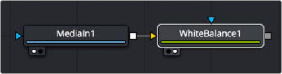
A White Balance node applied to a MediaIn1 node
Inspector
White Balance controls
![]()
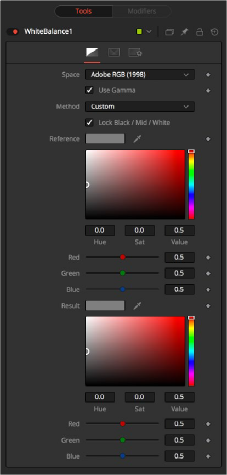
Balance Tab
Use this menu to select the color space of the source image, if it is known. This can make the correction more accurate since the node can take the natural gamma of the color space into account as part of the correction. If the color space that the image uses is unknown, leave this menu at its default value.
The White Balance node can operate using one of two methods: a Custom method or a color Temperature method.
— Custom: The Custom method requires the selection of a pixel from the scene that should have been pure gray. The node uses this information to calculate the color correction required to convert the pixel so that it actually is gray. When the correction is applied without an effect mask connected and the LockBlack/Mid/White checkbox enabled, the node white balances the entire shot.
— Temperature: The color Temperature method requires that the actual color temperature of the shot be specified.
This checkbox locks the Black, Midtones, and White points together so that the entire image is affected equally. Unchecking the control provides individual controls for white balancing each range separately. This control affects both methods equally.
These controls appear only if the Custom method is selected. They are used to select a color from a pixel in the source image. The White Balance node color corrects the image so that the selected color is transformed to the color set in the Result Color Picker below. Generally, this is gray. A color that is supposed to be pure gray but is not truly gray for one reason or another should be selected.
If the Lock Black/Mid/White checkbox is deselected, different references can be selected for each color range.
For example, try to select a pixel for the black and white references that are not clipped in any of the color channels. In the high end, an example would be a pixel that is light pink with values of 255, 240,
240. The pixel is saturated/clipped in the red, although the color is not white. Similarly, a really dark blue-gray pixel might be 0, 2, 10. It is clipped in red as well, although it is not black.
Neither example would be a good choice as a reference pixel because there would not be enough headroom left for the White Balance node.
These controls appear only if the Custom method is selected. They are used to select the color that the node uses to balance the reference color. This generally defaults to pure, midrange gray.
![]()
If the Lock Black/Mid/White checkbox is deselected, different results can be selected for each color range.
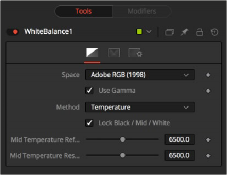
White Balance Temperature controls
When the Method menu is set to Temperature, the Temperature reference control is used to set the color temperature of the source image. If the Lock Black/ Mid/White checkbox is deselected, different references can be selected for each color range.
Use this control to set the target color temperature for the image. If the Lock Black/Mid/White checkbox is deselected, different results can be selected for each color range.
This checkbox selects whether the node takes the gamma of the image into account when applying the correction, using the default gamma of the color space selected in the Space menu at the top of the tab.
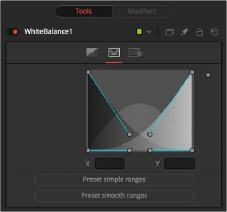
White Balance range tab
Ranges Tab
The Ranges tab can be used to customize the range of pixels in the image considered to be shadows, midtones, and highlights by the node.
The ranges are selected by manipulating the spline handles. There are four spline points, each with one Bézier handle. The two handles at the top represent the start of the shadow and highlight ranges, whereas the two at the bottom represent the end of the range. The Bézier handles are used to control the falloff.
![]()
The midtones range has no specific controls since its range is understood to be the space between the shadow and the highlight ranges.
The X and Y text controls below the Spline display can be used to enter precise positions for the selected Bézier point or handle.
These two buttons can be used to return the spline ranges to either Smooth (default) or Simple (linear) settings.
Settings Tab
The Settings tab in the Inspector is also duplicated in other Color nodes. These common controls are described in detail at the end of this chapter in “The Common Controls” section.