< Previous | Contents | Next >

The Chroma Keyer node
Chroma Keyer Node Introduction

NOTE: When working with blue- or green-screen shots, it is best to use the Delta Keyer or Primatte node, rather than the more general purpose Chroma Keyer node.
NOTE: When working with blue- or green-screen shots, it is best to use the Delta Keyer or Primatte node, rather than the more general purpose Chroma Keyer node.
NOTE: When working with blue- or green-screen shots, it is best to use the Delta Keyer or Primatte node, rather than the more general purpose Chroma Keyer node.
The Chroma Keyer node creates an alpha channel (matte) for an image by removing selected colors from the scene. Unlike the Delta Keyer or Primatte, which use specific optimizations for keying from blue and green colors, the Chroma Keyer works equally well with any color.
Inputs
The Chroma Keyer node includes four inputs in the Node Editor.
— Input: The orange input accepts a 2D image that contains the color you want to be keyed for transparency.
![]()
— Garbage Matte: The gray garbage matte input accepts a mask shape created by polylines, basic primitive shapes, paint strokes, or bitmaps masks. Connecting a mask to this input causes areas of the image that fall within the matte to be made transparent. The garbage matte is applied directly to the alpha channel of the image.
— Solid Matte: The white solid matte input accepts a mask shape created by polylines, basic primitive shapes, paint strokes, or bitmaps masks. Connecting a mask to this input causes areas of the image that fall within the matte to be fully opaque.
— Effect Mask: The optional blue input expects a mask shape created by polylines, basic primitive shapes, paint strokes, or bitmaps masks. Connecting a mask to this input limits the pixels where the alpha multiply occurs. An effects mask is applied to the tool after the tool is processed.
Basic Node Setup
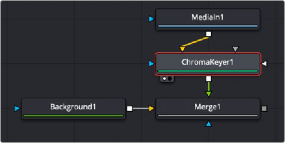
The Chroma Keyer node takes in a 2D image like the MediaIn node below and removes a color that you identify by dragging over it in the viewer. The result is that the selected color is replaced with transparency, allowing you to composite the image as the foreground in a Merge node.

A Chomra Keyer node creating transparency on the MediaIn node.
Inspector

The Chroma Key tab
Chroma Key Tab
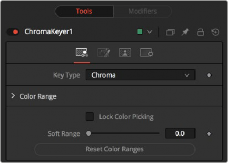
The Chroma Key tab is used to make the initial selection of color for keying.
![]()
The Key Type menu determines the selection method used for the matte creation.
— Chroma: The Chroma method creates a matte based on the RGB values of the selected color range.
— Color: The Color method creates a matte based on the hue of the selected color range.
Colors are made transparent by selecting the Chroma Keyer node in the node tree, and then dragging a selection around the colors in the viewer. The range controls update automatically to represent the current color selection. You can tweak the range sliders slightly, although most often selecting colors in the displays is all that is required.
When this checkbox is activated, selecting colors from the viewer is disabled to prevent accidental addition to the range. It is a good idea to activate this checkbox once you make the color selection for the matte. All other controls in the node remain editable.
This control softens the selected color range, adding additional colors into the matte.
Clicking this button resets the Chroma Keyer’s range controls, discarding all color selections. All other sliders and controls maintain their values.

The Chroma Key Image tab
Image Tab
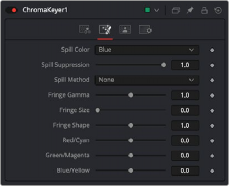
The Image tab primarily handles removing spill color on the foreground subject. Color spill occurs when light containing the color you are removing is reflected onto the foreground subject.
This menu selects the color used as the base for all spill suppression techniques.
This slider sets the amount of spill suppression applied to the foreground subject. When this slider is set to 0, no spill suppression is applied.
![]()
This menu selects the strength of the algorithm used to apply spill suppression to the image.
— None: None is selected when no spill suppression is required.
— Rare: This removes very little of the spill color and is the lightest of all methods.
— Medium: This works best for green screens.
— Well Done: This works best for blue screens.
— Burnt: This works best for blue. Use this mode only for very troublesome shots. Most likely you will have to add strong color correction after the key to get, for example, your skin tones back.
This control is used to adjust the brightness of the fringe or halo that surrounds the keyed image.
This expands and contracts the size of the fringe or halo surrounding the keyed image.
Fringe Shape forces the fringe toward the external edge of the image or toward the inner edge of the fringe. Its effect is most noticeable while the Fringe Size slider’s value is large.
Use these three controls to color correct the fringe of the image. This is useful for correcting semitransparent pixels that still contain color from the original background to match the new background.

The Chroma Key Matte tab
Matte Tab
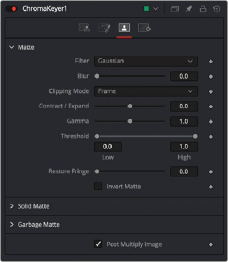
The Matte tab refines the softness, density, and overall fit of the resulting matte.
This control selects the filtering algorithm used when applying blur to the matte.
![]()
— Box: This is the fastest method but at reduced quality. Box is best suited for minimal amounts of blur.
— Bartlett: Otherwise known as a Pyramid filter, Bartlett makes a good compromise between speed and quality.
— Multi-box: When selecting this filter, the Num Passes slider appears and lets you control the quality. At 1 and 2 passes, results are identical to Box and Bartlett, respectively. At 4 passes and above, results are usually as good as Gaussian, in less time and with no edge “ringing.”
— Gaussian: The Gaussian filter uses a true Gaussian approximation and gives excellent results, but it is a little slower than the other filters. In some cases, it can produce an extremely slight edge “ringing” on floating-point pixels.
Matte Blur blurs the edge of the matte based on the Filter menu setting. A value of zero results in a sharp, cutout-like hard edge. The higher the value, the more blur applied to the matte.
This option determines how edges are handled when performing domain of definition rendering. This is profoundly important when blurring the matte, which may require samples from portions of the image outside the current domain.
— Frame: The default option is Frame, which automatically sets the node’s domain of definition to use the full frame of the image, effectively ignoring the current domain of definition. If the upstream DoD is smaller than the frame, the remaining area in the frame will be treated as black/transparent.
— Domain: Setting this option to Domain will respect the upstream domain of definition when applying the node’s effect. This can have adverse clipping effects in situations where the node employs a large filter.
— None: Setting this option to None will not perform any source image clipping at all. This means that any data required to process the node’s effect that would normally be outside the upstream DoD will be treated as black/transparent.
This slider shrinks or grows the semitransparent areas of the matte. Values above 0.0 expand the matte, while values below 0.0 contract it.
This control is usually used in conjunction with the Matte Blur to take the hard edge of a matte and reduce fringing. Since this control affects only semitransparent areas, it will have no effect on a matte’s hard edge.
Matte Gamma raises or lowers the values of the matte in the semitransparent areas. Higher values cause the gray areas to become more opaque, and lower values cause the gray areas to become more transparent. Completely black or white regions of the matte remain unaffected.
Since this control affects only semitransparent areas, it will have no effect on a matte’s hard edge.
![]()
This range slider sets the lower threshold using the handle on the left and sets the upper threshold using the handle on the right.
Any value below the lower threshold setting becomes black or transparent in the matte.
Any value above the upper threshold setting becomes white or opaque in the matte. All values within the range maintain their relative transparency values.
This control is often used to reject salt and pepper noise in the matte.
This restores the edge of the matte around the keyed subject. Often when keying, the edge of the subject where you have hair is clipped out. Restore Fringe brings back that edge while keeping the matte solid.
When this checkbox is selected, the alpha channel created by the keyer is inverted, causing all transparent areas to be opaque and all opaque areas to be transparent.
Solid Mattes are mask nodes or images connected to the solid matte input on the node. The solid matte is applied directly to the alpha channel of the image. Generally, solid mattes are used to hold out keying in areas you want to remain opaque, such as someone with blue eyes against a blue screen.
Enabling Invert will invert the solid matte, before it is combined with the source alpha.