< Previous | Contents | Next >
For example, if you’re editing a project that consists half of camera raw media, and half of DNxHD media, you probably only need to optimize the camera raw media, so you can create a Smart Bin that gathers all of it, based on Resolution, Codec, File Name, or whatever other metadata is appropriate. Once gathered, it’s an easy thing to select all of these clips in preparation for the next step.
— Right-click one of the selected clips, and choose Generate Optimized Media from the contextual menu.
![]()
All optimized media is written to the same directory as the Cache files are written, which defaults to the first scratch disk listed in the Preference dialog’s Media Storage panel. The location of Cache and Optimized files is also selectable via the “Cache files location” setting in the Master Settings panel of the Project Settings.
Optimized Media for Raw Source Clips
In general, once you create optimized media, DaVinci Resolve keeps track of it and continues using it regardless of whatever changes you make to your project, including changing the Timeline resolution. However, any change to the camera raw settings of optimized clips will automatically discard the optimized media, requiring you to re-generate optimized media for them.
Customizing the Type of Optimized Media You Create
The Master Settings panel of the Project Settings has a set of controls that govern what kind of media files are created when you create optimized media.
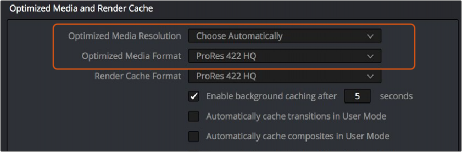
Options available for creating optimized media in the Master Settings panel of the Project Settings
There are two settings affecting Optimized Media in the Optimized Media and Render Cache section:
— Resolution: Lets you choose whether to create optimized media at the same size as your original media files (by choosing Original), or to reduce the bandwidth of your optimized media further by reducing its resolution by a Half, Quarter, Eighth, or Sixteenth. The “Choose automatically” option tries to balance visual quality with efficiency by only reducing the resolution of media files that are larger than the currently selected Timeline resolution, using whatever reduction ratio best matches the Timeline resolution.
— Optimized Media Format: Lets you choose the format and codec with which to generate optimized media. Options include Uncompressed 10-bit, and Uncompressed 16-bit float for maximum quality. Other options include ProRes Proxy through 4444 XQ, and DNxHR LB through 444. All options will store image data in the optimized and proprietary .dvcc image
format. While smaller formats take less room on your scratch disk, there are two good reasons to use higher-quality formats for creating Optimized Media.
![]()
— Preventing Clipping: Be aware that the format you choose will determine whether out-of- bounds image data is preserved when the signal is optimized. If you find that image data (typically super-white levels) are clipped after optimization, you should switch to 16-bit float, ProRes 4444, or ProRes 4444 XQ; in particular, any of these three codecs are appropriate optimized formats for HDR grading.
— Preserving Alpha Channels: Also be aware that the format you choose will determine whether Alpha Channels will be preserved, if they’re present in the clips being Optimized. Currently, the Uncompressed 10-bit, Uncompressed 16-bit Float, ProRes 4444,
ProRes 4444 XQ, and DNxHR 444 formats preserve alpha channels.
Choosing Resolution Automatically
The “Choose automatically” option of the Resolution setting bears a bit more explanation. When selected, only source media with a higher resolution than the selected Timeline resolution will generate downsized optimized media. How much each clip will be downsized depends on how much larger each clip is than the Timeline resolution. For example, if you’re working within a 1080 resolution project, then 8K clips will generate quarter-resolution optimized media, and 4K clips will generate half- resolution optimized media, such that all optimized media is somewhere around 1080 resolution. All clips that are 1080 and smaller generate optimized media at the same resolution as the source clips.
In the example of a 4K project, 8K clips will generate half-resolution optimized media, and all other clips that are 4K and smaller will generate optimized media at the same resolution as the source clips.
Proxy Resolution | Width | Height |
Full 8K UHD | 7680 | 4320 |
Full UHD/Half 8K UHD | 3840 | 2160 |
Full-HD/Half UHD/Quarter 8K UHD | 1920 | 1080 |
Half-HD/Quarter UHD/Eighth 8K UHD | 960 | 540 |
Quarter-HD/Eighth UHD/Sixteenth 8K UHD | 480 | 270 |
Eighth-HD/Sixteenth UHD | 240 | 135 |
Table of optimized resolutions for different television frame sizes