< Previous | Contents | Next >
This determines how the solid mask restores color to the image.
— None: No color replacement. The solid mask does not affect the color.
— Source: The color from the original image.
— Hard Color: A solid color.
— Soft Color: A solid color weighted by how much background color was originally removed.
The color used with the Hard Color and Soft Color replace modes.
— Invert: Inverts the solid mask, before it is combined with the source alpha.
— Invert: Normally, solid areas of a garbage mask remove the image. When inverted, the transparent areas of the mask remove the image.
Common Controls Settings Tab
The Settings tab in the Inspector is also duplicated in other matte nodes. These common controls are described in detail at the end of this chapter in “The Common Controls” section.
Depth Map [DMp]
![]()
The Depth Map node
Depth Map Node Introduction
Depth Map creates an Alpha channel based on the perceived distance of objects in your clip. By being able to isolate a specific depth region, the opportunities to manipulate the resulting image are greatly expanded. For example, combined with a Blur node you could simulate a depth of field effect, but confined only to the distant background of your shot. You could enhance a foreground object, like a person, increasing contrast, saturation, and sharpness, similar to using a qualifier. You can use a Depth Map to fix video issues, for example fixing a color temperature problem by isolating
a far window that was shot in daylight, causing background actors to be tinted blue, while leaving the foreground subject that was shot with studio lighting unaffected.
The resulting Depth Map Alpha channel is visualized as a black and white image, with white being the area that is affected by the resulting changes and black areas remaining unchanged.
Inputs
The Depth Map node includes two inputs in the Node Editor.
— Input: The yellow input accepts a 2D image that contains the shot you wish to analyze for depth.
— Effect Mask: The optional blue input expects a mask shape created by polylines, basic primitive shapes, paint strokes, or bitmaps masks. Connecting a mask to this input limits the pixels where the difference matte occurs. An effects mask is applied to the tool after the tool is processed.
Basic Node Setup
The Depth Map is designed to take an input from an image source and create an Alpha channel based on the perceived distance from the camera. Then it will feed that Alpha to downstream nodes. In
the example below, the Depth Map is used to isolate the background of the image and apply a color grade to just the background, while leaving the foreground actors unaffected as they move through the frame.
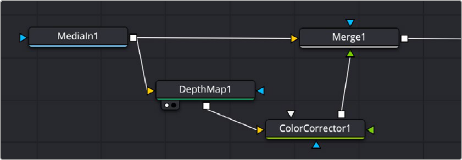
A sample Depth Map node structure for isolating subjects based on distance from the camera
![]()
Inspector
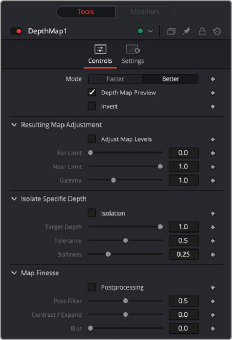
The Depth Map Controls tab
Controls Tab
The Controls tab in the Depth Map contains all the parameters for adjusting the quality of the resulting matte.
— Mode: Depth Map is a very computationally intensive effect. The quality setting allows a Faster mode to speed up the responsiveness to adjustments, while the default Better mode gives the best results and should be turned on when the adjustments are finished.
— Depth Map Preview: By default this box is checked and shows you the current Depth Map for making adjustments. When this check box is disabled, the resulting Alpha can then be used for grading on other nodes.
— Invert: Checking this box reverses the Depth Map, switching its transparent and opaque regions.
These controls let you determine how the Depth Map’s contrast is adjusted.
— Adjust Map Levels: When deselected (default), all scaling is turned off, allowing you to adjust the full range of the Depth Map. When enabled, this option clips the Depth Map’s levels to 0 and 1. This functions as a preview of what will happen to the Depth Map when used as an Alpha channel where the values are always clipped to 0 and 1. Checking this box also activates the tools below.
— Far Limit: This control adjusts the black levels of the Depth Map.
— Near Limit: This control adjusts the white levels of the Depth Map.
— Gamma: This control adjusts the intermediate depth values to be brighter or dimmer compared to the fixed black and white levels.
These controls allow you to sweep backwards and forwards in the scene by depth, allowing you to isolate a specific depth range to adjust.
![]()
— Isolation: This checkbox turns the depth isolation tools on or off.
— Target Depth: This controls the specific depth you want to isolate. 1 is fully in the foreground, while 0 is fully in the background.
— Tolerance: Sets the range to either side of the Target Depth to include in the Depth Map.
— Softness: This sets a subtle ramp-in and ramp-out of the selected range, giving it a more organic selection.
These controls modify the resulting Depth Map’s Alpha channel for use in grading.
— Post Processing: This control turns the Map Finesse tools on or off.
— Post-Filter: This control blends the map to the smooth areas and edges of the image. It is used to prevent later grading effects from visibly varying within the region.
— Contract/Expand: This control dilates or erodes the overall shape at the edges; useful for fine tuning the boundary between the affected and unaffected regions of the map.
— Blur: This control softens the boundary of the map, allowing it to blend more smoothly into the resulting image.