< Previous | Contents | Next >
Enabling Invert inverts the garbage matte before it is combined with the source alpha.
Select this option to cause the keyer to multiply the color channels of the image against the alpha channel it creates for the image. This option is usually enabled and is on by default.
Deselect this checkbox and the image can no longer be considered premultiplied for purposes of merging it with other images. Use the Subtractive option of the Merge node instead of the Additive option.
For more information on these Merge node settings, see Chapter 95, “Composite Nodes,” in the DaVinci Resolve Reference Manual, or Chapter 33 in the Fusion Reference Manual.
Common Controls Settings Tab
The Settings tab in the Inspector is also duplicated in other Matte nodes. These common controls are described in detail at the end of this chapter in “The Common Controls” section.
Magic Mask [MagM]
The Magic Mask node
![]()
Magic Mask Node Introduction
The Magic Mask palette uses the DaVinci Neural Engine to automagically create a mask to isolate an object in the frame, guided by user-applied paint strokes to identify the subject for isolation. Masks can be generated for either an entire object or just a part of it. This allows you to create complicated masks of complex shapes that may be difficult to isolate with other tools. For example, using the Magic Mask to modify only the wood grain section of this guitar.

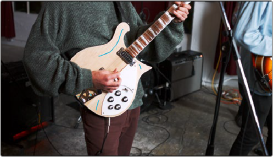
(Left) Multiple strokes isolating the wood grain of the guitar, while ignoring the musician’s arm; (Right) The finished shot, with a warmer wood grain

NOTE: The Magic Mask tool in Fusion is based on the Object mode of the Magic Mask tool in the Color page and is designed to be used for any subject that is not a person. Subjects like cars, pets, and food are all good candidates for Object mode. If you are trying to isolate a human being, using Magic Mask’s Person mode in the Color page will likely give you better results.
NOTE: The Magic Mask tool in Fusion is based on the Object mode of the Magic Mask tool in the Color page and is designed to be used for any subject that is not a person. Subjects like cars, pets, and food are all good candidates for Object mode. If you are trying to isolate a human being, using Magic Mask’s Person mode in the Color page will likely give you better results.
NOTE: The Magic Mask tool in Fusion is based on the Object mode of the Magic Mask tool in the Color page and is designed to be used for any subject that is not a person. Subjects like cars, pets, and food are all good candidates for Object mode. If you are trying to isolate a human being, using Magic Mask’s Person mode in the Color page will likely give you better results.
Drawing Strokes in the Viewer
The Magic Mask tool works by drawing lines directly into the viewer. Once a stroke is drawn, the viewer will automatically show the mask you’ve created. You can draw multiple strokes to create a mask in an additive fashion and use negative strokes to remove areas from the mask. It is best to choose a frame to draw on where the object is completely in view and unobstructed.
— To draw a positive stroke to add an object to a mask: Load the Magic Mask node in a viewer, and left-click and drag the stroke across the object you want to choose. Alternatively you can change the Stroke Mode to Add in the Inspector and left-click and drag to draw a new positive stroke. Positive strokes are colored blue.
— To draw a negative stroke to remove an object from a mask: Load the Magic Mask node in a viewer, and Option-left-click and drag the stroke across the object you want to remove.
Alternatively you can change the Stroke Mode to Subtract in the Inspector and left-click and drag to draw a new negative stroke. Negative strokes are colored red.
— To delete a stroke (or group of strokes) to remove them from the mask: Shift-drag around a stroke or group of strokes to select them (green), and press the delete key to remove them. Alternatively you can change the Stroke Mode to Select in the Inspector and left-click and drag a selection window to select one or more strokes. Clicking the delete button removes them.
![]()
Drawing positive strokes will select areas of similar contrast and color, allowing you to link complex shapes together. Generally you will need more strokes to actively define a complex object, due to the greater variety of the shapes involved. Stroke position is usually more important than stroke length.
Drawing negative strokes removes areas from the object that you don’t want to isolate. This can be something simple, like removing the wheels of a car from a mask, or more complicated like
removing specific books from a mask of a bookshelf. Stroke position is usually more important than stroke length.
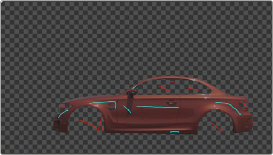

(Left) Multiple strokes isolating the car’s body, while removing the wheels and cabin; (Right) The finished shot, fed through a color corrector node to change the color of just the car’s body
Inputs
The Magic Mask node includes four inputs in the Node Editor.
— Input: The orange input accepts a 2D image that contains the luminance values you want to be keyed for transparency.
— Garbage Matte: The gray garbage matte input accepts a mask shape created by polylines, basic primitive shapes, paint strokes, or bitmaps masks. Connecting a mask to this input causes areas of the image that fall within the matte to be made transparent. The garbage matte is applied directly to the Alpha channel of the image.
— Solid Matte: The white solid matte input accepts a mask shape created by polylines, basic primitive shapes, paint strokes, or bitmaps masks. Connecting a mask to this input causes areas of the image that fall within the matte to be fully opaque.
— Effect Mask: The optional blue input expects a mask shape created by polylines, basic primitive shapes, paint strokes, or bitmaps masks. Connecting a mask to this input limits the pixels where the luminance key occurs. An effects mask is applied to the tool after the tool is processed.
Basic Node Setup
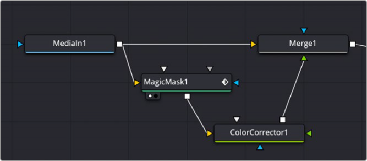
The Magic Mask takes RGB inputs from other nodes and lets you isolate specific objects in the frame to use as a mask. Tracking the mask as it changes over time is built into the tool. You can then use the output of the Magic Mask into any mask input.
![]()
A Magic Mask node, feeding a matte to a Color Corrector connected to the foreground of a Merge node
Inspector
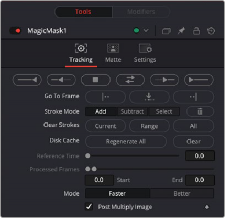
The Magic Mask Tracking tab
Tracking Tab
You can think of each stroke you’ve drawn as a persistent eyedropper that samples the image that overlaps it. The mask that results from all strokes’ collective analysis of the image is generated live over each frame of the clip. This means that if the camera or the subject moves, you need to motion track or otherwise adjust the position of each stroke to follow along with the motion, so the subject continues to be correctly identified. You also need to make sure that each stroke is able to analyze what it’s supposed to, and turn off strokes that can’t for whatever reason.
— Tracking Controls: These buttons control the tracking direction, from left to right:
— Track Reverse: Continuously tracks from the current frame all the way to the beginning of the clip.
— Track Reverse One Frame: Tracks one frame backwards and stops. Useful if you’re tracking frame-by-frame to watch the progress of a particularly complicated bit of motion.
If something goes wrong, you can back up to the last frame where the stroke was able to properly track the subject, and drag the stroke to a better location using the pointer to make it follow the subject properly. If necessary, you can go a frame at a time, dragging the stroke to a better position every time it fails to follow the feature you’re using it to isolate.
— Stop Tracking: Stops tracking, in cases where there’s a problem with the track, and you want to make a change.
— Track Forward Then Reverse: Tracks from the current frame all the way to the end of the clip, then returns to the original tracking point and tracks backwards to the beginning of the clip.
— Track Forward One Frame: Tracks one frame forward and stops. Useful if you’re tracking frame-by-frame to watch the progress of a particularly complicated bit of motion. If necessary, you can go a frame at a time, dragging the stroke to a better position every time it fails to follow the feature you’re using it to isolate.
— Track Forward: Continuously tracks from the current frame all the way to the end of the clip.
![]()
— Go To Frame: These buttons snap the playhead to the selected frame, from left to right:
— First Frame of Tracked Area: Moves the playhead to the first tracked frame of a range of tracked frames in preparation for tracking backwards if there are untracked frames at the beginning of the clip.
— Reference Frame: Moves the playhead to the frame on which you initially drew the strokes.
— Last Frame of Tracked Area: Moves the playhead to the last tracked frame of a range of tracked frames in preparation for tracking forwards if there are untracked frames at the end of the clip.
— Stroke Mode: These buttons let you change and modify the strokes drawn in the Viewer
— Add: Lets you add an additional stroke (blue) that determines what in the frame will be included in the mask.
— Subtract: Lets you add an additional stroke (red) that determines what in the frame will be excluded from the mask.
— Select: Lets you draw a selection rectangle around single or multiple strokes to select them (green).
— Delete: Deletes all selected strokes (green).
— Clear Strokes: These buttons remove all strokes from the selected range.
— Current: Removes strokes from the frame under the playhead.
— Range: Removes strokes from the selected render range.
— All: Removes all strokes from the entire clip.
— Disk Cache: These buttons allow you to control what’s stored in the disk cache.
— Regenerate All: Rebuilds the disk cache.
— Clear: Deletes the frames in the current cache.
— Reference Time: The Reference Time determines the frame where the initial strokes are drawn. It is also the time from which tracking begins. The reference frame cannot be changed once it has been set without destroying all pre-existing tracking information.
— Processed Frames: Displays the range of frames that have already been tracked. Start is the earliest frame tracked and end is the last frame tracked. These fields are not user editable.
— Mode: Two options let you choose a tradeoff between quality and performance. Faster lets you generate a lower quality mask more quickly that’s suitable for garbage matting. Better generates a higher quality mask with more detail that’s more processor-intensive.
Select this option to cause the keyer to multiply the color channels of the image against the Alpha channel it creates for the image. This option is usually enabled and is on by default.
Deselect this checkbox and the image can no longer be considered premultiplied for purposes of merging it with other images. Use the Subtractive option of the Merge node instead of the Additive option.
![]()
For more information on these Merge node settings, see Chapter 95, “Composite Nodes,” in the DaVinci Resolve Reference Manual, or Chapter 33 in the Fusion Reference Manual.
Matte Tab
The Matte tab refines the alpha of the key, combined with any solid and garbage masks connected to the node. When using the Matte tab, set the viewer to display the Alpha channel of Magic Mask’s final output.
— Filter: Selects the Filter that is used when blurring the matte.
— Box Blur: This option applies a Box Blur effect to the whole image. This method is faster than the Gaussian blur but produces a lower-quality result.
— Bartlett: Bartlett applies a more subtle, anti-aliased blur filter.
— Multi-Box: Multi-Box uses a box filter layered in multiple passes to approximate a Gaussian shape. With a moderate number of passes (e.g., four), a high-quality blur can be obtained, often faster than the Gaussian filter and without any ringing.
— Gaussian: Gaussian applies a smooth, symmetrical blur filter, using a sophisticated constant- time Gaussian approximation algorithm.
— Fast Gaussian: Gaussian applies a smooth, symmetrical blur filter, using a sophisticated constant-time Gaussian approximation algorithm. This mode is the default filter method.
— Blur: This blurs the edge of the matte using a standard, constant speed Gaussian blur. A value of zero results in a sharp, cutout-like hard edge. The higher the value, the more blur is applied to the matte.
— Erode/Dilate: This shrinks or grows the matte. Eroding the matte reveals more of the foreground input, while dilating the matte reveals more of the background input. Values above 0.0 dilate the matte and values below 0.0 erode it.
— Gamma: This raises or lowers the values of the matte in the semitransparent areas. Higher values cause the gray areas to become more opaque, and lower values cause the gray areas to become more transparent. Completely black or white regions of the matte remain unaffected.
— Threshold: Any value below the lower threshold becomes black or transparent in the matte. Any value above the upper threshold becomes white or opaque in the matte. All values within the range maintain their relative transparency values.
— Restore Fringe: This restores the edge of the matte around the keyed subject. Often when keying, the edge of the subject where you have hair is clipped out. Restore Fringe brings back that edge while keeping the matte solid.
— Invert Matte: When this checkbox is selected, the Alpha channel of the image is inverted, causing all transparent areas to be opaque and all opaque areas to be transparent.
Solid mattes are mask nodes or images connected to the solid matte input on the node. The solid matte is applied directly to the Alpha channel of the image. Generally, solid mattes are used to hold out keying in areas you want to remain opaque, such as someone with blue eyes against a blue screen.
Enabling Invert inverts the solid matte before it is combined with the source alpha.
![]()
Garbage mattes are mask nodes or images connected to the garbage matte input on the node. The garbage matte is applied directly to the Alpha channel of the image. Generally, garbage mattes are used to remove unwanted elements that cannot be keyed, such as microphones and booms. They are also used to fill in areas that contain the color being keyed but that you wish to maintain.
Garbage mattes of different modes cannot be mixed within a single tool. A Matte Control node is often used after a Keyer node to add a garbage matte with the opposite effect of the matte applied to the keyer.
Enabling Invert inverts the garbage matte before it is combined with the source alpha.
Common Controls
The Settings tab in the Inspector is also duplicated in other Matte nodes. These common controls are described in detail at the end of this chapter in “The Common Controls” section.