
< Previous | Contents | Next >
When this checkbox is enabled, the alpha channel value is maintained even when passing through other nodes downstream that may cause the shape to overlap with copies of itself. When disabled, the alpha channel value may increase when the shape overlaps itself. For instance, if a star alpha channel is set to .5, enabling the Allow Combining checkbox maintains that value even if the shape passes through a duplicate or grid node that causes the shape and alpha channel to overlap. Disabling the checkbox causes the alpha channel values to be compounded at each overlapping area.
Allow Combining Enabled (left), Allow Combining Disabled (right)
Common Controls
The Settings tab in the Inspector is common to all Shape nodes. These common controls are described in detail at the end of this chapter in “The Common Controls” section.
![]()
sTransform
The sTransform node
The sTransform node is used to add an additional set of transform controls to the existing controls that are contained in Shape nodes. These additional transforms can be used to create hierarchical animations. For instance, you can use a sStar’s built-in Angle control to spin the star around. The star can then be output to an sTransform node. The rotation control in the sTransform can be used to orbit the star around the frame.
Like almost all Shape nodes, you can only view the sStar node’s results through a sRender node.
External Inputs
The following input appears on the node’s tile in the Node Editor:
— Input1: [orange, required] This input accepts the output of another Shape node. The shape connected to this input is moved, scaled, and rotated based on the sTransform settings.
Basic Node Setup
The sTransform node takes the input from another Shape node and adds another set of transforms or hierarchical animation. The output of the sTransform can go into a sRender for viewing and further compositing.

An sStar node connecting to an sTransform node, and then viewed using an sRender node
Inspector
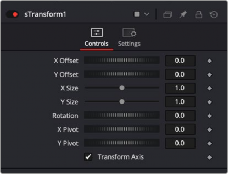
The sTransform Controls tab
![]()
Controls
The Controls tab is used to define the add a set of transform controls to the incoming shape.
These parameters are used to position the shape left, right, up, and down in the frame. The shape starts in the center of the frame, and the parameters are used to offset the position. The offset coordinates are normalized based on the width of the frame. So an X offset of 0.0 is centered and a value of 0.5 places the center of the shape directly on the right edge of the frame.
The X and Y Size determine the vertical and horizontal scaling of the incoming shape. If the values are different then the shape will be skewed from its original design.
The dial rotates the shape based on the pivot controls.
These parameters position the axis of rotation for the incoming shape. The pivot point is visible in the viewer as a red X. The X can be dragged in the viewer for positioning.