< Previous | Contents | Next >
The GlobalAlign node

NOTE: The Global Align node is available only in Fusion Studio and DaVinci Resolve Studio.
NOTE: The Global Align node is available only in Fusion Studio and DaVinci Resolve Studio.
NOTE: The Global Align node is available only in Fusion Studio and DaVinci Resolve Studio.
Global Align Node Introduction
As opposed to Stereo Align, this node does not utilize optical flow at all. It’s meant as a fast and convenient way to do simple stereo alignment for both X and Y as well as rotation.
Global Align comes in handy at the beginning of the node chain to visually correct major differences between the left and right eye before calculating Disparity.
Manual correction of large discrepancies between left and right, as well as applying an initial color matching, helps Disparity generate more accurate results.
Inputs
The two inputs on the Global Align node are used to connect the left and right images.
![]()
— Left Input: The orange input is used to connect either the left eye image or the stack image.
— Right Input: The green input is used to connect the right eye image. This input is available only when the Stack Mode menu is set to Separate.
Outputs
Unlike most nodes in Fusion, Global Align has two outputs for the left and right eye.
— Left Output: This outputs the newly aligned left eye image.
— Right Output: This outputs the newly aligned right eye image.
Basic Node Setup
Global Align is typically placed at the beginning of the node tree. Below it is inserted between the left and right eye images and the Disparity node to visually correct major differences.

A Global Align node used to manually correct left and right eye discrepancies
Inspector
![]()
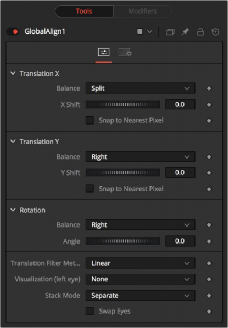
The Global Align Controls tab
Controls Tab
The Controls tab includes translation and rotation controls to align the stereo images manually.
— Balance: Determines how the global offset is applied to the stereo footage.
— None: No translation is applied.
— Left Only: The left eye is shifted, while the right eye remains unaltered.
— Right Only: The right eye is shifted, while the left eye remains unaltered.
— Split Both: Left and right eyes are shifted in opposite directions.
While adjusting the X or Y shift dial, this option ensures that the image is shifted in full pixel amounts only to maintain optimum quality. This avoids sub-pixel rendering of the image, which could result in subtle blurring.
— Balance: Determines how the global rotation is applied to the stereo footage.
— None: No rotation is applied.
— Left Only: The left eye is rotated, while the right eye remains unaltered.
— Right Only: The right eye is rotated, while the left eye remains unaltered.
— Split Both: Left and right eyes are rotated in opposite directions.
This dial adjusts the angle of the rotation. Keep in mind that the result depends on the Balance settings. If only rotating one eye by, for example, 10 degrees, a full 10-degree rotation will be applied to that eye.
When applying rotation in Split mode, one eye will receive a -5 degree and the other eye a
+5 degree rotation.
This menu chooses the filter method that delivers the best results depending on the content of your footage.
This control allows for different color encodings of the left and right eye to conveniently examine the results of the above controls without needing to add an extra Anaglyph or Combiner node.
Set this to None for final output.
Determines how the input images are stacked.
![]()
When set to Separate, the right input and output will appear, and separate left and right images must be connected.
With Stacked Mode, image stereo pairs’ left and right images can be swapped.
Common Controls
The Settings tab in the Inspector is also duplicated in other Stereo nodes. These common controls are described in detail at the end of this chapter in “The Common Controls” section.