< Previous | Contents | Next >
The Camera Tracker has two inputs:
— Background: The orange image input accepts a 2D image you want tracked.
— Occlusion Mask: The white occlusion mask input is used to mask out regions that do not need to be tracked. Regions where this mask is white will not be tracked. For example, a person moving in front of and occluding bits of the scene may be confusing to the tracker, and a quickly-created rough mask around the person can be used to tell the tracker to ignore the masked-out bits.
Basic Node Setup
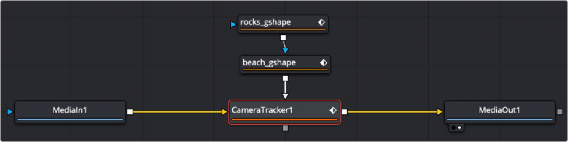
The Camera Tracker background input is used to connect the image you want tracked. Polygon masks can be connected into the occlusion mask input to identify areas the tracker should ignore.
The Camera Tracker with occlusion masks
![]()
Inspector
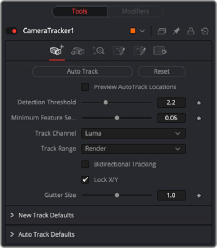
The Camera Tracker tab
Track Tab
The Track tab contains the controls you need to set up an initial analysis of the scene.
Automatically detects trackable features and tracks them through the source footage. Tracks will be automatically terminated when the track error becomes too high, and new tracks are created as
needed. The values of the Detection Threshold and Minimum Feature Separation sliders can be used to control the number and distribution of auto tracks.
Deletes all the data internal to the Camera Tracker node, including the tracking data and the solve data (camera motion path and point cloud). To delete only the solve data, use the Delete button on the Solve tab.
Turning this checkbox on will show where the auto tracks will be distributed within the shot. This is helpful for determining if the Detection Threshold and Minimum Feature Separation need to be adjusted to get an even spread of trackers.
Determines the sensitivity to detect features. Automatically generated tracks will be assigned to the shot and the Detection Threshold will force them to be either in locations of high contrast or low contrast.
Determines the spacing between the automatically generated tracking points. Decreasing this slider causes more auto tracks to be generated. Keep in mind that a large number of tracking points will also result in a lengthier solve.
Used to nominate a color channel to track: red, green, blue, or luminance. When nominating a channel, choose one that has a high level of contrast and detail.
![]()
Used to determine which frames are tracked:
— Global: The global range, which is the full duration of the Timeline.
— Render: The render duration set on the Timeline.
— Valid: The valid range is the duration of the source media.
— Custom: A user determined range. When this is selected, a separate range slider appears to set the start and end of the track range.
Enabling this will force the tracker to track backward after the initial forward tracking. When tracking backward, new tracks are not started but rather existing tracks are extended backward in time.
It is recommended to leave this option on, as long tracks help give better solved cameras and point clouds.
Trackers can become unstable when they get close to the edge of the image and either drift or jitter or completely lose their pattern. The Camera Tracker will automatically terminate any tracks that enter the gutter region. Gutter size is given as a percentage of pattern size. By default, it’s 100% of pattern size, so a 0.04 pattern means a 0.04 gutter.