< Previous | Contents | Next >
The USD Camera Node
uCamera Node Introduction
The uCamera node generates a virtual camera for viewing the USD scene in its 3D environment. It closely emulates the settings used in real cameras to make matching live-action or 3D-rendered elements as seamless as possible. Adding any cameras to a 3D composite allows you to frame the elements in a composite how you want and animate the camera during a scene to create moving camera shots.
Inputs
— None.
Basic Node Setup
![]()
The output of a uCamera node should be connected to a uMerge node to build it into a USD 3D scene with other assets and nodes.
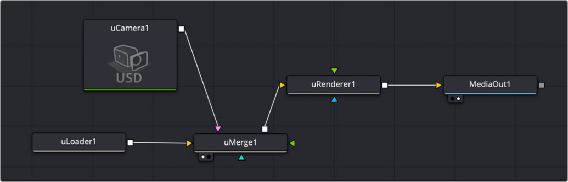
The uCamera node is connected to a uMerge node to give standard camera controls to a USD scene.
Displaying a uCamera node directly in the viewer shows only an empty scene; there is nothing for the camera to see. To view the scene through the camera, view the uMerge node where the uCamera
is connected, or any node downstream of that uMerge. Then right-click on the viewer and select uCamera > [Camera name] from the contextual menu. Right-clicking on the axis label found in the lower corner of each USD viewer also displays the Camera submenu.
The aspect of the viewer may be different from the aspect of the camera, so the camera view may not match the actual boundaries of the image rendered by the uRenderer node. Guides can be enabled to represent the portion of the view that the camera sees and assist you in framing the shot. Right-click on the viewer and select an option from the Guides > Frame Aspect submenu. The default option uses
the format enabled in the Composition > Frame Format preferences. To toggle the guides on or off, select Guides > Show Guides from the viewers’ contextual menu, or use the Command-G (macOS) or Ctrl-G (Windows) keyboard shortcut when the viewer is active.
Inspector

![]()
The uCamera Controls tab
Controls Tab
The Controls tab contains some of the most fundamental camera settings, including the camera’s clipping plains, focal length, and film back properties.
The Projection Type menu is used to select between Perspective and Orthographic cameras. Generally, real-world cameras are perspective cameras. An orthographic camera uses parallel orthographic projection, a technique where the view plane is perpendicular to the viewing direction. This produces a parallel camera output that is undistorted by perspective.
Orthographic cameras present controls only for the near and far clipping planes and a control to set the viewing scale.
The clipping planes are used to limit what geometry in a scene is rendered based on an object’s distance from the camera’s focal point. Clipping planes ensure objects that are extremely close to the camera, as well as objects that are too far away to be useful, are excluded from the final rendering.