< Previous | Contents | Next >
The Dent node
Dent Node Introduction
The Dent node creates a circular deformation of an image similar to a Fish Eye Lens effect, with the choice of six different Dent filters.
Inputs
The two inputs on the Dent node are used to connect a 2D image and an effect mask, which can be used to limit the warped area.
— Input: The orange input is used for the primary 2D image that is warped.
— Effect Mask: The blue input is for a mask shape created by polylines, basic primitive shapes, paint strokes, or bitmaps from other tools. Connecting a mask to this input limits the Dent to only those pixels within the mask. An effects mask is applied to the tool after the tool is processed.
Basic Node Setup
![]()
The Dent node is used below to make a circular pattern based on a Fast Noise and a Mosaic Blur (DaVinci Resolve Resolve FX only). The Crop node at the end is used to set the desired resolution.

The Dent node can help create lens distortion effects or a motion graphics background.
Inspector
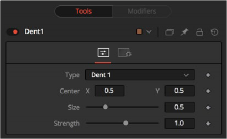
The Dent Controls tab
Controls Tab
The adjustments in the Controls tab are used to change the Dent style, position, size, and strength.
Select the type of Dent filter to use from this menu. All parameters for the Dent can be keyframed.
This creates a bulge dent.
This creates a dent, mirrors it, and inverts it.
This creates a displacement dent.
This creates a deform dent.
This creates a fracture to a center point.
This creates a smooth rounded dent.
This positions the Center of the Dent effect on the image. The default values are 0.5, 0.5, which center the effect in the image.
![]()
This changes the size of the area affected by the dent. Animate this slider to make the dent grow.
This changes the overall strength of the dent.
Common Controls
The Settings tab in the Inspector is also duplicated in other Warp nodes. These common controls are described in detail at the end of this chapter in “The Common Controls” section.