< Previous | Contents | Next >
Defines how the left and right borders of the gradient are treated.
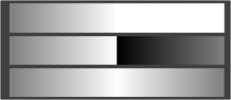
Gradients set to Once, Repeat, and Ping Pong from top to bottom, respectively, and shifting the gradient to the left.
— Once: When using the Gradient Offset control to shift the gradient, the border colors keep their values. Shifting the default gradient to the left results in a white border on the left; shifting it to the right results in a black border on the right.
— Repeat: When using the Gradient Offset control to shift the gradient, the border colors are wrapped around. Shifting the default gradient to the left results in a sharp jump from white to black; shifting it to the right results in a sharp jump from black to white.
— Ping Pong: When using the Gradient Offset control to shift the gradient, the border colors ping- pong back and forth. Shifting the default gradient to the left results in the edge fading from white back to black; shifting it to the right results in the edge fading from black back to white.
Allows you to pan through the gradient.
![]()
The Start Time and End Time thumbwheels determine the time range the gradient is mapped into. This is set in frames. The same effect can be achieved by setting the Gradient to Once and animating the offset thumbwheel.
Key Stretcher Modifier
The Keyframe Stretcher modifier is primarily used when creating title templates in Fusion for use in DaVinci Resolve’s Edit page or Cut page. The Keyframe Stretcher modifier is added to an animated parameter, so the keyframes in the animated parameter stretch when the template is trimmed in the Timeline. It can be applied by right-clicking a parameter and selecting Modify with > KeyStretcher.
For more information on the Keyframe Stretcher Modifier controls, see the Keyframe Stretcher Node in Chapter 49, “Miscellaneous Nodes” in the Fusion Reference Manual or Chapter 110 in the DaVinci Resolve Reference Manual.