< Previous | Contents | Next >
— Choose a playhead from the Color > Active Playheads submenu. That playhead will be placed at the same position as the original playhead, but it is now the one that is selected, so dragging the new playhead to a new position of the Mini-Timeline will reveal the original playhead you were using.
— Click on the top handle of any playhead to select it, making that the currently active playhead controlled by the transport controls. By default, no keyboard shortcuts are mapped to the four playheads that are available, but you can create a custom keyboard mapping that you can use to quickly switch among them.
— Using the DaVinci Advanced control panel, you can use the A, B, C, and D buttons on the jog/ shuttle panel to switch to the playhead you want to control.
— Choose Color > Active Playheads > Reset Playheads.
Show Current Clip With Handles
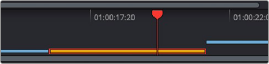
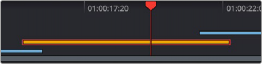
If you’re working on a project that’s part of a round-trip workflow, and you know you’ll be rendering handles for each clip, it can be useful to temporarily expose these handles for the current clip that you’re grading, so you can easily apply tracking or keyframing effects to the full frame range of each clip.
— Choose View > Show Current Clip With Handles.
(Left) The current clip in the Mini-Timeline, (Right) The same clip shown with Show Current Clip With Handles enabled
![]()
While this mode is enabled, Unmix is turned on and cannot be disabled, in order to let you view the overlapping handles of each clip clearly. The duration of handles that are exposed is defined by the Default Handles Length parameter of the Editing panel in the User Preferences. Clip Handles can be shown or hidden at any time.
Thumbnail Info
The thumbnails make it easy to find the clips you’re looking for visually, and they always show the media as it’s currently graded. The most obvious piece of information is the frame that’s used for each clip’s thumbnail. If you feel that a particular clip’s thumbnail isn’t representative of its content, you can change it.
— Move the pointer over a thumbnail, drag to the left or right to scrub through the clip, and stop when you find a frame you want to use as the new thumbnail.

Dragging a thumbnail to change the representative image
If media is replaced in the middle of a color correction timeline, or if you copy or ripple a grade to a range of clips, the thumbnails may not immediately update to accurately represent the current state of each clip. In this case, you can manually refresh the thumbnails.
— Right-click anywhere in the Thumbnail timeline and choose Update All Thumbnails.
You can also choose to display the codec, clip names, and version used by each clip in the Timeline.
— Double-click the thumbnail clip name of any clip to cycle through each clip’s codec, clip name, and version.
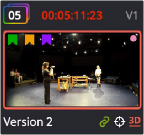
Additional information appears above and below each thumbnail, providing a way of keeping track of which clips have been graded, which clips are using different versions, which clips have been cached, and so on.
![]()
Each clip thumbnail has a number of valuable indications permitting quick comparison to other shots.
The following list explains each piece of information that can appear above, within, or below the thumbnails in the Timeline.
— Clip number: (top left) Each clip’s number appears above its thumbnail. Clips are numbered in ascending order according to the position of their first frame, from left to right, regardless of the video track in which they appear.
— Grade indicator: (top left) If a clip has been graded, a thin rainbow indicator surrounds the clip number.