< Previous | Contents | Next >
With this checkbox turned on (the default), all clips in the Timeline are sorted by reel name first, and then by source timecode. This way, clips with similar timecode from the same reel will appear next to one another in C mode.
If you turn this checkbox off, reel name is ignored, and all clips in the Timeline are sorted only by source timecode. This may result in clips from multiple sources being mixed together, but it is useful in specific situations.
For example, when grading dailies from a three camera shoot, you may want to see consecutive clips from all three cameras lined up one after the other on the Timeline, so that Cam1_Shot1, Cam2_Shot1, and Cam3_Shot1 appear first, followed by Cam1_Shot2, Cam2_Shot2, and Cam3_Shot2, and so on. In this situation, you don’t want clips from cameras 2 and 3 to be placed at the end of the Timeline simply because of their reel name.
Flags, Clip Colors, and Markers
You have the option of flagging or marking clips in the Color page just like you can in the Edit page, in order to keep track of specific media or frames that you may need to do something to later. For example, you could flag every closeup of a particular actor with a blemish that you want to spend some time fixing with a green flag.
— To add a flag to a clip: Move the playhead to a clip in the Mini-Timeline, and choose a color from the Mark > Add Flag submenu, or Right-click any clip’s thumbnail, and choose a flag color from the Flags submenu. Flags are not frame-specific, so flagging one clip will result in flags also being placed on all other clips that share the same source media in the Media Pool.
— To remove all of a clip’s flags: Move the playhead to a clip in the Mini-Timeline, and choose Mark > Clear Flags, or right-click a clip’s thumbnail and choose Flags > Clear All.
— To change the clip color: Move the playhead to a clip in the Mini-Timeline, and choose a color from the Mark > Set Clip Color submenu, or Right-click any clip’s thumbnail, and choose a color from the Clip Color submenu. Clip Colors are clip-specific.
— To remove a clip’s color: Move the playhead to a clip in the Mini-Timeline, and choose Mark > Set Clip Color > Clear Color, or right-click a clip’s thumbnail and choose Clip Color > Clear Color.
![]()
— To mark a frame of a clip: Right-click a clip’s thumbnail and choose a marker color from the Marker submenu.
— To remove a single marker: Right-click a clip’s thumbnail and choose Delete Marker from the Marker’s submenu. Alternately, you can select the marker in the Mini-Timeline, and press the Delete key.
— To remove all of a clip’s markers: Right-click that clip and choose Clear All from the Markers submenu.
Timeline Filtering
A drop-down button to the right of the Clips button at the top right of the Color page Interface Toolbar presents preset options for dynamically filtering which clips are shown in the Timeline. This allows you hide all the other clips in the Timeline except for the subset on which you want to focus.
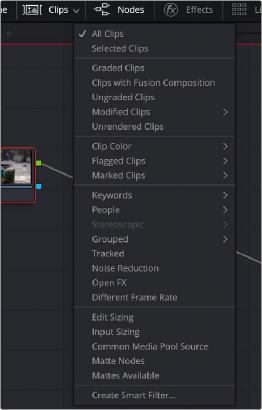
Timeline filtering options
For example, once you’ve added flags or markers to clips, it’s easy to hide every other clip in the Timeline that doesn’t fit the criteria; for example, hiding clips that don’t have a green flag. This does nothing to alter the original edit, and you can return the Timeline to its original state at any time.
— Click the Timeline Filtering drop-down button to the right of the Clips button at the top left of the DaVinci Resolve UI, and choose an available option. While the timeline is filtered, an orange line appears underneath the Clips button in the UI toolbar at the top of the page.
![]()
— Click the Timeline Filtering drop-down button, and choose All Clips.
You can use timeline filtering in conjunction with A or C mode sorting to arrange clips in whatever way is best for the task you’re trying to accomplish. Clip filtering can also be used in the Lightbox, and a currently selected clip filtering method will simultaneously isolate clips in the Timeline and Lightbox as you switch back and forth.
Preset Timeline Filters
DaVinci Resolve comes with several preset criteria by which you can filter the Timeline, which cover many common organizational workflows:
— All Clips: No clips are filtered, and every clip in the current edit is shown.
— Selected Clips: Filters all currently selected clips.
— Graded Clips: Filters all clips that have been graded.
— Clips with Fusion Composition: Clips with Fusion page effects applied to them.
— Ungraded clips: Filters all clips that have not yet been graded.
— Modified clips: Submenu, filters all clips that have been modified within a specified time.
— Unrendered clips: Filters all clips that have not yet been rendered.
— Clip Color: Filters all clips that have any color, no color, or a particular color set in the Timeline; a submenu presents each color.
— Flagged Clips: Filters all clips that have any flag, no flag, or a particular flag; a submenu presents each color.
— Marked Clips: Filters all clips that have any marker, no markers, or a particular marker; a submenu presents each color.
— Keywords: Filters all clips that have a specific keyword assigned. A submenu presents a list with each keyword that’s used in the Media Pool of the current project.
— People: Filters all clips that have a specific person assigned from the People Management Window. A submenu automatically presents a list of each person that’s been identified.
— Stereoscopic: Filters stereo 3D clips, a submenu presents options for filtering All Stereo Clips, or just Stereo clips that have been Autoaligned, those with Convergence adjustments, those with Floating Windows adjustments, or stereoscopic clips with swapped media for the left and right eyes.
— Grouped: Filters all clips belonging to a particular group, a submenu shows all available groups.
— Tracked: Filters all clips with motion tracking.
— Noise Reduction: Filters all clips using noise reduction.
— OpenFX: Filters all clips using OpenFX.
— Different Frame Rate: Filters all clips with frame rates that don’t match that of the project.
— Edit Sizing: Filters all clips that have had any Edit Sizing parameters adjusted.
— Input Sizing: Filters all clips that have had any Input Sizing parameters adjusted.
— Common Media Pool Source: Filters all clips sharing the same source in the Media Pool as the current clip.
— Matte Nodes: Filters all clips with an exposed Matte node in the Node Editor.
— Mattes Available: Filters all clips with a matte assigned to them, whether they’re used or not.
![]()
— Collaborative Update Available: (Only available in Collaborative Mode) Filters all clips that have been flagged as having been updated during a collaborative workflow.
Creating and Using Smart Filters
If none of the preset filters does what you need, you can create your own custom Smart Filter in order to sift out clips based on any of the intrinsic or user-entered metadata that’s available in the Metadata Editor, Media Pool, and Color page timeline. Smart Filters work much the same way as Smart Bins, and they’re created and edited using the same procedures. For more information on Smart Bins,
see Chapter 18, “Adding and Organizing Media with the Media Pool.” In fact, Smart Filters can be very sophisticated, allowing you to filter the contents of the Thumbnail timeline by multiple criteria, and using multiple groups of multiple criteria for situations where you need to find clips that match all of one set of criteria, but only one of a second set of criteria. In this way, you can create Smart Filters to solve a wide variety of workflow needs as you work in the Color page.
It’s important to point out, however, that as much intrinsic metadata is available to every clip in DaVinci Resolve (clip properties including frame rate, frame size, codec, file name, and so on), the more
time you take entering extra metadata in the Metadata Editor to prepare your project for work for editing and grading (for example, entering scene and take information, and keywords for things like character names, day and night, interior and exterior, framing, and so on), the more powerful Smart Filters can be in helping you to sift and sort through the contents of a program you’re grading.
Imagine being able to filter out all the closeups associated with a particular person in a program, or finding all the establishing shots corresponding to a particular location. If you or an assistant can take the time to enter metadata for the source material in a project that identifies these characteristics, you’ll be able to work even more quickly to match shots together and find the clips you need for any given situation.
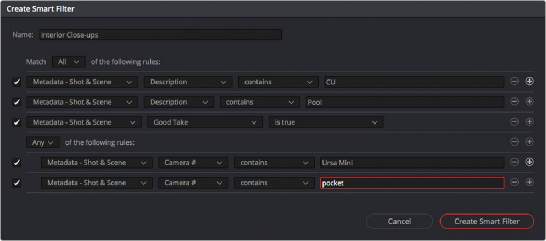
1 Click the Timeline Filtering drop-down button to the right of the Clips button at the top right of the DaVinci Resolve UI, and choose Create Smart Filter.
2 In the Create Smart Filter dialog, enter a name for the filter, and use the following controls to create one or more filter criteria (you can have as many filter criteria as you like):

The Create Smart Filter dialog
— Show in all projects checkbox: Lets you create a persistent smart filter that appears in all projects in your project library. Smart filters created this way will be found in the User Smart filters section inside every project’s Clips button in the Color page.
— Match options: For multi-criteria filtering, choosing All ensures that every single criteria you specify is met for a clip to be filtered. Any means that if only one out of several criteria is met, that clip will be filtered.
![]()
— Filter criteria enable checkbox: Lets you enable or disable any criteria without having to delete it.
— Metadata category drop-down: Lets you choose which category of metadata you want to select a criteria from. Each category of metadata that’s available in the Metadata Editor is available from this drop-down menu. Additionally, Color Timeline Properties (containing many properties unique to the Color page timeline) and Media Pool Properties (containing every column in the Media Pool) provide access to additional metadata you can use for filtering.
— Metadata type drop-down: For choosing which exact type of metadata to use, of the options available in the selected metadata category.
— Metadata criteria drop-down: Lets you choose the criteria by which to filter, depending on the metadata you’ve selected. Options include “true/false,” integer ranges, date ranges, string searches, flag and marker colors, and so on.
— Add filter criteria button: Lets you add additional criteria to create multi-criteria filters. You could use multiple criteria to, for example, find all clips from Scene 2, that also contain the keyword “Diana,” that also have the keyword “CU” in order to find all the Scene 2 close-ups of Diana. Additionally, if you Option-click this button, you can add a nested match option in order to create even more sophisticated filters, where the filter must match all of one set of criteria, and any of another set of criteria.
A complicated Smart Filter with multiple criteria and a second match option setting
As you’re editing the filter criteria, the Thumbnail timeline automatically updates to show you how the Smart Filter you’re creating is working.
3 When you’re done editing the filter criteria, click Create Smart Filter. The resulting Smart Filter appears at the bottom of the Filter drop-down menu, and is turned on by default.
— To rename a Smart Filter: Click the Timeline Filtering drop-down and choose the Smart Filter you want to rename from the Rename Smart Filter submenu, then change the name in the Smart Filter Name dialog, and click OK.
— To edit a Smart Filter: Click the Timeline Filtering drop-down and choose the Smart Filter you want to edit from the Edit Smart Filter submenu, then edit the filter criteria, and click OK.
![]()
— To delete a Smart Filter: Click the Timeline Filtering drop-down and choose the Smart Filter you want to delete from the Delete Smart Filter submenu. It’s immediately deleted.
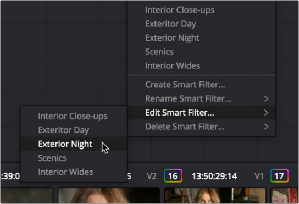
Submenus available for modifying Smart Filters